
When two Image Windows are overlapping in Print Template, the common part will become empty white space. When a user needs one big Image Window with a smaller "preview / overview" window, the only way to make it work is to place another image window on top.
We have added three new parameters to control behavior of Image Window - they can be controlled via with Template Editor, HyperDoc Options and INI entry:
Parameter in Configuration INI file
Section: [TSLRVC Library Settings]
Parameter: DefaultVportsOverlapMode:
Possible values:
0- overlapping parts of viewports will be painted and printed with white solid brush,1- overlapping parts are defined by most top defined viewport and only this viewport should be visible.
Default value is 1 and it's recommended for most scenarios.
Caution
Please see the section called “Common problems” for problem with reading this parameter in HIS.
Parameter in HyperDoc
To control clipping from HyperDoc change value of Fill/clear overlapping viewports parameter.
This can be done by clicking Tools menu and then choosing Options....
In HyperDoc Options dialog select Advanced tab. There you will find this parameters.
Possible values:
False- overlapping parts of viewports will be painted and printed with white solid brush,True- overlapping parts are defined by most top defined viewport and only this viewport should be visible.
Changes done to this parameter will take immediate effect in HyperDoc. This will also modify DefaultVportsOverlapMode parameter in INI file.
Parameter in Template Editor
Clipping mode can also be defined in Template Editor (installed along with HyperDoc installation) by choosing proper option from dropdown menu.
This will only influence specific template and will overwrite general settings (controlled by parameters described above) but only for this specific template.
If you choose option Undefined template will use parameters described above from INI file or HyperDoc.

Tip
You can set this parameter different for both orientation: Landscape and Portrait.
HIS version | Java version |
4.95 |
|
4.92 |
|
4.91 |
|
4.90 |
|


* - Java 7 update: 6 and 7 have problems with HyperDoc Online certificates and require administration actions.
HIS version | Internet Explorer | Mozzila Firefox | Chrome | Opera | Safari |
4.95 |
|
|
|
|
|
4.92 |
|
|
|
|
|
4.91 |
|
|
|
|
|
4.90 |
|
|
|
|
|


** - Chrome by default checks if plugins (like Java) are up to date. If not it blocks them. To use Java 6 with Chrome, please use those instructions.
Important
Browsers should always be kept up to date to maintain best compatibility.
Please note, that Advanced Printing is still available only in Internet Explorer.
Note
Due to some problems with Chrome, first run of HIS on this browser needs an additional refreshing of HIS initial page.
Functionality of two quick print buttons have been changed.
Print  button
and new
button
and new Print to PDF  button
- will now print according to values of their parameters defined in HDocASP.ini file.
button
- will now print according to values of their parameters defined in HDocASP.ini file.
Before this change, those buttons were using last used parameters set in Print Preview.
Please see the section called “New printing option: "Print to PDF"” and HyperDoc Online manual: User Manual/Printing for more details.
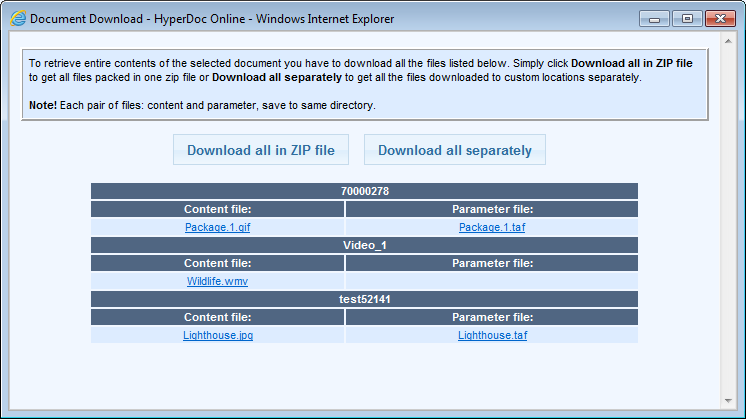
It is now possible to download multiply files/documents in HyperDoc Online just by clicking single button.
The Download File dialog was given two additional buttons:
Download all in ZIP file - your browser will download all documents you have selected packed as a ZIP file (default name is
download.zip).Download all separately - you will be asked to open/save/cancel for each documented selected to download.
Additionally, downloaded package will have report.txt file with any errors that were encountered during download if any.
Note
.NET Framework 3.0 is required on server machine.
Caution
Downloading multimedia files on BLOB Databases (non standard) may not work properly. See the section called “Common problems”.
Colors used to enhanced properties popup layout can be controlled using those parameters in [Configuration] section of INI file:
color_background = "#F1F7FF";
color_table_back = "#DDECFF";
color_table_title_back = "#506682";
color_table_title_text = "#FFFFFF";
Above values are default and presented using RGB hexadecimal format.
This new functionality enables controlling which of printing options (Advanced Print, Simple, Print to file, Print to PDF) are available in Print Preview mode.
Parameters of [Configuration] section in INI file are:
HIS_print_to_file – indicates whether Print to file mode is enabled,
HIS_print_advanced - indicates whether Advanced print mode is enabled (IE only),
HIS_print_simple – indicates whether Simple print mode is enabled.
HIS_print_to_pdf – indicates whether Printing to PDF mode is enabled.
All parameters share same integer values from range 0-1. Value 0 means disabled. If parsed value is grater than 1, it will be treated as 1 (enabled).
On non IE browsers if advanced print is enabled and simple print is disabled, simple print is automatically enabled.
If all print mode parameters are disabled, then simple print is automatically enabled.
If print mode parameter is not set from INI, dafault=1 (enabled) will be used.
Example of setting parameters:
HIS_print_to_file = 1;
HIS_print_advanced = 1;
HIS_print_simple = 1;
HIS_print_to_pdf = 0;
You can now define your own color palettes for lines and fills in Measurement mode using two new parameters of [Configuration] section in INI file.
Those are:
line_colors_palette
fill_colors_palette
A full color palette definition consists of single string (max length = 512) that is a sequence of 16 color descriptions, all separated by semicolons.
A color description consists of three substrings:
color number (valid values are between 1 and 16; both limits are included);
color RGB code as 6 hex digits (using of AUTOCAD codes is recommended);
color name as ordinary string;
All are separated by colons.
User can define only chosen colors, colors not defined by user are taken from default palette.
A parser approves any color that meets above requirements and it rejects others.
An approved color replaces the original color in a palette.
In the case there are few descriptions of the same color the last valid description is approved.
Please see below example of color pallet definition, that is also a default one:
fill_colors_palette="1,000000,White;2,FFFFFF,Black;3,FF9933,Orange;4,99CC00,Grass;5,66CCFF,Blue;6,99FFFF,Cyan;7,CC99CC,Magenta;8,FFFF99,Yellow;9,666666,DarkGray;10,999999,Gray;11,CC3333,Ruby;12,33CC00,Green;13,003399,Navy;14,99CCCC,Steel;15,993399,Violet;16,CCCC66,Khaki";
The default color palette for lines uses exactly the same string.
Handling video files watched via HyperDoc Online have been improved.
Multiply users can now stream same videos at the same time. Where it's possible video will be shown in HIS browser but when it's not possible it should work without any problem in external program.
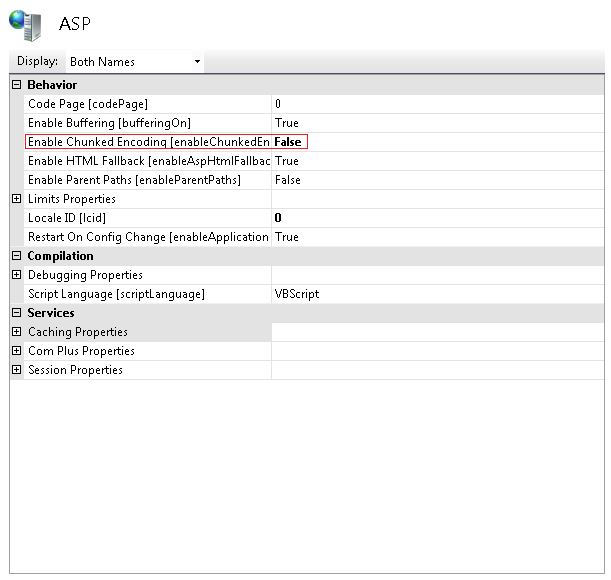
Important
It's highly advised to disable HTTP 1.1 chunked transfer encoding in IIS configuration.
To do so please go to Internet Information Services (IIS) manager and configure properties for ASP application.
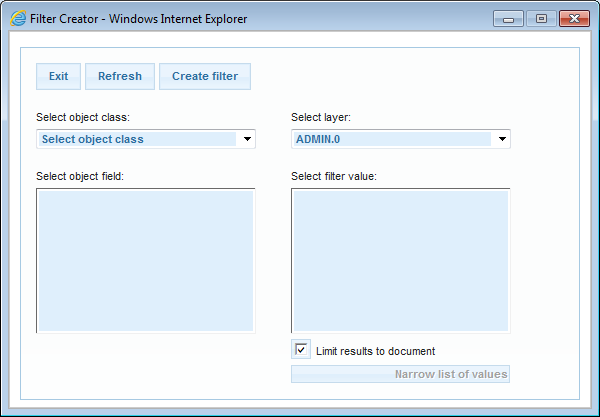
Checkbox "Limit results to document" have been added to Filter Creator's dialog.
While it's checked it will help the user with defining proper fields by narrowing choices to currently chosen document.
HyperDoc has been extended with possibility of using proprietary groups with already implemented Proprietary User List mode.
Important
If user is added as a group member his effective rights are the sum of his personal rights and rights resulting for all his group's memberships. Please note that groups cannot be set as group members in this mode.
MSSQL users and groups can be also managed using HyperDoc Admin tool and HIS sites described above. But in this case, there are some limitations.
Here are some of them: fixed database roles couldn't be deleted, public role and dbo user shouldn't be managed using above tools. User used by HyperDoc Internet Server needs to have enough rights for users and groups handling (please refer to Microsoft MSDN to check rights requirements).
To enable using of proprietary groups with proprietary users one has to use “Check and Create Extra Tables” option from HyperDoc Configuration Manager's File menu.
Then they would be available after setting Proprietary User List mode in HyperDoc Admin from User list mode menu.
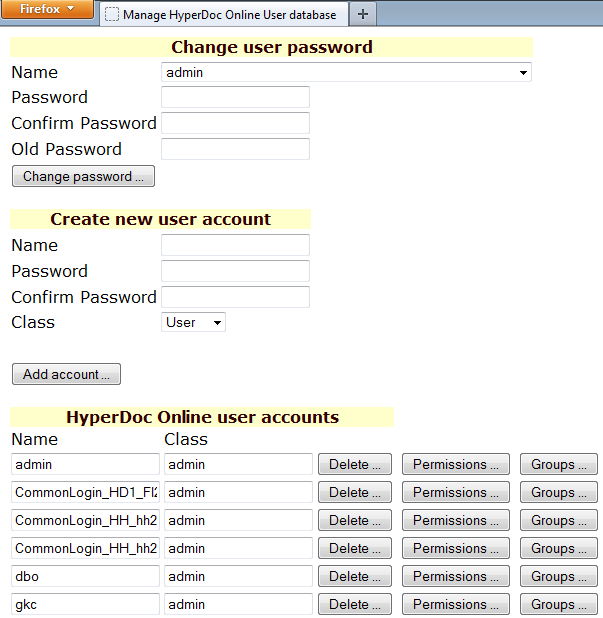
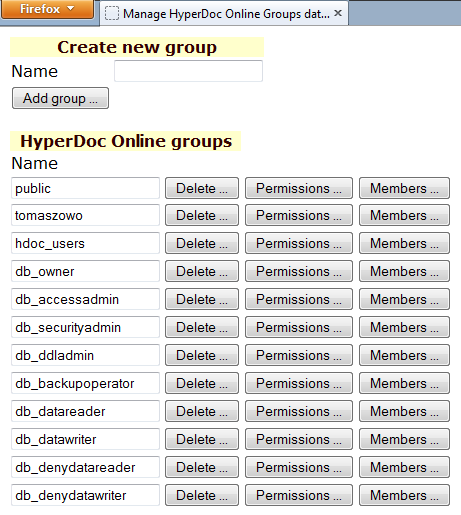
Proprietary groups and users memberships can be managed from within HyperDoc Admin tool or using hisUsers.asp and newly added hisGroups.asp web pages.
hisUsers.asp has been extended with Groups button.
List of operations possible to be done on hisUsers.asp site:
adding new users,
changing users passwords,
deleting users,
setting users memberships,
setting users permissions (HyperDoc rights).
The page looks like this:
Option Print to PDF is available from Print Preview panel or
by pressing Print to PDF button on toolbar.
It allows printing images into PDF files.
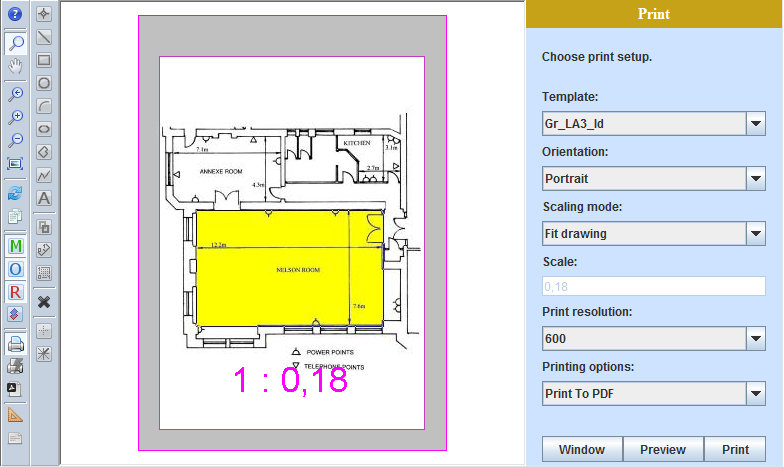
You can control PDF output normally, as with the normal printing. You can set template, orientation, scaling mode and print resolution. Check out the result by clicking on Preview button.
After you click on Print button new browser tab will open.
Depending on browser you are using you may be prompted with various dialogs but generally you will be asked whether you want to Open, Save or Save as the PDF file.
Document ID will be used as default PDF name.
Tip
When you have the PDF files saved you can Print it on your local printer. Depending on PDF viewer you can get different Printing dialog. Always set the printing to no additional scaling, actual size, no margins - this way you will get on paper same scale as set in HyperDoc.
Warning
Please note that, there are some images that can be problematic to convert to PDF file. Problem can be encountered when for example you try to Print to PDF large images (like 2MB) with template for A3 (or larger) paper size with highest resolution set in HIS (600).
In those cases, try to change your resolution to smaller one - like 400 or change template size.
Below are parameters that can be set in HDocAsp.ini:
HIS_print_to_pdf([Configuration]section) - allows controlling whetherPrint To PDFoption is available or not in Printing options dropdown. Possible values are 0 and 1. Default is 1bit_depth([Configuration]section) - is responsible for number of bits per pixel in a created bitmap. Possible values are only 8 and 24.bit_depth = 8;means that the palette bitmap is created.bit_depth = 24;– true color bitmap is created.Default value is 8.
PrintToFileWithMargins([TSLRVC Library Settings]section) - is responsible for printing with or without margin in Print-outs to files (likePDForpng).Possible values:
0- prints without margins,1- prints with margins.
Default value is
1and it's recommended for use.
Caution
Please see the section called “Common problems” for problem with reading this parameter in HIS.
Example:
HIS_print_to_pdf = 1;
bit_depth = 24;
Below parameters controls Print to PDF option only when invoked by pressing Print to PDF button (quick Print to PDF).
They are present in HDocASP.ini file in [CONFIGURATION] section.
- QuickPrintOrientationPdf
Sets printout orientation when printing to PDF via
Print To PDF(QuickPrintToPDF) button. Possible values:P– portrait orientation (default value)L- landscape orientation
- QuickPrintResolutionPdf
Sets print resolution in
dpiwhen printing to PDF viaPrint To PDF(QuickPrintToPDF) button. Possible values: 150, 300, 400 (default value), 600.- QuickPrintScalingModePdf
Sets scaling mode for printouts when printing to PDF via
Print To PDF(QuickPrintToPDF) button. Possible values:FD - fit drawing (default value)
MD - match drawing
Note
Scale View and Match View modes are restricted only for use in Print Preview.
- QuickPrintTemplatePdf
Print template name for use in printouts to PDF when printing via
Print To PDF(QuickPrintToPDF) button. Print Template should be chosen from available print templates in folder defined inTemplateDirectoryparameter.If
QuickPrintTemplatePDFis not present or it's value is empty, blank template will be used instead.
This functionality allows to define standard scales used in HyperDoc Online printing for displayed document.
To control standard scales for HyperDoc Online define standard_scales and general_scales parameters in
[Configuration] section of INI file.
Sample entry in INI can look like this:
standard_scales="0.5,1,2,10,50,200,400,550,700";
general_scales="1.0,3.3,4.7,5.8,6.5,7.6,8.3";
The values of those parameters are sequences of ordered real numbers. The sequence from standard_scales parameter will be taken for printouts so it's have higher priority.
However if a scale of printed drawing is out of standard_scales range, for example: the drawing needs at least scale=1:800 to fit in Print Window (based of sample parameters given above), general_scales will be used and drawing scale will be set to 1:830.
general_scales parameter values "1.0, 2.5, 5.0, 8.0" can give scales of 1:1, 1:2.5:, 1:5.0, 1:8.0 but also 1:100, 1:250, 1:500, 1:800 or 1:1000, 1:2500, 1:5000, 1:8000;
The default values for standard_scales is "1.0,2.0,3.0,4.0,5.0,7.5".
The default values for general_scales parameter is "1.0,3.0,5.0,7.0".
Note
The modified scale according to parameters can be observed when ScaleMode=2 (Match view)is set in Print Preview or when print template used displays a scale value.
Caution
standard_scales values can be in range of any real numbers but values of general_scales parameter can only be between 1(always including) - 9(excluding).
This functionality allows to define standard scales used in HyperDoc Online Publishing Agent (HOPA) printing for displayed document.
To control standard scales for HOPA define standard_scales_hopa and general_scales_hopa parameters in
[Configuration] section of INI file.
Sample entry in INI looks like this:
standard_scales_hopa="0.5,1,2,10,50,200,400,550,700";
general_scales_hopa="1.0,3.3,4.7,5.8,6.5,7.6,8.3";
The standard_scales_hopa parameter can be also defined in HOPA URL by adding StdScales / STDS parameter to HOPA call.
The general_scales_hopa parameter can be also defined in HOPA URL by adding GenScales / GENS parameter to HOPA call.
The values of those parameters are sequences of ordered real numbers.
The sequence from standard_scales_hopa parameter will be taken for printouts so it's have higher priority - and also parameter given in HOPA Call will have priority over the one given in INI file.
However if a scale of printed drawing is out of standard_scales_hopa range, for example: the drawing needs at least scale=1:800 to fit in Print Window (based of sample parameters given above), general_scales_hopa will be used and drawing scale will be set to 1:830.
Tip
The particular scale you want to apply to the drawing can be forced by adding STDS parameter with a single number you want. For example:
...HOPAGetPrint4DocEx.asp?DocID=1904640&STDS=300
This way the drawing will have exact scale you want.
This solution is recommended only when you know the drawing you are applying this parameter to and you set it in URL.
It's not advised to use single scale value in INI file as it will apply to all drawings.
general_scales_hopa parameter values "1.0, 2.5, 5.0, 8.0" can give scales of 1:1, 1:2.5:, 1:5.0, 1:8.0 but also 1:100, 1:250, 1:500, 1:800 or 1:1000, 1:2500, 1:5000, 1:8000;
The default values for standard_scales_hopa is "1.0,2.0,3.0,4.0,5.0,7.5".
The default values for general_scales_hopa parameter is "1.0,3.0,5.0,7.0".
Note
The modified scale according to parameters can be observed when ScaleMode=2 (Match view) is set in Print Preview or when print template used displays a scale value.
Caution
standard_scales values can be in range of any real numbers but values of general_scales parameter can only be between 1(always including) - 9(excluding).
This parameter can be used in following HOPA calls:
GetPrint4Object,
GetPrint4Doc,
Get....Ex HOPA functions after activating Print Preview mode.
As requested, we have changed CallHOPAGetAny4All call.
Now when, document ID is empty (when we have AutoIncrement ID in database), user wont see document ID tooltip when hovering over miniature image.
Changes were done to SearchField and SearchValue parameters that allows use with multiple windows.
Please see description for HOPAGetView4Object.asp in HOPA Manual API for more information on those parameters.
Warning
Please note that for this version of HyperDoc applet doesn't support templates with multiview.
So using multiply SF and SV parameters with HOPA Excalls and multi-view templates will not give proper results.
By using this page you are able to retrieve list of all spots linked to given object (or objects – you can define collection by using parameters SearchField and SearchValue).
This is needed for creating multi-view HOPA calls as regular HOPA call can show single image at a time, so we could only obtain first, default view.
As a result of this function, an XML/JSON list is returned. You can either use this list and create a custom viewing solution, or use simple gallery Tesselet that will handle all of that automatically, with just a simple configuration
There are two typical situations, where we need to discover multiple links:
Single object that has multiple links to spots. In relation to real objects, this can be an apartment that consists of multiple spaces or similar situation.
Multiple objects that match some common criteria, where each of these has a link(s) to spot. In relation to real objects, that could be a collection of spaces that all have the same contract number.
In both cases one can use either single object identification methods (Object class, Object ID) or search for objects by specific criteria to find one or more matching objects. This function will return all linked spots for each found object.
Param name | Abbr. | Req. | Def. Value | Description |
ObjClass | OC | + | Object class | |
ID | ID | + | Object key | |
ObjID | OID | Object’s marshaled id | ||
Search Field | SF | Name of field in given object class or document type | ||
Search Value | SV | Value for Search Field | ||
AncClass | AC | Name of ancestor's class to be used instead of specified object | ||
ObjSet | OS | Object set ID | ||
ObjSetName | OSN | Object set name | ||
DocForObj | DFO | 2 | Use default document linked to object | |
DocForSpot | DFS | 3 | Use document containing spot for given object | |
HierName | HN | (first hierarchy) | Name of hierarchy | |
ClientFunc | CF | name of JavaScript function to be called when data is retrieved. | ||
TPID | parameter with encrypted user, password and UTC time | |||
Custom_xyz | C_xyz | Custom parameter with xyz name |
Returned XML format:
<Objects>
  <Object ObjectID="ObjectID">
    <Document DocID="DocID">
      <Spot SpotID="SpotID" Layer="Layer_name" Available="0/1"/>
    </Document>
  </Object>
</Objects>
Attribute Available tells us, if the spot is on visible layer / can be called with HOPA calls (value 1) or on invisible layer / unavailable for HOPA calls layer (value 0).
This Tesselet component is a reference implementation that uses data returned by HOPAGetSpots4ObjectXml.asp function.
It can be customized by providing configuration parameters and used on external website without any coding. Main goal of this viewer is to easily show all spots / views for given object(s).
Additionally, this Tesselet provides two printing buttons:
Print Current Document– that will result in single-page printoutPrint All Documents– that will result in multi-page printout
Requirements:
A website on a server
Working HIS/HOPA 4.95 installation
Installation
Add tessel javascript to your web page:
<meta http-equiv="X-UA-Compatible" content="IE9" />
<script src="http://<server_name>/HIS_name/TesselDisplaySpotsWidget/tessel_display_spots_widget.js" type="text/javascript"></script>
<link type="text/css" rel="stylesheet" href="http://<server_name>/HIS_name/TesselDisplaySpotsWidget/css/tessel_display_spots_widget.css"/>
Your Add-in by default installs to Tessel Software Line\HyperDoc\ASPPages\TesselDisplaySpotsWidget folder.
Customize widget with your particular HOPA call. To do so, add to your html
headarea following script:<script type="text/javascript"> var customer_configuration = { hostName:"http://<server_name>/HIS_name", hopaFunctionName: "HOPAgetview4object.asp", hopaGetSpotsFunctionName: "HOPAGetSpots4ObjectXML.asp", hopaParams: "ObjClass=Rooms&SF=Room_Status&SV=Free", hopaPrintParams: "PT=Print_Template_A4&O=L&MM1=1&SMP1=100&UV1=1&SM1=2&DFS2=1&SMP2=120&UV2=0&SM2=1&DFO3=1", printDocumentText: "Print Document", printAllDocumentsText: "Print All Documents" image_width:"700", image_height: "500" }; tessel_display_spots_widget.TSL_addLoadEvent(); </script>Warning
Do not modify last line:
tessel_display_spots_widget.TSL_addLoadEvent();Add div containing widget to your web page in a following way (do not change it's
id):<div id="tessel_display_spots_widget"></div>
Parameters detailed description
Following parameters need to be set in order to receive positive results in Tesslet utilization:
hostName: server that contains JavaScript widget and also contains css stylesheet and working HOPA installation.hopaFunctionName: HOPA function that returns desired view of spots ex."HOPAGetView4Object.asp".hopaGetSpotsFunctionName: HOPA function that returns collection of spots, ex. "HOPAGetSpots4ObjectXML.asp".hopaParams: string containing HOPA parameters for particular HOPA function call.hopaPrintParams: string containing HOPA parameters to be added to HOPA call after clicking on one of Tesslet buttons.Important
Do not add
SIandMUMparameters here, they will be added automatically for multipage print-outs.image_width: the width of html main Tesslet image.image_height: the height of html main Tesslet image.printDocumentText: localization text forprint current documentbutton. If there is no text the button will not display.printAllDocumentsText:localization text forprint all documentsbutton. If there is no text the button will not display.
Customer server configuration
To change layout of widget, you may redefine stylesheet: tessel_display_spots_widget.css.
Important
Please remember:
not to include clientFunc parameter in hopaParams field,
that in call HopaGetPrint4Object.asp, parameter
SpotIDs=allwill be addded for multipage print-outs,that in call HopaGetPrint4Object.asp, parameter
MultiMatch=1will be addded for multipage print-outs,
PrintAllDocuments option detailed description
This function depends on whether GetSpots4objectXML was started with set 'Search Field' and 'Search Value' as input parameters.
If so, 'Print All Spots' link will be prepared with utilization of 'MultiMatch' parameter with value 1 (MUM=1).
Otherwise, link will be prepared by utilization of 'SpotIDs' parameter with value 'all' (SI=all).
Example of utilizing getSpots4objectXml function
HOPAgetspots4objectxml.asp&ObjClass1=Rooms&SF1=Room_Status&SV1=Rented&ObjClass2=Rooms&SF2=Room_Status&SV2=Free" &ObjClass2=Rooms&SF2=Room_Status&SV2=Free ObjClass=Floors&ID=Floor002
Sample HOPA Get Spots calls:
http://<server_name>/<HIS_name>/HOPAgetspots4objectxml.asp?ObjClass=Floors&ID=Floor002&ClientFunc=processData
http://<server_name>/<HIS_name>/HOPAgetspots4objectxml.asp?ObjClass1=Rooms&SF1=Room_Status&SV1=Rented&ObjClass2=Rooms&SF2=Room_Status&SV2=Free&ClientFunc=processData
Note
Sample webpage with sample configuration can be found with HIS installation in Tessel Software Line\HyperDoc\ASPPages\TesselDisplaySpotsWidget folder.
Following applet functions are disposed as public API.
Please note that due to utilizing object oriented programming pattern in javascript, each function call should be prefixed with widget's object name 'tessel_display_spots_widget':
processData(data) - function that calls server for spot parameters
reload() - function that reloads tesslet data function with new values, input in 'customer_configuration' JavaScript object.
TSL_addLoadEvent() - function that adds widget initialization function as an on load event for the page tesslet is appended to. Used for appending 'initialize' function to 'onload' events.
Example of utilizing reload() function under a hyperlink
<a href="#" onclick=' return tessel_display_spots_widget.reload();'>Reload tesslet</a>
Support for multi object printing has been added to HyperDoc's HOPA calls. New parameters have been added to enable this functionality:
MultiMode (MUM) - this parameter indicates whether SF – SV query combination returns multiple results (value 1) or one result (value 0)
SpotIDs (SI) - parameter applied for
GetPrint4ObjectorGetPrint4Doc,DocID (DID) - parameter applied for
GetPrint4ObjectorGetPrint4Doc.
SpotIDs - for specific object, identified by Object Class and Object ID one can use SpotIDs parameter that can be used in two modes:
Provide specific SpotID that should be used.
In case where object has multiple spots connected, that allows user to select specific spot/view to be used for printout, please refer to
HOPAGetSpots4ObjectXml.aspon information how to obtain a list of spots for a given object.Use SpotIDs=all mode to obtain multi-page printout that will contain all spots/views
Tip
If you use SpotIDs=all parameter and you do not get satisfying result - try using it with DFS parameter.
In multiple view templates this parameters can supply multiple results only if applied for the main (first) image view.
Caution
Please note that there can be object with several spots linked to them but some of the spots can lie on invisible layers. Those spots cannot be seen/called for.
If you use parameter SI=all they will not be shown but the call will work properly showing all available spots.
But if you use parameter SI=ID of spot on invisible layer the call will return error.
Using Search Field / Search Value parameters gives those possibilities:
When used with default value of
MultiMatchparameter (disabled) printout will only contain single, first found object with its default view or document depending on parameters,When used with
MultiMatchenabled (value1), a set of generic parameters must be used to determine collection of objects. Number of found objects and spots will determine number of pages in the printout (one page for one spot). Additional parameters with appropriate numeric suffixes can be used for each Image Window.
Caution
Please remember that parameters: MUM (with: SF, SV, OC) and SI should be passed in a generic form.
Constant image in multiple images printing
In multiple view templates current solution supports applying parameters for other template windows as it was before. If one does not applies images to other windows, they will not be shown. If constant image is not applied, the same image will appear in all image windows.
If one applies some parameters like DFO, MM to one image window (like window 2 or 3), this settings result will appear in each print page in this particular window.
In this case one applies only multiple printing in main parameters set (t.m. Parameters without numbers), this parameter set will be valid for all image windows on current page.
Warning
Please note that for this version of HyperDoc applet (HOPA Ex calls) doesn't support templates with multiview.
Examples:
1. http://his-server/HOPAGetPrint4Object.asp?
2. PrintTemplate=PRINT3-A4
3. &OC=Rooms
4. &ID=Room6615
5. &HN=HDocHierarchyDefinition
6. &SpotIDs=all
7. &UV2=0
In this example, lines 3,4,5 will be used to determine master object. Line 6 will enable finding all spots for that object. Each found object will be used to create separate print page. Additional parameters can be provided like in line 7, for each Image Window separately
1. http://his-server/HOPAGetPrint4Object.asp?
2. PrintTemplate=PRINT3-A4
3. &OC=Rooms
4. &SF=Room_Status
5. &SV=Free
6. &HN=HDocHierarchyDefinition
7. &MUM=1
8. &UV2=0
HDoc 4.95 have gone through performance code review. Tasks like: browsing through hierarchy, loading document list, changing tabs on document lists will now execute much faster.
Problems with changing focus to objects with hundreds (or thousands) documents attached should now be fixed.
We have slightly changed logic of selecting documents while browsing through hierarchy in Infoscope  mode:
mode:
selected document tab is changed to the one with default document when changing navigation objects,
document containing spot has precedence over default document (only if object have spots connected to it).
In non InfoScope modes the logic was generally not changed:
selected document tab is hold always when changing navigation objects,
if Hide Empty Document Tabs mode is enabled, tab will be switched to All only if no documents are found for selected type,
document tab will be changed to specific tab when using Search and Show Document function,
default document will be shown only if user is in All tab or if the document is present in selected type list. This will not trigger changing tab selected by user.
Printing to PDF is now possible in HyperDoc Client.
If you want to save your current displayed document to a PDF file press Print Preview button and then Print to File button.
You will see Save as dialog
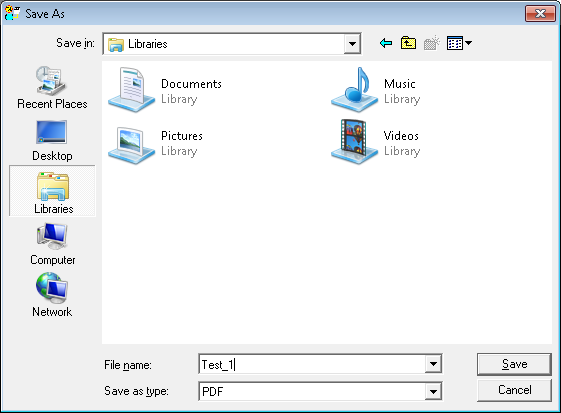
Select PDF from Save as type: drop-down menu and enter file name and press Save.
Compression Mode for Output Drawing dialog will pop out.
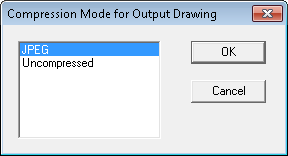
We suggest saving to compressed (JPEG option) file as the output file is much smaller than uncompressed one.
We have added useful tool to the online documentation that can convert national characters to character entities that can be used in HOPA call.
You can find it in: HyperDoc Online Publishing Agent API (HOPA)\API\HOPA Functions and search on page for "Encoder". The tool is added to description of Present function.
Note
Not available in PDF
All the colors used by TSL programs have been added as a table to the manual with they respective codes in RGB and BGR format.
You can find it in Appendices for all products, so for example: HyperDoc\Administration\Appendices\TSL Color Codes.
Note
Not available in PDF
HyperDoc Option dialog has been described, explaining all options available there and linking those options to parameters in Database or Configuration file.
This section have been put in TSL Documentation under this path: HyperDoc\Administration\Configuration\HyperDoc Option.
List of selected bugs fixed for version 4.95:
[HDOC-219] - TAF file suggested for downloading with foreign documents stored in database
[HDOC-238] - Scrollbars in hierarchy and in document list panes are not working properly
[HDOC-324] - Two print templates replicated to micasa.hyperhouse.se/Staging but can not be seen
[HDOC-407] - Can not create document report with ID connection path.
[HDOC-443] - Why is this spot cut of in one corner with HOPA parameter MM=2
[HDOC-444] - PGR 5 and HIS 4.92 and non IE browsers.
[HDOC-446] - Performance problem HD-HIS 4.92, documentlist.
[HDOC-463] - Set Default View command needs HyperDoc restart to be applied
[HDOC-468] - PDF print out from HyperDoc and suggested filename for the PDF file.
[HDOC-476] - HIS: Hisusers.asp - cannot cancel "Delete user" operation
[HDOC-484] - ImageViews in print template
[HDOC-496] - DCM Bug fixes (problem with cancel, doc list sync)
[HDOC-502] - Filters in replication
