
This functionality shows tabs that correspond to types of existed documents only. Next to the type name the number of documents of this type is displayed.
To control HyperDoc behavior add HideEmptyDocTabs variable to General section of HDoc.ini file, eg:
HideEmptyDocTabs=1, “1” (one) value means the option is set, 0 (zero) otherwise.
In HIS this feature is controlled by hide_empty_doc_tabs variable in Configuration section of HDocAsp.ini file.
True value means that the feature is on, e.g.: hide_empty_doc_tabs=true
     [General]
     HideEmptyDocTabs=1
     [Configuration]
     hide_empty_doc_tabs=true;
Enter Tools menu and choose Options menu option. Click at Advanced tab.
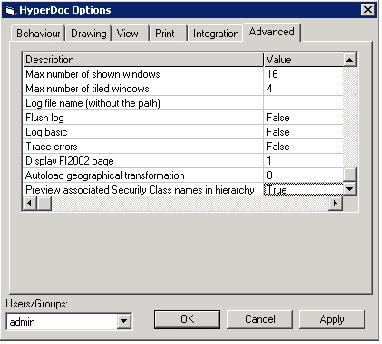
Scroll down to Preview associated Security Class names in hierarchy option and type True or 1 (one) in Value column in order to enable Security Class preview in hierarchy window. To turn the preview of, type False or 0 (zero). Click Apply or OK button. Hierarchy window should look as presented in figure:
Access to stamps.tvd are now handled by new user rights in HyperDoc.
It now works together. Details are in documention about Tessel Passport.
To check a new functionality open HIS session. Chose node with not empty overlay drawing. Enter a measurement drawing by clicking Measurement drawing active button. Then select (by mouse clicks) one or more spots (while holding CTRL key).
For the selected spots you can change line color (by choosing a new color from Line color control), fill color (by choosing a new color from Fill color control) and line width (by entering a new width in Line width editing box). Watch hints displaying in the box just below the Measurement panel title.
To accept changes you have to click in Enter button (use Reject button to withdraw changes). Using Enter button causes copying the selecting spots to measurement drawing and painting them with tools that are established in edition process. Because each spot's copy is located exactly in it's original spot place you can see both them painting one on the other with a color that is a mixture of original colors. Spots copy has big grips that you can use to drag the whole spot or/and to change its shape. The original spot is not selected any more (it is panted without grips). Generally a spot's copy behaves exactly in the same way as a new item defined in measurement drawing by using item specific buttons.
Notice that each time you click Enter button with a selection that contains overlay spots (or/and redlining spots if it is allowed by configuration) the new copies of these spots are created. If selection contains spots from measurement, drawing are not copied. In all cases spots change their's tools according to edition actions. Hint warns you when usage of Enter button is connected with copying even a single spot.
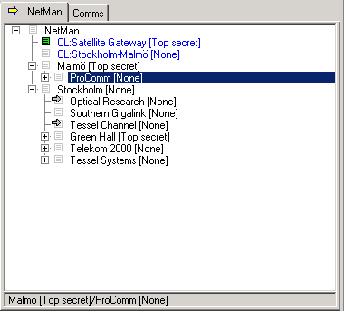
Typical HIS configuration with database that contains spots in the overlay drawing (presence of not empty redlining drawings doesn't change the functionality described above).
New function has been added to pop-up menu for spots. It is named Mark Linked. After selecting spots on drawing, if they have link to objects, user could use it to mark objects linked to selected spots in hierarchy tree. If spot has Default link to object then this object is marked, if there is no Default link then first object from links list is marked (to see Linked Objects list please use Show Links... option from from spot's pop-up menu).
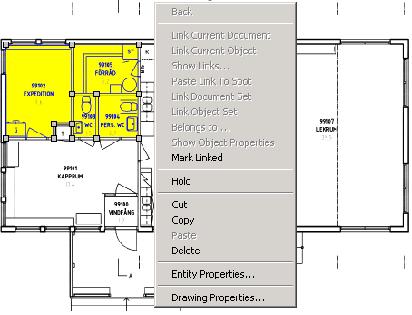
By default when marking objects, hierarchy is extended to show all of them.
It is controlled by parameter stored in HyperDoc database called ExpandHierarchyAfterMarkingObjects (value 1 indicates that hierarchy should be extended to show all marked objects, 0 it doesn't).
Option could be also set in Advanced tab of HyperDoc options dialog – just set “Expand hierarchy tree after marking multiple objects” to True or False.
New parameter in HdocParams: ExpandHierarchyAfterMarkingObjects. Possible values are 1 or 0.
To check a new functionality open HyperDoc with any database. Open HyperDoc Options dialog (Tools/Options …). Choose “Drawing” tab on it. On the tab click “Symbol library properties”. A Properties dialog that is open has caption wit qualified path to TVD file that is used as a symbol library. Chose Tool Sets tab on the dialog. Below List of tool sets there is a check -box called Sort alphabetically. Use it to sort the list.
Check Change and Add new buttons when the check-box is checked and unchecked. Check if Insert new button is disabled when check-box is checked.
All new functionality concerns a Symbol library. The most often name that is used for it is STAMPS.tvd. Its current name and place (disk/database) can be set by Symbol library options that is availabled on Drawing tab of HyperDoc Options dialog.
OCM has been extended to show properties of object linked to spot selected on drawing.
If OCM's window is visible then after clicking on spot it will show properties of object linked to that spot (if multiple objects are linked then firstly default one will be show, if there is no default object then one of them will be shown). Besides showing properties given object is also selected in hierarchy.
If selected spot is not linked with any objects then OCM window is blank.
To edit multiple objects (connected to group of selected spots) one could use “Mark linked” option from spot's pop-up menu to mark objects in hierarchy and then if they share same object's class then Marked edited mode could be chosen in OCM.
TDXMSaveRun.wsf script was added for better error handling. Additionally we've changed TDXMSplit. Now it prepare batch file, which using following configuration:
TDXMSaveRun.wsf /exeFile:"[PATH_TO_TDXMPP]\tdxmpp.exe"
/configFile:"[PATH_TO_TDXMXMLConf]\TDXMXMLConf.xml"
/inputFile:"[PATH_TO_INPUT_FILE]"
/resultFile: "[PATH_TO_OUTPUT_RESULT_FILE]"
/tdxmLogFile:"[PATH_TO_OUTPUT_TDXM_LOG]"
/logFile:[PATH_TO_LOG_FILE]
TDXMSaveRun.wsf /exeFile:"[PATH_TO_TDXMPP]\tdxmpp.exe"
/configFile:"[PATH_TO_TDXMXMLConf]\TDXMXMLConf.xml"
/inputFile:"[PATH_TO_INPUT_FILE]"
/outputDir: "[PATH_TO_OUTPUT_DIRECTORY]"
/logFile: [PATH_TO_LOG_FILE]
First one is requied by TDXMSplit.
Defines whether the root node should automatically expand or not after HyperDoc Online starts.
To activate this feature, set new root_auto_expand = true; option in Configuration section of HdocASP.ini.
Default value is set to false.
After loading initial HyperDoc data, first level of objects under root will be automaticaly loaded and exposed, giving immediate insight into data hierarchy tree.
This feature when activated works also when switching between hierarchies.
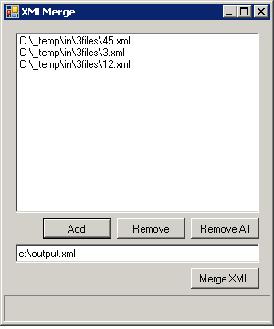
Program can be run in two modes, graphical and console. To open in graphical mode just type XMLMerge.exe or double-click executable file. Application window will be shown.
To run application in console mode you have to pass two parameters:
| input_files_dir – a directory where all input files are stored (only files with *.xml extension are taken); |
| output_file – file where merging result will be stored. |
Sample call:
XMLMerge.exe C:\inputFiles C:\output\mergeResult.xml
If message “Operation done. Result file: C:\output\mergeResult.xml” is displayed, merging operation is done. If not, proper message will be displayed.
In graphical mode click Add button, navigate and add any xml files to merge. Added files will be displayed in window. It's possible to select one or more (use Shift and/or Ctrl while choosing) and remove them using Remove button. Remove All button removes all files from list.”c:\output.xml” line specifies file where result will be stored. To merge files added to the list click Merge XML button. Progress of merging operation is showed on progress bar under Merge XML button.
Application uses .NET 3.5.
