
We have created new documentation system about Tessel products add added it to HyperDoc's installation package.
The documentation have a form of webhelp - it's a
html page so you can normally display it using web browser. You can open it from Windows
Menu Start, it is located in Tessel Software Line\HyperDoc\Help folder.
As for now - the documentation does not cover all of our products/topics but it is being constantly updated and we hope to complete it for next version of HyperDoc.
Documentation has a Print button that prints current topic.
For the best performance please make sure in printing option after clicking on a button that your page orientation is set to Portrait.
Since this version of HyperDoc, that is 4.91, HyperDoc Online will be fully supported by other browsers than Internet Explorer.
Those are: Mozilla Firefox, Chrome, Opera and Safari.
Please note, that Advanced Printing is still available only in Internet Explorer.
Note
Due to some problems with Chrome, first run of HIS on this browser needs an additional refreshing of HIS initial page.
HyperDoc can store so called native documents (based on mainly scanned or rasterized drawings) as well as so called foreign documents of various types (Office documents, PDF files, DWG/DWF drawings, SVG pictures, plain text files, any URL pointed resources, and other of any type).
Foreign documents cannot be rendered by HyperDoc natively but are passed along to associated program to display it.
Note
Please note that due to various possibilities of different browsers with different configuration regarding user security and installed plugins, actual user experience in handling foreign documents may vary.
Below you can see screen from HyperDoc Online - take a look at Document View Pane. As you can see it differs from the one you see while opening native documents.
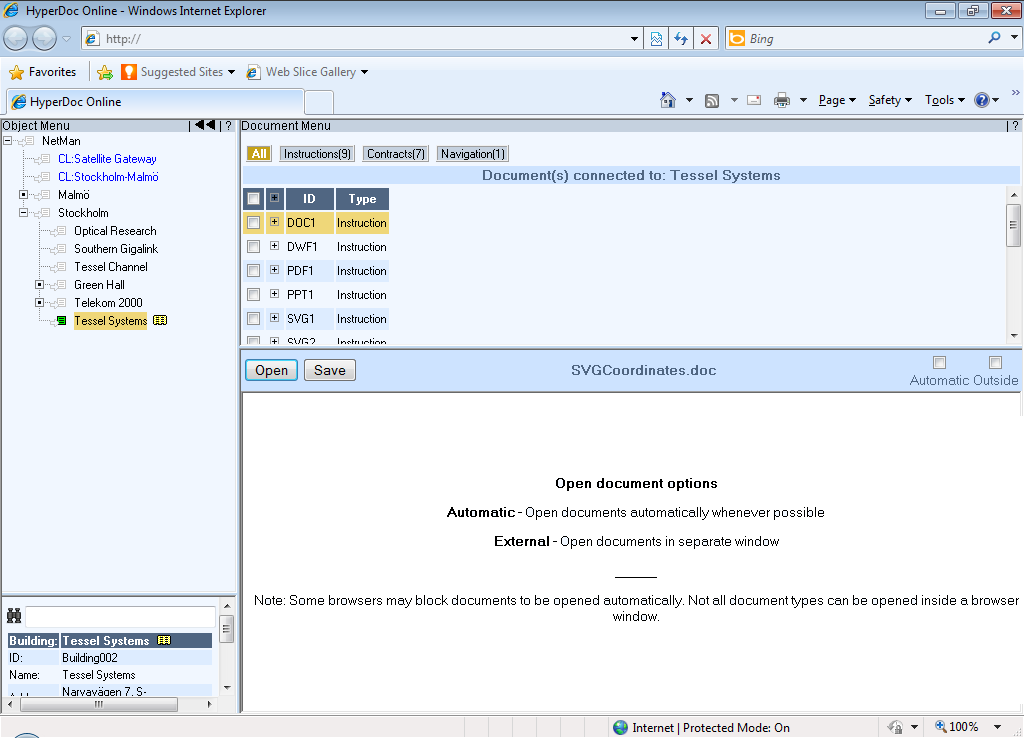
On top of the Document View Pane there is a Title bar. It contains: button Open and Save, original file name attached to the document and two checkboxes Automatic and External
Button Open tries to open (load) foreign document directly in viewer frame (or in external window depending on your configuration - read below). Depending on browser configuration, document content can be opened directly or after additional confirmation in separate dialog displayed by browser. If browser cannot open foreign document natively or using installed plugins, separate dialog is displayed by browser that allows to open document using associated application. This dialog allows saving documents as well.
Button Save allows to save (download) document content directly on your disc. Depending on browser configuration, downloading can start immediately or after additional confirmation in separate dialog displayed by browser where you decide to open document in associated application, instead of saving. If system doesn't have appropriate application associated with given document type, separate dialog will be displayed by browser that helps to find suitable one.
Check-box Automatic forces Open action to be started immediately after choosing document from document list. This is default setting; to avoid waiting for large documents to download, user can switch Automatic check-box off and open documents on demand using Open button manually.
Note
In some situations, depending on browser type and configuration, automatic opening cannot be forced due to browser security restrictions. In such case, user has to activate Open action manually.
Check-box External forces document content to be directed to external browser window instead of internal viewer frame. It is possible to open several documents displayed in external windows concurrently. Changed setting of External check-box will be used in next Open action. To switch target of currently opened document, click External check-box and then Open button to re-open it again.
The default combination of this check-boxes can be controlled by parameters defined in [Configuration]section in INI file:
foreign_document_autoopen
Select between
trueorfalseto set if foreign documents should open automatically.foreign_document_external
Select between
trueorfalseto set if foreign documents should open in external window.
It should be noted, that MS Office documents could be opened directly in Internet Explorer 7.0 browser using MS Office plugin. However, behavior of such arrangement is found not to be stable, especially when trying to open the same document in several external windows concurrently. To avoid potential problems that can lead to browser hangs, MS Office documents are passed directly to external application when opened. It should be noted that the same behavior is presented by higher Internet Explorer versions and other popular browsers as well (FF, Chrome, Opera).
This function allows user to easily copy preconfigured HOPA link to selected spot. It is triggered by right clicking on any spot. Proper configuration must be provided in HyperDoc INI file.
It's now enabled in Internet Explorer 6 and later, Mozilla Firefox, Opera, Chrome and Safari.
Select an object from hierarchy to show it in HyperDoc Online view frame.
If image contains spots, move mouse over spot. It will become highlighted.
Right click on hovered/highlighted spot. Action will trigger popup menu.
Click Copy link to spot menu option.

If operation is successful no popup message will be displayed but the link will be copied to clipboard.
If it fails the popup will be shown:
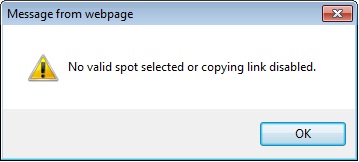
This functionality is set in [Configuration] section of HdocASP.ini configuration file.
New parameters should be added:
LinkToSpot_enabled
LinkToSpot_hopa_page_name
LinkToSpot_zoomspot
LinkToSpot_additional_parameters (optional)
Sample entry in HdocASP.ini:
LinkToSpot_enabled = "true";
LinkToSpot_hopa_page_name = "HOPAGetView4Object.asp";
LinkToSpot_zoomspot = "130";
LinkToSpot_additional_parameters = "&Width=800&Height=600";
LinkToSpot_enabled sets if the option is enabled or not. Default value is false.
LinkToSpot_hopa_page_name defines which HOPA .asp page is loaded for selected spot.
LinkToSpot_zoomspot parameter takes unsigned integer as a value. This parameter is applicable for both HOPAGetView4ObjectEx and HOPAGetView4Object functions.
If the parameter is set to 0, HOPA function will use AncClass parameter to display spot on an object that is higher in hierarchy and the image will not be centered on the spot of interest.
When zoomspot prarameter is set to a value greater than 0 than HOPA function will use
SMP (shortcut for Spot Margin Percent – see hopa documentation for details) parameter to display spot on an object that is higher in hierarchy.
Image will be then centered on the spot of interest and spot margin percent will be set to value passed in zoomspot parameter.
LinkToSpot_additional_parameters - are optional parameters. Parameters Width and Height are only applicable for HOPAGetView4Object function. Applying this parameters for HOPAGetView4ObjectEx function would create invalid link.
Important
Please remember that each HOPA function has different input parameters. When changing parameter that indicates HOPA page name, a reference to proper additional parameters should be made.
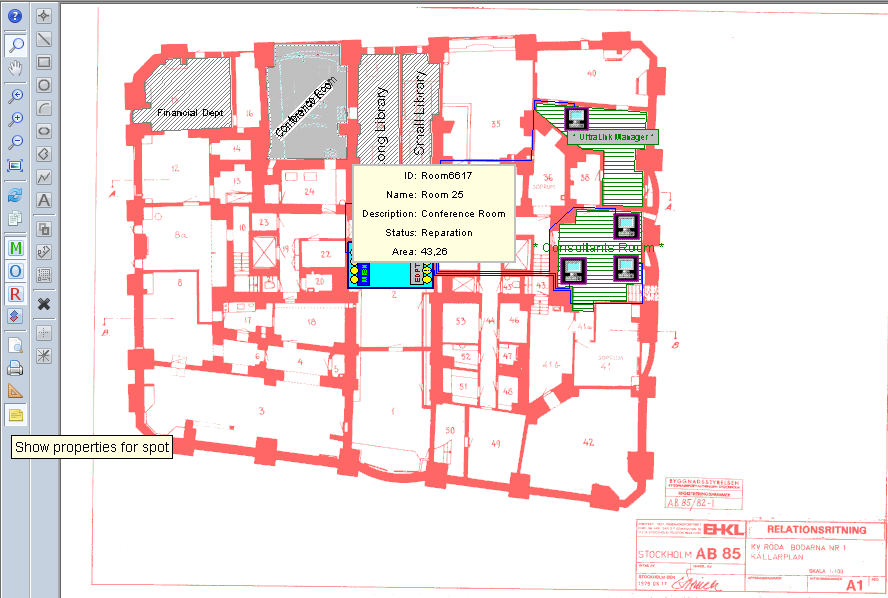
This HyperDoc Online functionality allows user to show properties in a popup window for spot when mouse is hovered over that spot.
This functionality can be enabled with a button on a toggle menu: Show properties for spot.
This button is controlled by entry in hisDocListStaticReadOnlyMenu.xml, which can be found in lang(eng, swe, nor ect.) in this path:
Tessel Software Line\HyperDoc\ASPPages\lang
<button caption="Show properties for spot" command="ShowPropertiesForSpot" offset="23" />
Also this section needs to be uncommented in a following way:
 <!-- <button caption="User button 1" command="menuEvent_User_1" offset="17" />
    <button caption="User button 2" command="menuEvent_User_2" offset="18" />
    <button caption="User button 3" command="menuEvent_User_3" offset="19" />
    <button caption="User button 4" command="menuEvent_User_4" offset="20" />
-->This HyperDoc Online web page is standard .asp page, which allows user to see all HyperDoc parameters currently used in HyperDoc Online.
All files required to display GetParams.asp page properly are stored in HyperDoc Online folder HyperDoc/Current/ASPPages/
To display page in browser, one should simply type:
http://his_address/getparams.asp where his_address stands for address of currently used HyperDoc Online.
Important
Access to page getParams.asp is restricted to users with administrator privileges only.
This functionality gives user the possibility to copy current view directly to clipboard by pressing Copy View menu button in HISDocView frame.
Note
Former functionality of Copy View,that is opening new window with object view, were not removed and can be enabled in INI section as described below.
Now the user is able to paste image containing current view to MS Word or Paint documents by just executing paste operation (using keyboard shortcut CTRL+V or clicking on Pastefrom proper menu).
Please modify hdocASP.ini file to choose how this function will work.
In [Configuration] section set CopyViewMode parameter to one of following integer values:
1 - copy directly to clipboard,
2 - copy to new window,
3 - copy both to clipboard and to new window.
Sample entry:
[Configuration]
CopyViewMode = ”1”;
By default CopyViewMode= 1. If it's set to other integer value than {1,2,3} then the default value will be taken anyway.
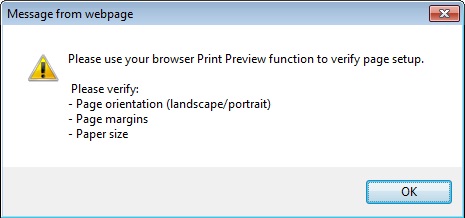
HyperDoc Online will now display alert popup window when user presses Simple Print button.
This feature gives the possibility of customization of menu bars and tool bars. It will prevent losing records in XML files when you install new version of HyperDoc Online. Please remember, that this is only declaration part. If you add new buttons or menu option you will still have to add configuration definition of menu's items or buttons to INI file.
First, please create folder for your customization files. Name and location doesn't matter.
In this folder those files can be stored:
hisHierarchyStaticMenu.xml - customization file for Object Menu
hisDocListStaticMenu.xml - customization file for Document Menu
hisDocViewToolbars.xml - customization file for tool bars
Of course, in this directory, you can put all of these files or only those relevant to given customization.
Note
Those files are normally present in your HIS directory, for example ASPPages\eng. You can copy them from there to your Customization folder but it's not adviced. It is adviced that in those files there should be only those entries that you want to modify.
In IIS, in HyperDoc Online directory, one should create virtual directory custommenus. This directory have to point to folder with customization files (see above).
Set the encoding in first line for xml file
For west European languages:
<?xml version="1.0" encoding="ISO-8859-1"?>
or for central and eastern european languages:
<?xml version="1.0" encoding="Windows-1250"?>
Root Element:
The root element is <menugroup>, without any attribute.
Child elements
Customization file contains two types of child elements:
menuitem
menugroup
Each one (there are exception, see below) should have following attributes:
command - name of command, the same as in main menu file;
mode - processing mode for given element:
del - given element will be removed from menu;
upd - caption of given element will be changed to this one from customization file;
add - given element will be added to menu at the end;
and optional attribute:
caption - attribute required in upd and add mode.
If you want to update or remove menuitem from existed menugroup, you should add menuitem element as a child of root element. Please see menuitem with command SwitchLayoutFreeMulti in example below.
You can't add menuitems to existed menugroup.
If menugroup element is in add mode, it has to have child elements - menuitem. These elements are not required to have an attribute mode (this attribute will be omitted).
<?xml version="1.0" encoding="ISO-8859-1"?>
<menugroup>
<menuitem mode="add" caption="Filter Creator" command="doclist_custom_cmd_1"/>
<menuitem mode="del" caption="Free - multiline" command="SwitchLayoutFreeMulti"/>
<menugroup mode="upd" caption="Document List Layout" command="DocListLayout"/>
<menugroup mode="add" caption="Filters" command="SetCustomPresentation">
<menuitem caption="Custom filter 1" command="doclist_custom_cmd_2"/>
<menuitem caption="Custom filter 2" command="doclist_custom_cmd_3"/>
</menugroup>
</menugroup>
Root element
The root element is <toolbars>, without any attribute.
Child elements
Customization file contains two types of child elements:
button
toolbar
Button element has to have mode del and command of button to remove from main toolbar XML file.
Toolbar element is used to add buttons to given toolbar and has to have command attribute.
Children of toolbar are buttons with all attributes used in main xml file: caption, command and offset.
<?xml version="1.0" encoding="ISO-8859-1"?>
<toolbars>
<button mode="del" command="ZoomIn"/>
<toolbar command="View" >
<button caption="User button 1" command="menuEvent_User_1" offset="17" />
<button caption="User button 2" command="menuEvent_User_2" offset="18" />
<button caption="User button 3" command="menuEvent_User_3" offset="19" />
<button caption="User button 4" command="menuEvent_User_4" offset="20" />
</toolbar>
</toolbars>
Warning
Please do not delete HELP buttons from Menus or Toolbars.
This HyperDoc Online add-in allows to select and add arbitrary documents from different objects in hierarchy to Document List that can be passed to predefined service in form of an XML (POST).
How to use Document List Creator Add-In:
You can either first choose documents from object and activate Addin or first Activate the Addin and then add documents to it's list. If you want to select documents in first place you can only select them from one object, then add them to new Addin list and then you can again add documents from all other objects in your data base.
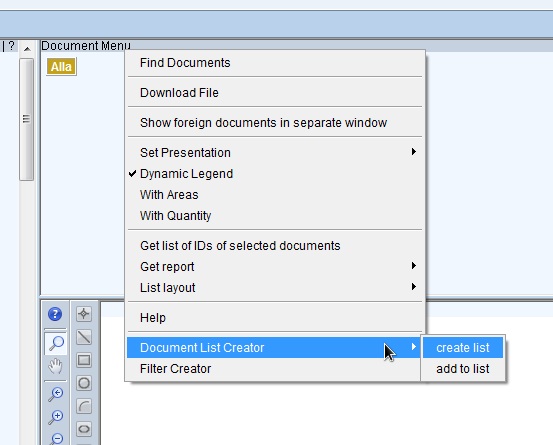
From Document Menu choose Document List Creator item, then choose one of the following:
create list
add to list
Selecting documents:
From Document pane select documents by selecting check boxes in the document table. Those selected documents can be added to Document List Creator no matter if the Addin is active or not. If it's not active you can create new List using both menu options (create list, add to list).
From the Document List window, press one of the following buttons:
Add documents – to add documents selected in Document Pane. This is equivalent to add to list operation from Document Menu->Document List
Order documents – to order/send documents on the list to preconfigured site (another application)
Clear list – to clear the list of added documents
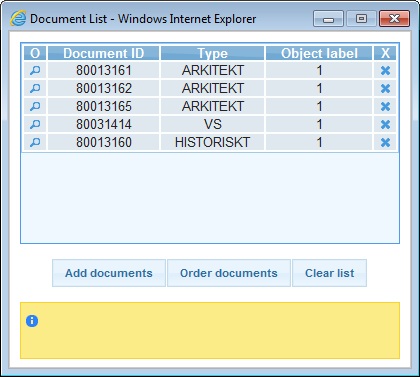
One can also remove a document from the list by clicking 'x' icon (located on the right of the table) in the documents table on chosen document.
One can also show document in HyperDoc Online by clicking 'show' icon in the documents table (located on the left of the table).
The highlighted panel on the bottom informs whether an action succeeded or not.
Warning
When the Document List Creator Add-In window is closed the selection is lost!
HyperDoc 4.91 +
TXHIT license
Folder ASPPages/DocListCreator with files (this should install automaticly with Hyper Doc):
documentlistaddin.html,
jsaddin.js,
documentlistaddin.js,
ext-scripts folder, containing jquery-1.4.4.min.js and jquery-ui-1.8.7.custom.min.js javascript scripts,
CSS folder containing stylesheet jquery-ui themes for add-in. Utilizing 'redmond' folder by default,
HIS_DLC_Proxy_Handler.ashx – server code behind page for creating an add-in request to external server.
To HDocAsp.ini file in section [Configuration] add:
javascripts2Include parameter with part “DocListCreator/jsaddin.js” for example:
javascripts2Include="DocListCreator/jsaddin.js;";
If javascripts2Include parameter is already present in ini file with other value, then please merge both values. Example:
javascripts2Include="Facilit/facilit.js;FilterCreator/jsaddin.js";
add new doclist_custom_cmd_n parameter with following values:
"javascript:hTop.DLC_openForm();"
“javascript:hTop.DLC_addCheckedDocuments();”
For example:
doclist_custom_cmd_2="javascript:hTop.DLC_openForm();";
doclist_custom_cmd_3="javascript:hTop.DLC_addCheckedDocuments();";
(optionally) you can change the layout of Add-Ins beetween redmond and blitzer by adding this line:
stylesheet_jqueryui_theme = "redmond";
To hisDocListStaticReadOnlyMenu.xml file add a group simmilar to one:
<menugroup caption="Document List Creator" command="" dynamic="0">
		<menuitem caption="create list" command="doclist_custom_cmd_n" checkbox="1"/>
		<menuitem caption="add to list" command="doclist_custom_cmd_n" checkbox="1"/>
  	</menugroup>
Where n has to be same as in HDocAsp.ini file
OPTIONAL - Check Your localization for DocList Add-in in '/lang/hislocalization.js' file that is placed under IIS virtual directory 'lang'. You can modify them if needed. Strings that concern DocListCreator are prefixed with 'DLC'.
Set following variables in documentlistaddin object in documentlistaddin.js script:
URL = "http://sample_url";
- url where the list is to be sent
var stylesheetTheme ="blitzer";
- The jquery ui theme stylesheet for the add in. Options: blitzer, redmond.
ALTERNATIVE
One can also include only one menu item to Document Menu– 'create list' without wrapping it into a group. The Add to list functionality is additionally provided in the add-in's window under the button with english label: 'Add documents', so one may not need to add this button.
If so, add to hisDocListStaticReadOnlyMenu.xml only following item only:
<menuitem caption="create list" command="doclist_custom_cmd_n"/>
With doclist_custom_cmd_n with equivalent content:
javascript:hTop.DLC_openForm();
<?xml version="1.0" encoding=”utf-8”?>
	<documentSet>
		<document id=”770” type=”Arkitekt” />
		<document id=”130845” type=”Arkitekt” />
		<document id=”17397”  type=”Arkitekt”/>
		<document id=”17398”  type=”Arkitekt” />
    </documentSet>
You can find this sample page in 'DocListCreator' folder
<%@ WebHandler Language="C#" Class="HIS.Arkivtjanst.Handlers.ProxyHttpHandler" %>
using System;
using System.Xml;
using System.Web;
using System.Web.Caching;
using System.Net;
using System.IO;
using System.Text;
using System.Configuration;
using System.Web.SessionState;
using System.Diagnostics;

namespace HIS.Arkivtjanst.Handlers
{
  public class ProxyHttpHandler : IHttpHandler, IRequiresSessionState
  {
    public void ProcessRequest(HttpContext context)
    {
      bool returnedValue = true;
      Stream xmlInputStream = context.Request.InputStream;

      System.IO.StreamReader MyReader = new System.IO.StreamReader(xmlInputStream, System.Text.Encoding.UTF8, false);
      string XMLRequest = MyReader.ReadToEnd().ToString();
      XmlDocument docContainingDocumentList = new XmlDocument();
      docContainingDocumentList.LoadXml(XMLRequest);

      context.Response.Write(returnedValue);
      return;

    }
    public bool IsReusable
    {
      get
      {
        return true;
      }
    }
    public ProxyHttpHandler()
    {
    }

  }
}
This is a new functionality which displays selected objects linked to line spots with fatter lines.
This functionality is configurable via [Configuration] section in
INI file. Color of highlighted lines is the same as for any
other spot. New configuration parameter is added. This parameter indicates width of
fattened line on highlight or select operation. It is only applicable for
"polyline", "segment" and "circarc" spots. Fattened polyline width keeps constant
width independently for image size (its not absolute).
spot_highlighted_line_width - sets width for spot line. Width is presented in percents of image size. '1.0' is 100%, '0.01' is 1% etc. It is advised to input values around '0.005' (0.5%).
Example:
spot_highlighted_line_width=0.005;
This functionality works in regular HyperDoc Online view as well as Print Preview. You
must first select the spot with CTRL and Right Mouse Button and
then enter Print Preview mode.
There was a difficulty in selecting single pixel lines in HyperDoc Online. Mouse pointer had to be exactly over the line to trigger highlight or select by click.
Now, the tolerance can be set in [Configuration] section of INI file by using new parameter: line_hit_sensitivity
line_hit_sensitivity - Tolerance is presented in percents of image size.
1.0 is 100%, 0.01 is 1%.
It is advised to input values around 0.005 (0.5%).
Example of entry:
line_hit_sensitivity = 0.005;
Note
If parameter is not defined in INI, line hit sensitivity will be equal to 0.005.
This functionality allows to define standard scale used in HyperDoc Online Print Preview mode for displayed document.
To use new functionality you have to define scales as sequence of real numbers between 1.0 and 10.0 (1.0 included, 10.0 excluded; 1.0 is obligatory and is always added). They will be used as base for scales calculation in any range: e.g. sequence 1.0, 2.5, 5.0, 8.0 gives scale values: 1.0, 2.5, 5.0, 8.0 but also 100, 250, 500, 800 or 1000, 2500, 5000, 8000; etc.
To control standard scales for HyperDoc Online define standard_scales parameter in [Configuration] section of INI file.
Sample entry looks like:
standard_scales="1.0,2.5,3.7,4.3,5.9,7.5,8.8";
The default is "1.0,2.0,3.0,4.0,5.0,7.5".
The scale can be observed e.g. in Print preview mode active with Match view scaling mode selected.
This functionality allows to define standard scale used in HOPA calls (GetPrint4Doc, GetPrint4Object, GetPreview4Object) that allows Print Preview mode.
To use new functionality you have to define scales as sequence of real numbers between 1.0 and 10.0 (1.0 included, 10.0 excluded; 1.0 is obligatory and is always added). They will be used as base for scales calculation in any range: e.g. sequence 1.0, 2.5, 5.0, 8.0 gives scale values: 1.0, 2.5, 5.0, 8.0 but also 100, 250, 500, 800 or 1000, 2500, 5000, 8000; etc.
To control standard scales for HOPA define standard_scales_hopa parameter in [Configuration] section of INI file.
Sample entry looks like:
standard_scales_hopa="1.0,2.5,3.7,4.3,5.9,7.5,8.8";
The default is "1.0,2.0,3.0,4.0,5.0,7.5".
The scale can be observed in HOPAGetPrint calls: 4Doc/Ex and 4Object/Ex active with Match view scaling mode selected.
This new HOPA page returns list of documents connected to given object.
User can run this page with following parameters:
ObjID
or
ID
ObjClass
HierName
Sample call using first option - ObjID:
http://his_address/HOPAGetDocListXML.asp?ObjID=HDocHierarchyDefinition|1|HDV_H1_FLOOR|B5C99144370F433A8E9F18CC0332C764
New HOPA functions getLegend4Doc and getLegend4DocEx give the same output as appropriate GetLegend4Object/Ex calls but it can be called by using expected DocID, and not like in GetLegend4Object/Ex by means of ObjClass and ID parameters.
Parameters are similar to those in HOPAGetView4Doc.asp and additionally LegendDynamic and LegendAreas (both are applied in HOPAGetPrint4Object.asp).
List of all parameters that are available for HOPAGetLegend4Doc:
DocID
Present
LegendDynamic
LegendAreas
PresentDef
BitDepth
Page
TPID
Custom
Width
Height
LayerName
ErrImage
This request returns legend window in context of given object.
To obtain the final image you have to specify parameters that identifies the object for which you want to get the image and Present parameter that define the name of presentation to be applied. Other parameters that are used in HOPAGetView4Doc.asp are accepted but irrelevant.
Width and Height parameters define size of output image in pixels; default is 800 and 600 accordingly.
Default value for both LegendDynamic and LegendAreas is 0 (False).
For some combination of parameter values, specially with LegendDynamic=1, the final image can be empty.
Parameters are identical to those in HOPAGetLegend4Doc.asp.
This request returns legend window in context of given object.
To obtain the final image you have to specify parameters that identifies the object for which you want to get the image and Present parameter that define the name of presentation to be applied. Other parameters that are used in HOPAGetView4Doc.asp are accepted but irrelevant.
The technology used to realize the request guarantees the high quality of output image (higher than in HOPAGetLegend4Doc.asp case).
The request is specially useful to define SRC tag of e.g. IFRAME element or SRC parameter of Window. Open procedure.
Width and Height parameters are irrelevant. They should be defined outside the request, e.g. as Width and Height parameters in Window. Open procedure or as Width and Height tags of IFRAME element that SRC parameter/tag is defined by HOPAGetLegend4ObjectEx.asp request.
Default value for both LegendDynamic and LegendAreas is 0 (False).
For some combination of parameter values, specially with LegendDynamic=1, the final image can be empty.
New feature was added for HOPA. You can now use custom fields (other than ID) for getting objects and documents.
For getting object you can use one of following sets of parameters:
ObjID (OID)
ID, ObjClass, HierName (ID, OC, HN)
SearchField, SearchValue, ObjClass, HierName (SF, SV, OC, HN)
For getting document you can use one of following sets of parameters:
DocID (DID)
SearchField, SearchValue, DocType
Note
It is possible, that in database is more than one object/document with given pair SearchField/SearchValue. In that case HOPA returns only the first one.
SearchField (SF) - name of field in given object class or document type.
SearchValue (SV) - searched value.
DocType (DT) - type of searched document.
Examples:
HOPAGetDocInfoXML.asp?SF=Drawing_Description&SV=Floor 66&DT=Drawings
HOPAGetProperties4ObjectXML.asp?OC=Rooms&HN=HierarchyDefinition&SF=Room_Name&SV=Consultants Room
Thanks to those two new parameters, HOPA calls (HOPAGetView4Object and HOPAGetPrint4Object and their Ex versions) can return images with a fattened spot polyline for called object.
Those parameters are:
LineColor (LC) - contains color for spot line. Example is: 'red' or '#ff0000'.
LineWidth (LW) - contains width for spot line. Example is: '0.005' or '0.01'.
Width is presented in percents of view for that spot. '1.0' is 100%, '0.01' is 1% etc. It is advised to input values around '0.005' (0.5%).
Sample calls are:
HOPAGetView4Object
http://his_adress/HIS/HOPAGetView4Object.asp?ObjClass=HDV_H1_STRUCT&ID=70000549&SMP=160&Width=800&Height=600&LW=0.02&LC=red
HOPAGetView4Object
http://his_adress/HIS/HOPAGetView4ObjectEx.asp?ObjClass=HDV_H1_STRUCT&ID=70000549&SMP=160&LW=0.02&LC=red
We have implemented new type of security classes that can be applied to designated document types.
By using this feature you can control user rights to see and perform various actions against type of documents, no matter where they are located in Database.
Configuration
Activation of this functionality requires database modification:
Open HyperDoc Configuration Manager (
HDCfgMan.exe) with INI pointing to chosen database,Log in as administrator,
Select menu
File/Check and Create Extra Tables.
Using security class
New menu option has been added to Tools menu in HyperDoc - Security Classes for Types.
This option opens Choose Type to Assign a Security Class dialog where you choose document type for which the security class will be created.
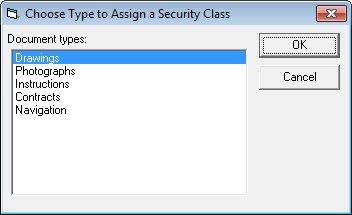
Security class dialog of chosen document type dialog will appear.
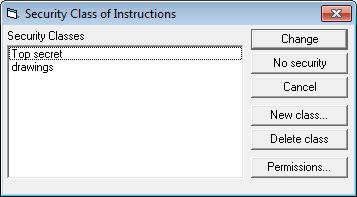
Note
If the dialog shows up with one of the security classes selected (on blue) this means that this security class refers to selected document type. So do not create new security class but modify the existing one.
Click New Class to create new security class for chosen document type.
Tip
It's recommended to name the security class using name of the document type chosen as it will be easier to recognize them in the future
By default permissions for new security class are blank so click Permissions...button to customize them.
Future managing the security classes for documents types is same as for normal security classes.
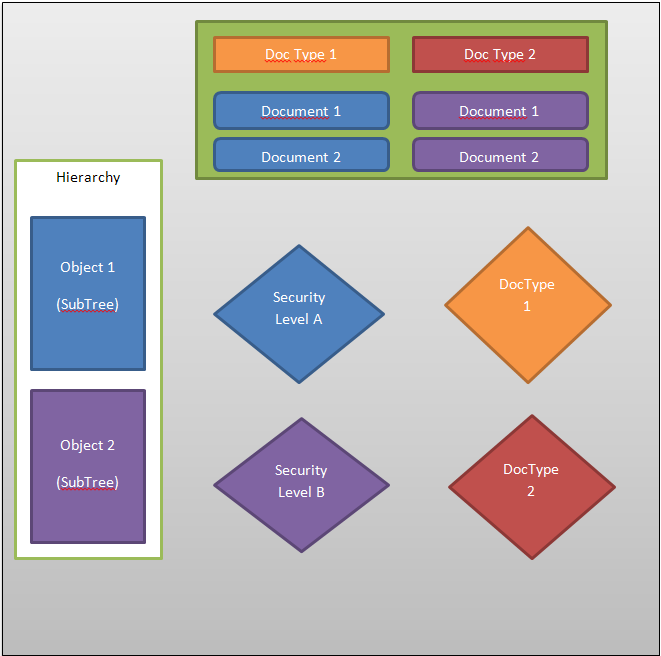
Described here is a simple scenario where we want to apply security for three groups of users:
Architects, that can access “Object 1”
 with it's sub tree and only documents of “DocType 1”
Engineers, that can access “Object 2”
 with it' sub tree and only documents of “DocType 2”
Administrators, that can access all objects
+
and all documents +
For easier management it is recommended to use separate Security Classes for document types. You can use one SC per type, or for several types that need the same security settings.
Setup user accounts
create group Administrators, Architects and Engineers. Grant appropriate rights to each group,
add users as needed,
users and groups can be defined using HyperDoc Administrator,
user and group rights can be assigned using HyperDoc Tools\User Permissions.
Setup Security Classes using HyperDoc Tools\Security Classes dialog. Use New Class to create “Security Level A”. It will be used to secure objects of “
blue” categoryedit this class and select user rights for groups (Permissions...),
for Architects and Administrators check appropriate rights and verify by selecting “View Effective rights”,
for Engineers un-check appropriate rights and verify by selecting “View Effective rights”,
assign this class to blue category objects by rights click on object and using “Change Security Class…” option.
Repeat steps for “Security Level B” that will be used to secure objects of “purple” category
.To apply security class to all objects and documents (sub tree) use Security Class Clone add-in for HyperDoc.
After completing above steps you have secured access to objects and connected documents. Next problem is the fact that Architects and Engineers will have access to all types of documents. To limit this access to specific types, follow instructions in next steps:
“DocType1_SC” will be used to define access to DocType1
Create new class and give it a meaningful name. You can create one security class per document type, or group them in logical entities. If you want to apply the same access rights for several types, the same security class can be applied. Here we will create per type security and therefore create class called: “DocType1_SC”,
Edit this class and remove all rights for Engineers group (leave unchecked) and add rights to Architects and Administrators,
Assign this class to DocType1 by using HyperDoc Tools\Security Classes for Types,
Now this document type will not be available for Engineers.
Repeat this steps for “DocType2_SC” that will be used to define access to DocType2
The zoom factor is now selectable in HyperDoc options for spot when it's chosen from InfoScope window.
To Change the value of zoom go to:
Tools -> Options,
Select Advanced tab,
The parameter to modify is called "Zoom factor used to expand/shrink area with spot to display it".
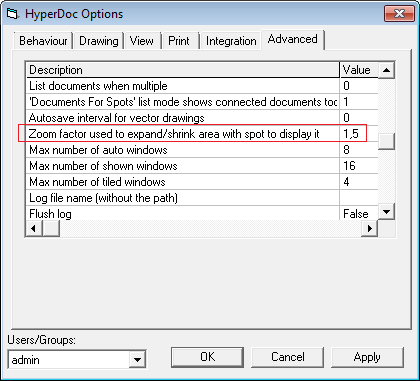
The default value is 1,5. The greater value is selected, the larger area is displayed - so a watched spot is smaller. Suggested range is between 1.1 and 1.9.
Important
Please note that this is the same parameter that controls zooming to spot chosen from hierarchy.
By default HyperDoc allows handling of many versions of same document. One of them is set as current and displayed in View pane but other versions are stored in database and can also be seen.
This feature allows Client to choose if he wants to store old document versions in database or only store one, most current version.
If the option is set to True adding new version of document in HyperDoc Windows Client will cause removing of all previous versions from database.
To control this option:
Choose Tools\Optionsand click onAdvancedtab,Change user to Default (because this options have to be common to all users),
Change parameter
Disable versioning (remove old versions after adding new one)and set required valueTrueorFalse.
When replicating - there is an option to replicate only current version. In replication profile set option AllVersions to 0.
View / Filtering / With InfoScope option controls what additional information is shown in the legend form. When this option is off, the legend form contains only the legend.
Now, when this option is on, the legend form also contains InfoScope view with automatically selected Limited with Document options.
Before 4.91 it did not select Limited with Document option so it showed documents connected to hole database. In case of large databases it hanged HyperDoc.
List of selected bugs fixed for version 4.91:
[HDOC-52] - Printing JPEG files from HIS
[HDOC-95] - Error number: 13 when SQL-DMO is not present.
[HDOC-109] - Download multiple documents doesn't work in Chrome
[HDOC-143] - Support of TrueColor icons in print templates
[HDOC-159] - "View external file formats in HIS" does not work
[HDOC-160] - Scrollbars in Hierarchy and DocList frames don't work in Safari and Chrome
[HDOC-166] - HyperDoc hangs when using Infoscope function with custom filter (Large DB)
[HDOC-168] - HIS add-ins not working in Opera
[HDOC-177] - "Fel vid uppkoppling mot server" when loading document in PGR5 and HIS
[HDOC-184] - HOPAGetLegend4Object.asp problem
[HDOC-186] - Adding "Filter Creator" Add-in should be updated to match instructions and should not involve coping FilterCreator folder to Lang Folder.
[HDOC-189] - HOPA/HOPA Plus .asp pages should have consistent Print buttons (Simple/Advanced)
[HDOC-191] - Run-time error when starting HyperDoc with ODBC database without valid license
[HDOC-208] - Searching in Firefox and Chrome doesn't work
[HDOC-209] - Truncation in Presentation Filters dialog
[HDOC-213] - Hidden document tabs in DCM
[HDOC-221] - No information that user do not have rights to download document using Download File menu option when the document is checked in document pane
[HDOC-239] - Document Tabs problem in Disconnected Document View
[HDOC-255] - Document list in HIS has problems with highlight under IE
[HDOC-262] - Document search by dictionary field in current domain
[HDOC-267] - HIS, not possible to adjust area value connected to spot
[HDOC-298] - Object properties for hovered spot, window flaw
[HDOC-295] - Error using vector file
[HDOC-285] - Allow attaching new external document as a new version of native document
