
HyperDoc has been primarily designed as a tool for integration of composite documents with database applications.
HyperDoc itself is, more than anything else, a database equipped with tools that provide visual instruments for organization,
navigation and presentation of documents and database records integrated in ways that enhance ease of use and productivity.
You may easily discover the database nature of HyperDoc by looking behind its graphical interface.
To do that you may use Microsoft Access to open HyperDoc demo database NetMan.mdb and choose pull-down menu Tools/ Relationships...
show the relationships between selected database tables in this demo application, as in the picture below.

Information about everything that HyperDoc will do when you operate this demo database is stored in those tables (plus some internal HyperDoc tables not shown for insufficient space). Building HyperDoc on a database foundation assures that the database engine itself, through rigorous definition and maintenance of data records keys and relationships guards the integrity of information.
It was not our objective, however, to scare you away with a stiff bureaucratic application. HyperDoc’s user interface and built-in mechanisms effectively hide away most of its internal complexities and let you find and operate on your data and documents productively and intuitively.
HyperDoc is a highly customizable application, subsystem or toolbox, depending on the development level you would like to use. The customization is done, appropriately to HyperDoc’s construction, using typical database development techniques, by defining tables, fields, relationships and queries. HyperDoc’s document management and graphical presentation tools automatically fit into each new HyperDoc environment, as it may be designed and configured by a developer or integrator, without any additional programming.
HyperDoc construction makes it easy to add to it database extensions using typical database development methods and tools. Complete applications may be built by adding some application-specific database tables, forms, queries, reports and code. This may be done either by creating add-ins, directly integrated with HyperDoc itself, or by interfacing HyperDoc with external database applications using ODBC data links or OLE Automation API calls.
Start HyperDoc by double-clicking its icon. Login to the demo database using the admin, admin account. We’ll be using this demo database to illustrate the basic features of HyperDoc in the following sections of this chapter.
HyperDoc recognizes the very basic fact about most of the real-world business processes around: that they deal with business objects and documents that refer to those objects. In order to allow for data processing, both business objects and documents are represented as records in the HyperDoc database. The database construction and an important part of HyperDoc’s document management functions are built on an assumption that it is easier to find appropriate documents if they are related (connected) to the relevant business objects. The same connecting mechanism works very well both ways, it facilitates finding relevant documents for selected business objects, and it provides a fast and automatic identification of relevant business objects for any document that has been properly filed.
In the Navigation window click plus-sign icons to expand hidden hierarchy levels, so that the NetMan (root), Stockholm and Tessel Systems objects are visible, as in the picture below.

Click document icon on the left side of Tessel Systems, so that it gets marked in green. The Documents List window on the right side of the screen will show (in its tabbed page All) a document connected to Tessel Systems: ID=Navig002, Type=Navigation. If you choose the Navigation tab, you will also see Description=City of Stockholm - orientation map. (This requires that the Connected button in the status bar of the Documents List window be pressed.)
The HyperView window automatically shows a predefined view of a map with Tessel Systems office marked on it. You may also right-click at the Tessel Systems object in the Navigation window and choose Modify Building from the pop-up menu. This will show a database record with more detailed information.
The above example shows that with a few clicks we managed to find a document associated with an object of interest in a database without having much prior knowledge about it.
As you probably noticed, expanding the hierarchy and selecting its objects is done independently from marking object’s document icon. This lets you control independently what you see in the Navigation and Documents List windows. For quick browsing of business objects and documents that are connected to them, it may be more convenient to check Current Object Marking in the Tools/Options menu. This makes HyperDoc marking object’s document icon automatically when the object gets highlighted as current in the Navigation window.
The simplest way of visual navigation, by marking single objects being of interest at the moment, as described in the previous section, would be insufficient for databases containing larger numbers of documents and business objects. Very soon it becomes necessary to select various groups of business objects to define domains of interests for searching documents. In order to allow marking document icons of multiple objects make sure that Current Object Marking is not checked in the Tools/Options menu. HyperDoc supports multiple hierarchies, which defines different views of your database.
In the Navigation window click plus-sign icons to expand hidden hierarchy levels, so that the objects of interest are visible, as in the picture below.
Press and hold the Ctrl key and left-click at document icons of ProComm, Optical Research and Telekom 2000 objects.
As you click the document icons, the documents connected to the marked objects are added to the list in the Documents list window.
Right-click at the list of documents and choose Document Set/Add All from the pop-up menu.
Right-click at the list of documents once more and choose Document Set/Show All - this makes HyperDoc show all documents from the Document Set in the HyperView window.
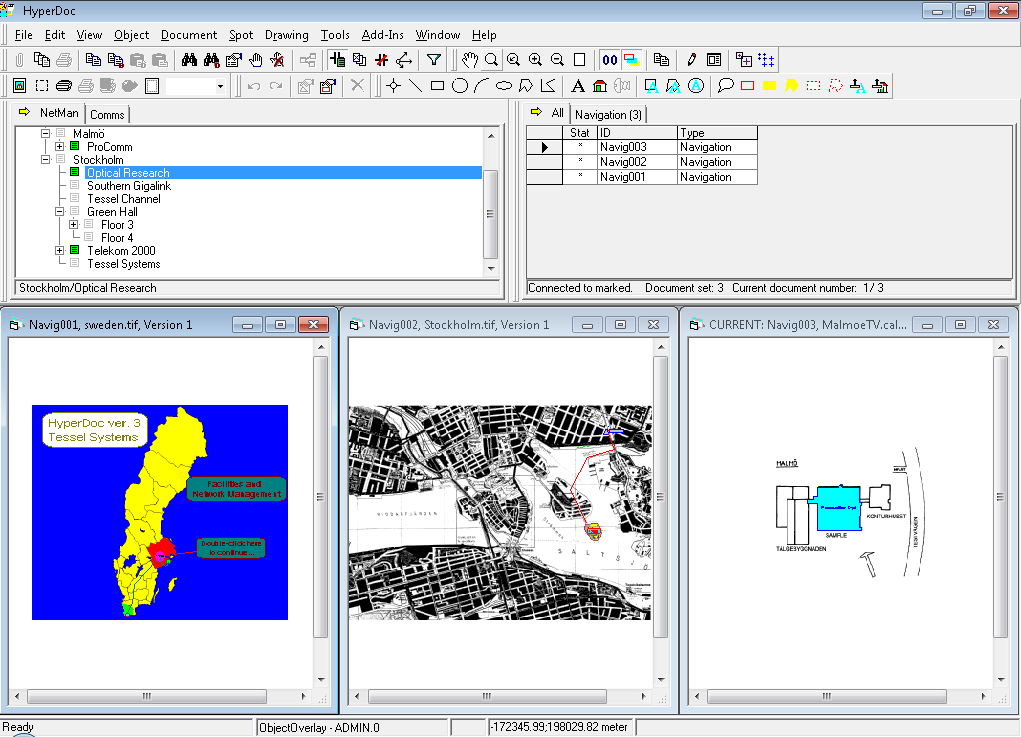
Right-click at the list of documents and choose Document Set/Remove All - this empties the Document Set. Choose Close All from the Window menu and maximize the Current document window that is left on the screen.
HyperDoc offers a number of different ways of marking objects in the Navigation window,
so that you may utilize the hierarchical organization of business objects in the most effective way.
Left-click at the document icon of Stockholm. It gets marked and the documents that are connected to Stockholm appear in the Documents List window.
The one that has Stat=D (Default document) is shown in the HyperView window.
Now press and hold the Right Alt key and left-click Stockholm's document icon again.
This corresponds to Mark Subtree from the Object menu and marks Stockholm
(as the subtree’s root - green document icon with a yellow corner) and all objects that belong to it in the hierarchy (as the subtree’s members - yellow document icon).
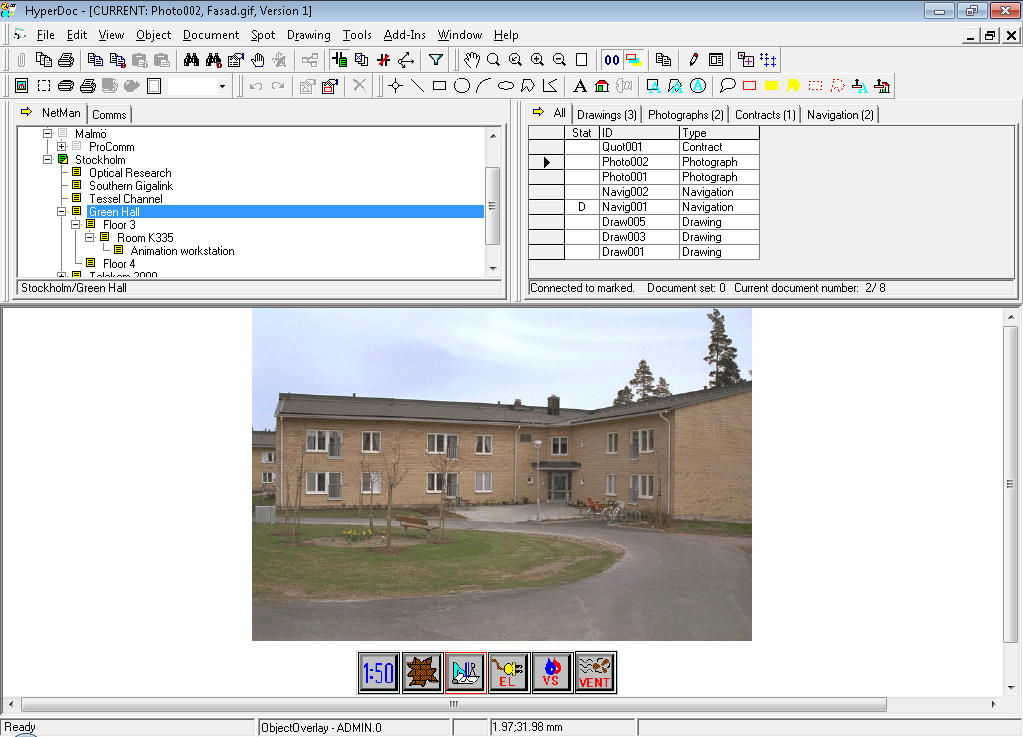
The Documents List shows now all documents that are connected to Stockholm and all its subtree members, as in the picture below.
Click at the record selector to choose the document with ID=Photo002.
HyperDoc displays this document (photograph) in the HyperView window and automatically synchronizes the
Navigation window by making the Green Hall object current, as the photograph has been connected to it.
As we have seen in previous sections Business Objects play an important role in organizing documents in HyperDoc. How those objects get defined, where their data is coming from, and what functions does HyperDoc provide to operate on them? Some answers to those questions follow.
HyperDoc is customizable, so that it may be used for various applications, each of those more than likely to need different kinds of Business Objects. HyperDoc user (or his consultant or database integrator) may define Business Objects at his will, simply by defining any number of database tables, each containing any number of fields, as they may be needed. The only requirements that must be satisfied here are:
Each object table must have a single-field unique key
Object tables must be linked as to create at least one hierarchy; multiple tables may belong to the same hierarchy level, but each table must have only one parent table.
Details of object tables and the hierarchy definition are filled into HyperDoc configuration tables according to rules described in the Configuration section of HyperDoc Configuration and Integration Manual. Document records are also configurable, independently for any number of document types.
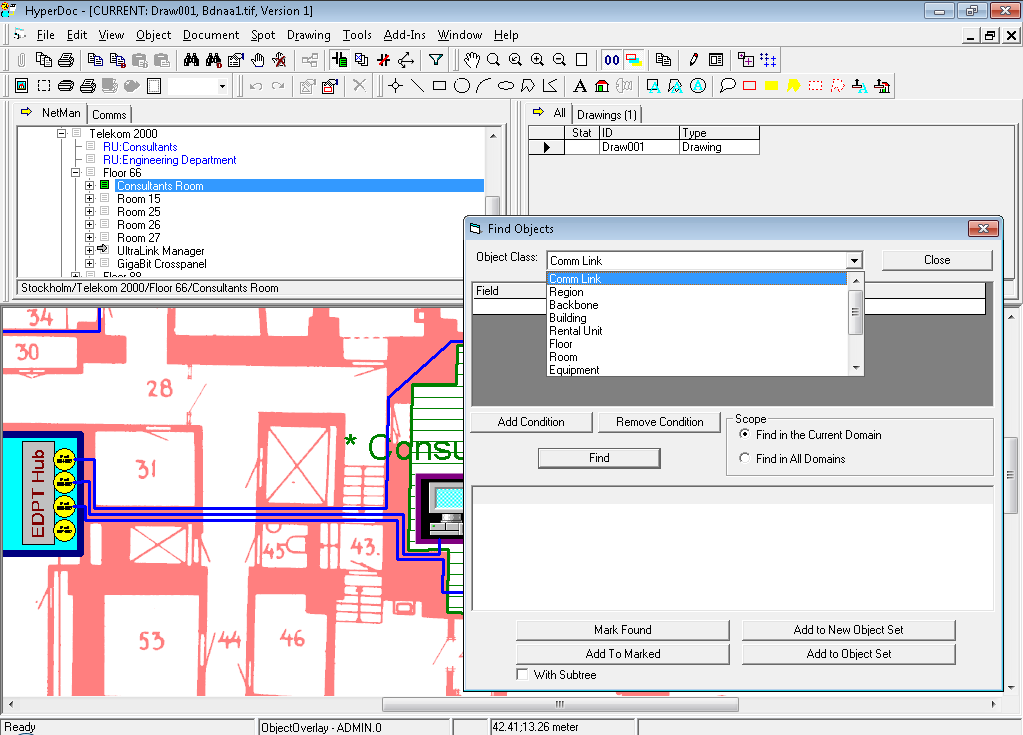
In order to see what kinds of objects have been defined for our demo database, you may right-click at any object in the Navigation window and choose Find Objects… from the pop-up menu. In the Find Objects dialog click the button to the right of the Class box to show the list of object classes that are defined in this database: Region, Building, Floor, Room, Equipment, Cable, etc., as shown in the following picture.
The data for Business Objects records may be provided from external sources, e.g. by updating the tables via ODBC, or may be defined using HyperDoc commands.
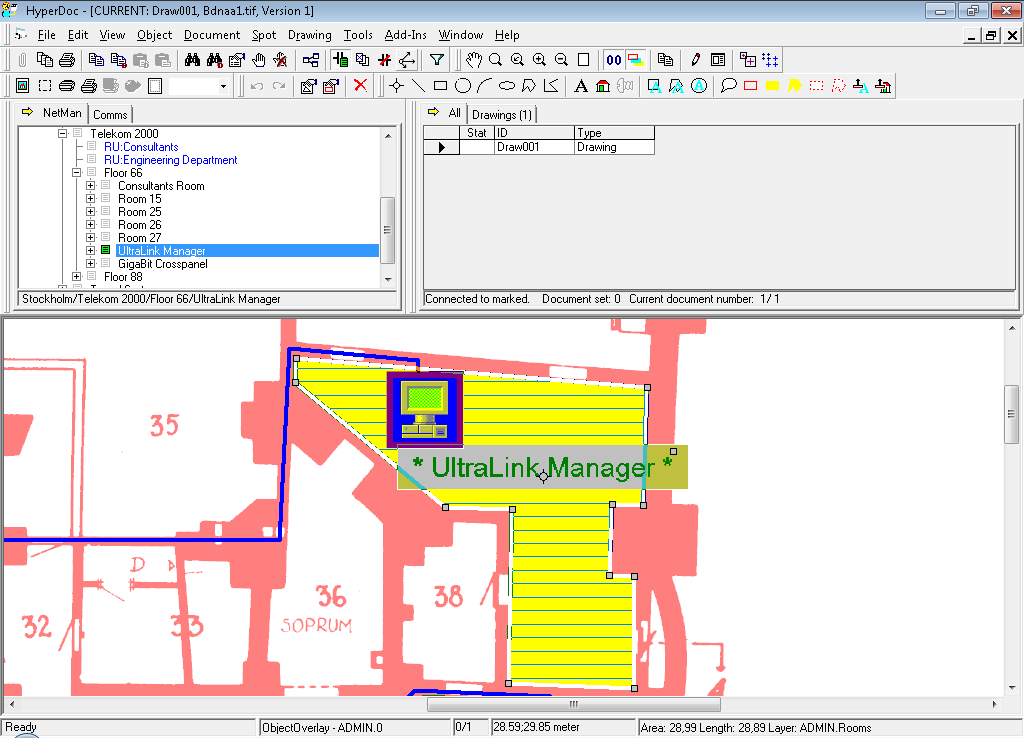
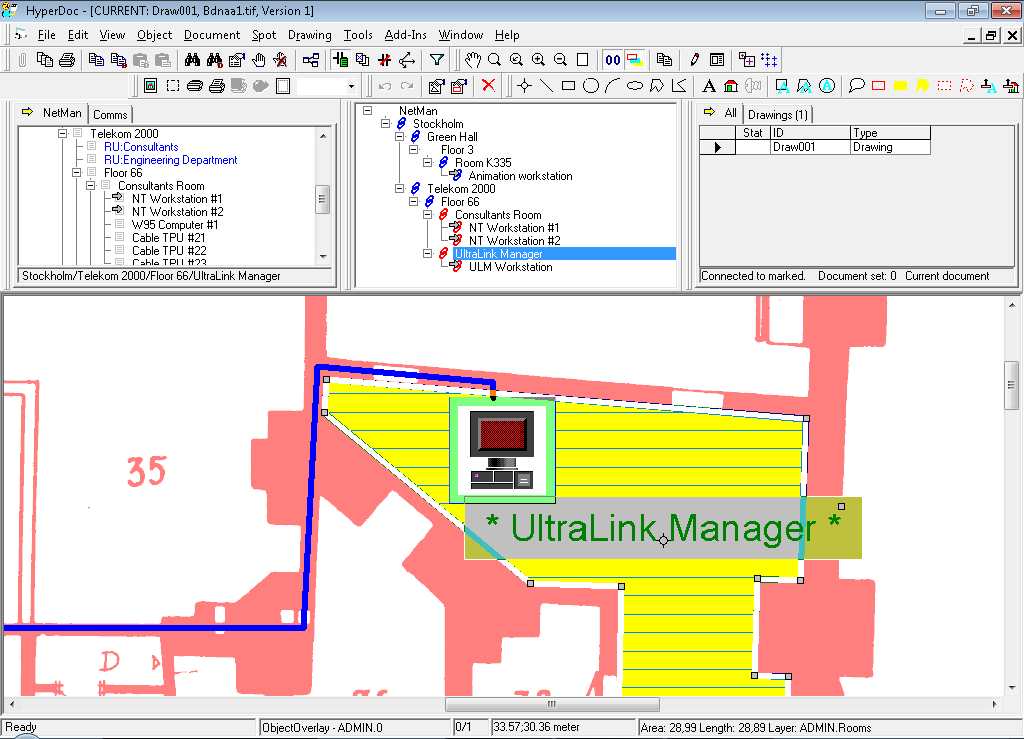
Click at Consultants Room (hierarchy path: Stockholm/Telekom 2000/Floor 66).
If you want to see the picture below, click also this object’s document icon, so that the drawing ID=Draw001 is shown in the HyperView window.
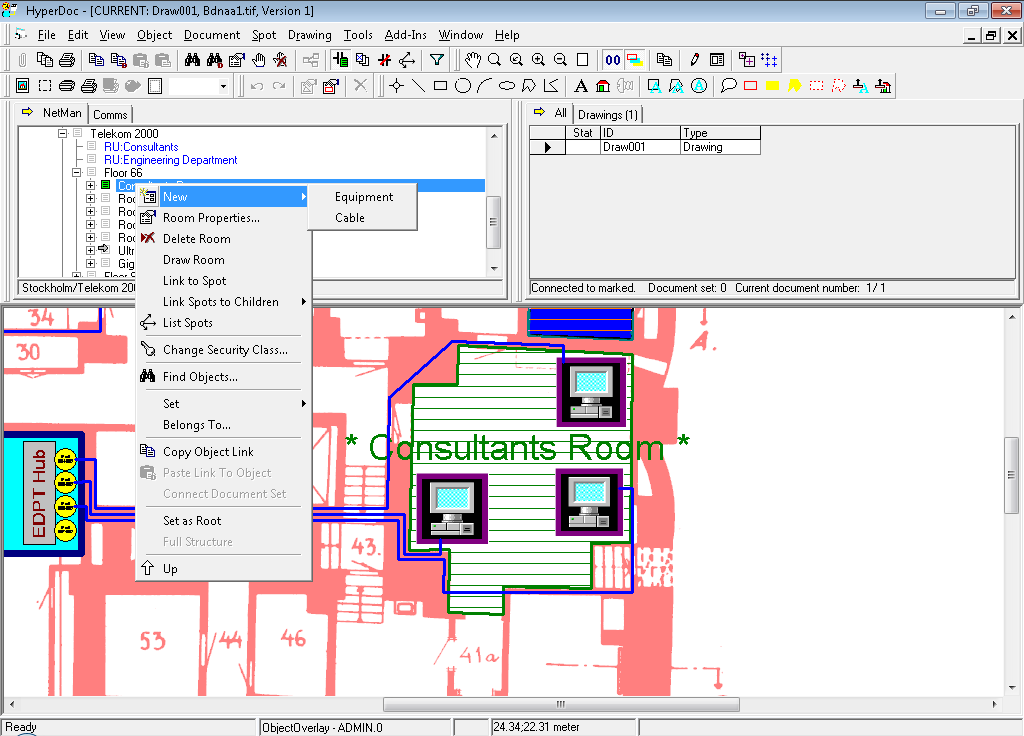
Right-click at Consultants Room shows a pop-up menu with operations that are applicable to this object. Choosing Modify Room (or View Room, depending on your permissions) will expose a form with this object’s record fields. Clicking New shows that, according to the current hierarchy definition, two kinds of objects may be added under this room: Equipment and Cable. Clicking Cable will let you define a new Cable record and fill in data to all its fields that have been configured for HyperDoc to take care of.
The same context-sensitive mechanism works for all levels of hierarchy, so that you may enter new Business Objects data, or modify the existing records using HyperDoc commands.
Hierarchical navigation, briefly described in previous sections, is intuitive, visual and usually gets you to the object of interest rather quickly. In larger databases, however, there is always a need to find objects by asking an appropriate question. You don’t want to navigate when you know the name of a thing.
In the Navigation window click the NetMan’s (root) minus-sign icon to hide all hierarchy levels. Right-click inside the Navigation window and choose Find Objects… in the pop-up menu.
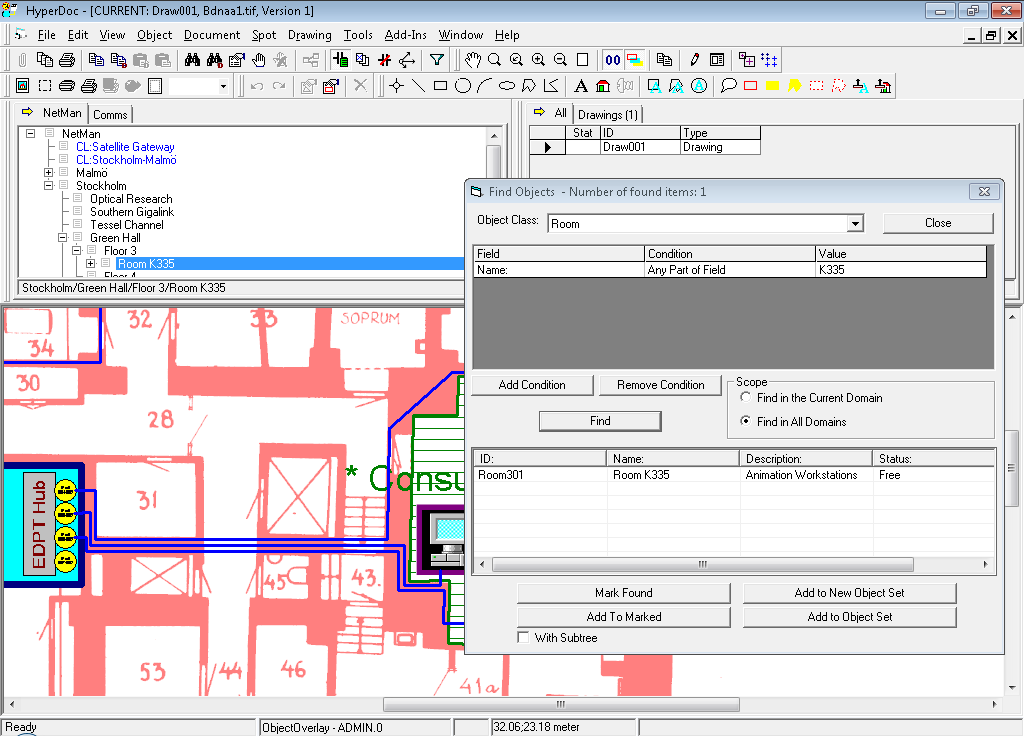
Let’s say that we want to find Room K335. Choose Object Class: Room.
First condition should be: Field: Name, Condition: Any Part of Field and Value: K335.
Choose Scope Find in All Domains and click Find.
HyperDoc expands the hierarchy as needed, finds the requested object and makes it current in the Navigation window. If Tools/Options/Current Object Marking is not checked, you will have to click the current object’s document icon in order to see connected documents, as in the following picture.
In contrast to Business Objects, documents are not subjected to hierarchical organization, instead they may be connected to Business Objects in a multitude of ways, from highly organized to seemingly random, often chosen on as needed basis and changed from time to time.
Documents exist in HyperDoc as logical entities. Document is a database record with its unique ID and an arbitrary number of attributes that may be configured as anything else in HyperDoc. Document provides an important boundary in the complex world of HyperDoc. While looking outward, document serves as an entity that is being related to Business Objects, searched, viewed and printed by users. While looking inward, document encapsulates files and versions that, although they may be changing in time, represent still the same logical information, so that it makes sense to refer to them as to the same logical document.
The real world knows by far too many kinds of real documents to let us escape with any smart concept of single universal logical document. This is why HyperDoc humbly makes a concession and lets you define any number of Document Types. The good thing is that this is done without compromising the idea of having an elegant logical document concept. Every type of document is represented in HyperDoc as a logical document that may have a specific set of attributes depending on its Document Type.
Use Mark All in the Object menu to get all connected documents shown in the Documents List window. Try to click different tabs that present Documents List sub-pages.
Tab All shows them all (obviously) and the attributes shown on this page are common to the all types of documents defined in this HyperDoc database.
Those attributes actually represent fields from the HyperDoc’s only logical documents table.
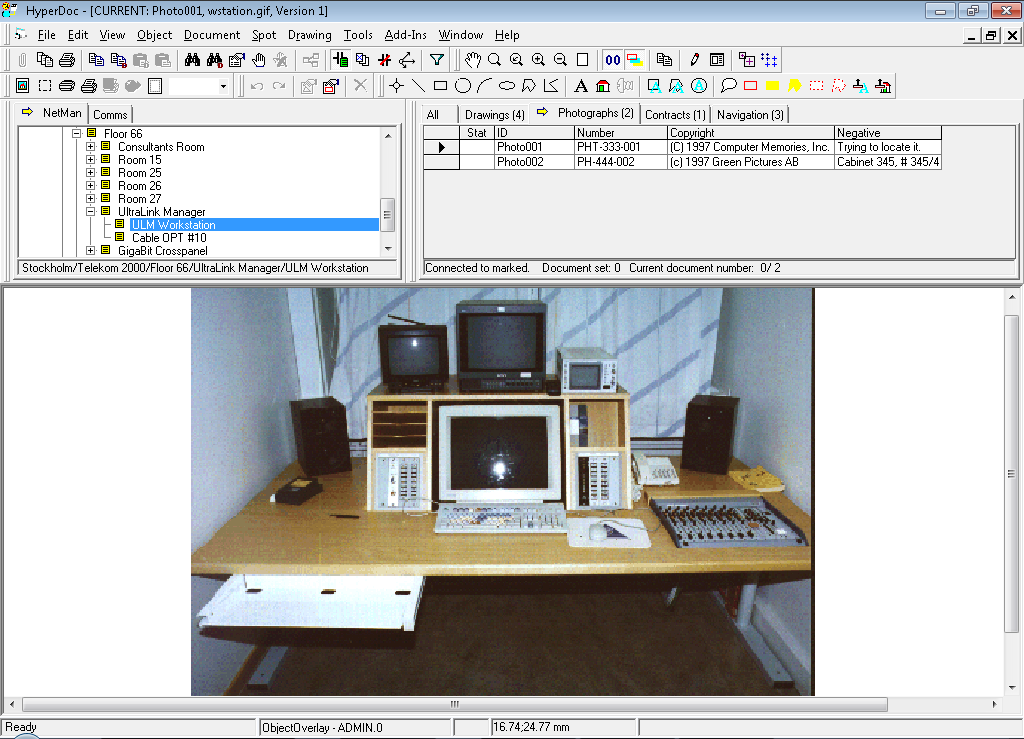
Click tab Photographs to see only those documents that were registered as photographs.
They have the same IDs as on the All page but all other attributes are different, e.g. the Negative field.
Try other tabs to see different types of documents. If you click tab Contracts, Excel may be called to show a spreadsheet file - simply exit from it to come back to HyperDoc.
Document (record) may have a number of versions, each defining a document file attached to the document. One version is current, and all versions share the same identity of the logical document (record) they belong to.
Click at the document icon of Malmö in the Navigation window, and then right click at the connected navigation document in the Documents List window.
Choose Versions… in the pop-up menu.
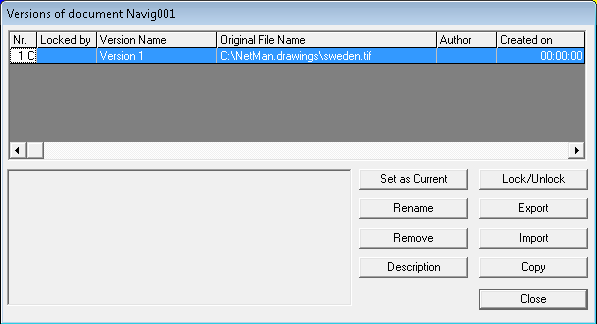
The Versions dialog shows details about files attached to the logical document. Version Nr is followed by C for the current version.
A version may be marked as Locked, if it has been exported, typically for editing outside of HyperDoc.
The Locked by column contains name of the user who locked given version.
If this field is empty it means that the given version is not locked.
Each version has a Name and its Original File Name, i.e. the path to the original location of the file that has been attached or imported while creating this version.
HyperDoc stores User Name of version creator and creation date.
The Description field allows you to describe the reason why the given version has been created.
HyperDoc keeps document files in system directories under system names, as described in sections below.
Document versions are created by attaching files or by importing files after editing done using external editing applications.
The Attach File… command in the File menu lets you choose a file for the current document.
Alternatively, the Attach from SuperView command may used after SuperView has been started by the Preview command.
SuperView lets you preview document files in the native formats (see description below) in their directories and choose the right one for the current HyperDoc document.
When issued from the pop-up menu of a right-clicked document in the Documents List window, both commands attach a file to that document.
HyperDoc manages document files stored in file system directories called Logical Devices. The notion of logical device was introduced to facilitate the management of files stored on different disk volumes and removable media. HyperDoc Administrator can define any number of Logical Devices. Three default Logical Devices are defined for each HyperDoc user:
import device - imported files are copied to this device unless otherwise specified
spots device – defines location where files with spots are created
redlining device - defines location where files with redlining are created
HyperDoc may also use so-called external devices. External device is a Logical Device with External attribute set.
When you attach a file to a document and this file is located inside directory tree of one of external devices,
then you are asked if you want to do a normal attach or external attach.
Normal attach copies files to the current import device. External attach leaves files where they are.
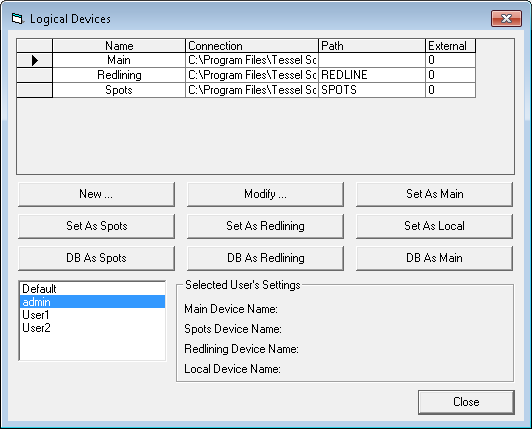
The Logical Devices command in the Tools/Options menu allows adding and modifying logical devices.
The directory name of a logical device is represented in two parts: connection and path.
It can be represented in the UNC (Universal Naming Convention) form.
When HyperDoc is started for the first time and there are no logical devices defined,
it creates three main devices according to the MainDocumentDirectory parameter in the [DM Settings] section of the HDoc.INI file.
Each user can have different default logical devices.
HyperDoc can handle document files in a variety of formats, scanned compressed data, vector CAD drawings, MS Office documents. The selection of available file formats depends on the version of HyperDoc, installed optional format libraries and other MS Windows applications.
Native file formats are those that HyperDoc displays using its own tools, which make it possible to provide integrated services like directly in HyperDoc’s windows.
Foreign file formats are those that HyperDoc displays using external applications, either in HyperDoc’s windows (in-place activation) or in external application’s windows. Depending on those applications features, services available to foreign file formats may be limited, and e.g. Redlining and ObjectOverlay may be not supported.
Document files are kept by HyperDoc as read-only.
All changes in the multi-user environment may be applied only to document’s Redlining and ObjectOverlay Drawings and
are controlled by users permissions defined by HyperDoc security system.
Modifications of document files must be done as editing by external applications that are either provided together with HyperDoc (like CADRaster or SuperEdit) or from other sources (like MS Office applications).
Editing of document files is always done using copies that have been explicit exported using Export command or created by the Edit File command.
The Edit File command creates temporary copy of document file and activates external applications. After finishing document edition new version is imported back to HyperDoc.
For explicit exported documents you have to use the Import command.
If you have used the Edit File command HyperDoc tries to detect closing edited document by external application and activate import operation.
It works with TSL applications CADRaster and SuperEdit or MS Office applications. Automatic detection is not always possible, e.g. HyperDoc cannot recognize when Notepad closes edited file.
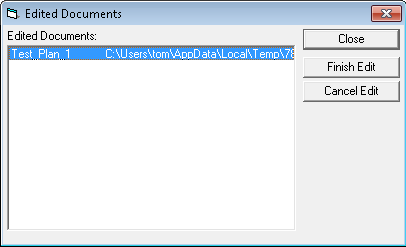
In such a case you should manually inform HyperDoc that edition has been finished using the Edited Documents dialog. The Edited Documents dialog allows you to cancel edition.
Document files under HyperDoc management never change - only an authorized administrator may delete them after replacing them by new versions.
Editing of document files is always done using their copies that have been exported to an external working directory.
Export may be done explicitly by the user from the Versions dialog or Document/Set menu,
or it is done automatically by HyperDoc while executing built-in Edit operations.
Versions that own the exported files are kept locked by HyperDoc until they are imported back to create new versions after editing.
Locking is done for editing purposes only and does not influence other HyperDoc operations, like navigation, viewing and redlining.
The Import command in the File menu gets the edited document files back to HyperDoc, creates new document versions for them and unlocks the previous versions.
Similarly to Export, Import is done automatically by HyperDoc while executing built-in Edit operations.
Redlining drawing is a drawing where user can place various annotations, markings and descriptions referring to document versions. Redlining drawing is created automatically for each version of document. The content of old versions’ redlining drawings is not inherited by the new version.
You can use any graphical entities for annotating and redlining purposes. Some special entities are predefined for dedicated use as follows:
Annotation is a framed text with an arrow connected to it;
Border is an empty red rectangular border;
Rectangle highlight is a transparent, yellow filled rectangle;
Polygon highlight is a transparent, yellow filled polygon;
Rectangle mask is an opaque, white filled rectangle with red dashed border;
Polygon mask is an opaque, white filled polygon with red dashed border.
You can place various kinds of annotations on specific layers created on demand inside the Redlining drawing. HyperDoc redlining has been implemented as multi-user facility. Named redlining layers may be created for private use by each user and for common use by users with appropriate permissions. Multi-user access to redlining layers is done without file locking, so that there are no delays or deadlocks, while the data integrity is preserved using advanced transaction-based technique.
HyperDoc (logical) documents are database records, so they may be searched for using familiar database queries.
Users and developers may create HyperDoc add-ins that implement arbitrarily sophisticated searching strategies.
Standard HyperDoc commands provide means of per-column sorting and searching for documents in the current Documents List
that contains documents from a domain defined by the selected mode and Navigation window status:
documents connected to marked objects, documents belonging to the current Document Set, or disconnected documents.
You can choose per column sorting or searching commands in pop-up menu activated by right mouse click at column header.
The Find Document dialog allows you search documents in All domains, independent from current domain displayed in Document List window.
While searching through the list in this way you may Ctrl+left-click at record selectors to highlight some documents and then include them to the Document Set.
Use Mark All in the Object menu. Choose the Drawings tab in the Documents List window.
Right-click at the Description column header and choose Sort Ascending in the pop-up menu. See that the documents get sorted accordingly.
Try Sort Descending for a change. Choose the Edit menu, and click Find… in the pop-up menu.
The Find Document dialog shows up as on screen below.
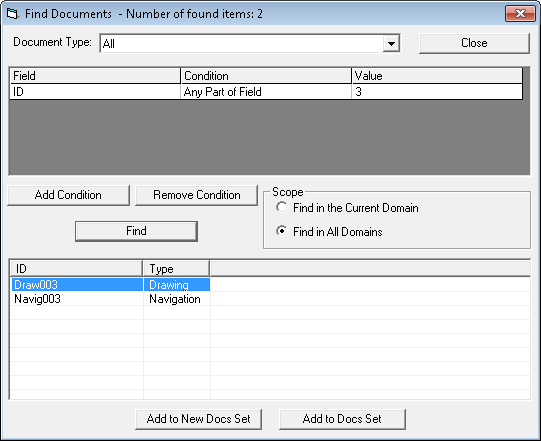
Fill-in Document Type:All, Field:ID,
Condition:Any Part of Field, Value:3.
Select Find in All Domains checkbox and Click on Find button.
The list will be populated with entry found documents with. Click on any to make it active and to jump to it in the Documents List.
HyperDoc provides tools to create and utilize visual information contained inside drawings and documents on the graphical entity level. Users may import or create graphical entities that represent, either symbolically or realistically, various objects of interest. Those may be visual references to other objects and documents, buildings marked on the background of maps, rooms outlined precisely for area measurement purposes, symbols and pictures of equipment for inventory control, anything that benefits from visual presentation. Graphical entities may be selected and manipulated, most interestingly they may be linked to database records and processed as information units. This opens endless possibilities for interesting applications.
HyperDoc creates two active drawings that are overlaid with every document: Redlining Drawing and ObjectOverlay Drawing (or Spots Drawing). ObjectOverlay Drawing is intended to maintain Spots. Spot is a graphical entity that has been linked to any object in the HyperDoc database. ObjectOverlay Drawing may contain many other entities, spots are only those graphical entities that HyperDoc is aware of and may use them in its functions.
Spots are created by HyperDoc users by importing or drafting graphical entities in the ObjectOverlay Drawing, and then by linking them to either documents or business objects in the HyperDoc database.
Hyper Link is a connection (link) between a spot and a document or an object in the HyperDoc database. It is used to provide a visual pathway from a spot on one document to another document or object. The same spot-object link may serve as both Hyper Link (when used for Hyper Navigation purposes) and as InfoScope Link (when used by InfoScope tools).
InfoScope Link is a connection (link) between a spot and an object. It is used to provide visual representation of HyperDoc database objects on the background of documents where the spots are defined. The same spot-object link may serve as both InfoScope Link (when used by InfoScope tools) and as Hyper Link (when used for Hyper Navigation purposes).
From the previous section we know, more or less, what to expect. Let’s try it now.
In the Navigation window click the NetMan’s (root) minus-sign icon to hide all hierarchy levels. Click also the NetMan’s document icon, so that the first navigation document is shown as in the picture below. (You can start anywhere, but this time let’s begin from the beginning).
The status bar at the bottom of the main HyperDoc window says that ObjectOverlay Drawing is active and its current layer is ADMIN.0 (layer 0 owned by the user ADMIN).
Click the red hatched area on the yellow shape of Sweden, so that it gets selected. The next box shows 1/1 that means that the currently selected spot has two links - one to a document and one to an object.

As advised by the lower note on the right side, double click the selected spot. This performs the Go to Object operation, i.e. it follows the object link defined for the double-clicked spot.
The hierarchy in the Navigation window gets expanded as needed to show the linked object Stockholm. The Documents List shows documents that are connected to Stockholm, a document marked as default (D) is made current and displayed in the HyperView window, as shown in the next picture. Incidentally it is the same map of Sweden as we have seen in the previous step, but another view is shown now, as it has been defined for this object using the Set Default View command in the Document menu.
Click the T2000 circle, so that it gets selected.
The status bar shows 0/1 meaning that the T2000 spot is linked to one object.
You might want to see what it is before going there, so right-click anywhere in the drawing and choose Show Links in the pop-up menu.
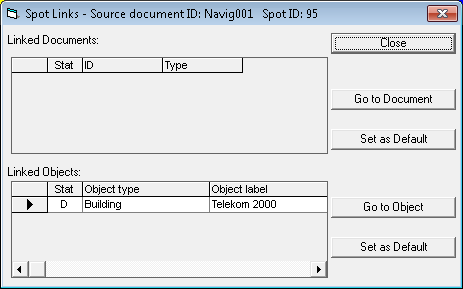
The Spot Links dialog shows the document and spot IDs in its title bar and displays Linked Document (none) and Linked Objects
(Building Telekom 2000) that were found in the database for the selected spot.
In the case of multiple linking this dialog would give you a possibility of deciding to which document or object exactly you would like to go.
Click the Go to Object button in order to follow the spot-object link. (This does the same as double clicking the spot.) The Telekom 2000 building location is shown on the background of a map of Stockholm, as shown in the next picture.

Double click the T2000 spot (polygon) on the Stockholm’s map.
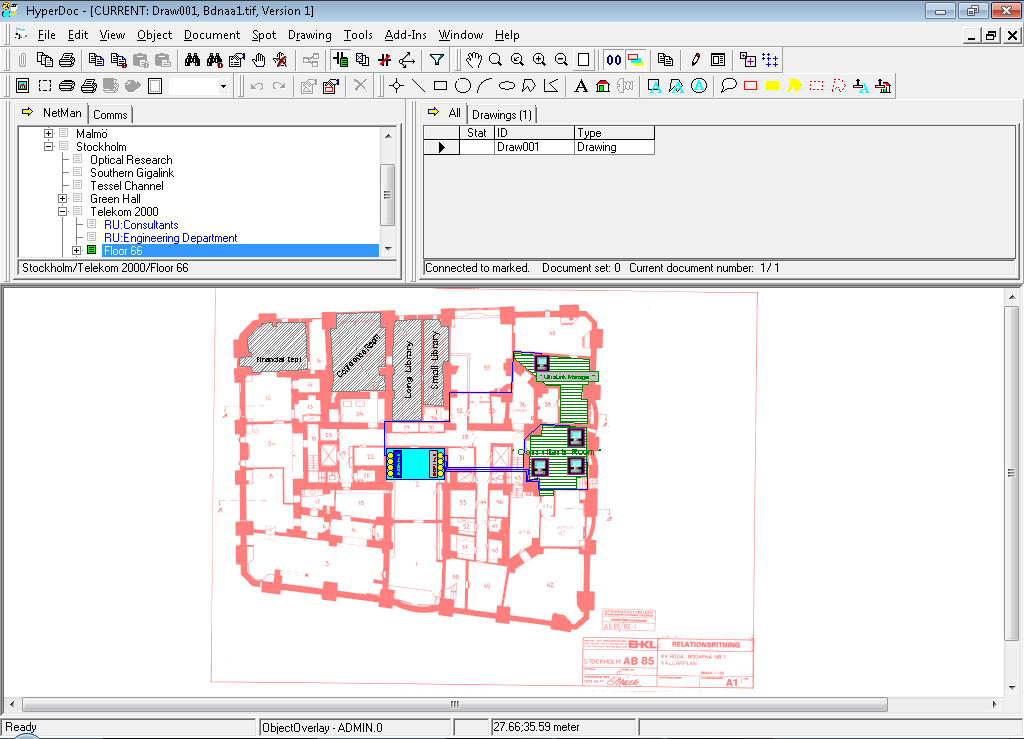
This hyperlinks us to the next object, Floor 66, shows it in the Navigation window and displays its drawing in the HyperView window.
Clicking at various objects presented on the background of the architectural drawing reveals that some of them are not linked to anything, e.g. polygons marking rooms in the left lower part of the drawing. Other entities, like horizontally hatched dark green polygons or symbols of computer equipment and cables, are further linked to objects in the database.
Double-click at the higher of the two green rooms.
This takes us over to the UltraLink Manager’s room that is made current in the Navigation window while its view is shown in the HyperView window.
More details about the room object may be shown by right-clicking at it and choosing Modify Room in the pop-up menu.
At any time, while hypernavigating as described above, you may go backwards. First make sure that no spot is selected - click at an empty place on the drawing to deselect everything.
Then right-click to get the pop-up menu and choose Back, if you want to go back along the chain of links that you have just traveled, or Up, if you want to go to an object one level up in the hierarchy.
Try to explore this demo database and see what other spots, objects and documents are linked together. You may, of course, add your own documents and data to make it more interesting.
When trying Hyper Navigation we have already used links to objects under the document level, i.e. to graphical entities contained inside ObjectOverlay Drawings. Functions and presentation methods different from Hyper Navigation are often necessary, depending on particular application needs. Very often HyperDoc spots are best interpreted as graphical presentation of objects represented on the background documents. Spot-object links are in such situations used to provide important two-way connection between visual representations and database objects.
InfoScope tools have been designed to provide an additional visualization of relations between spots on the drawings and objects in the database.
Both human users and computer applications tend to organize the objects they deal with in manageable sets. HyperDoc lets you define sets of objects that belong together for whatever reason, if it is only that they are of interest to you at the moment.
Suppose that you want to find out about all equipment that is called workstation something, including drawings on which it is marked in one way or another.
Right-click inside the Navigation window and choose Find Objects… in the pop-up menu.
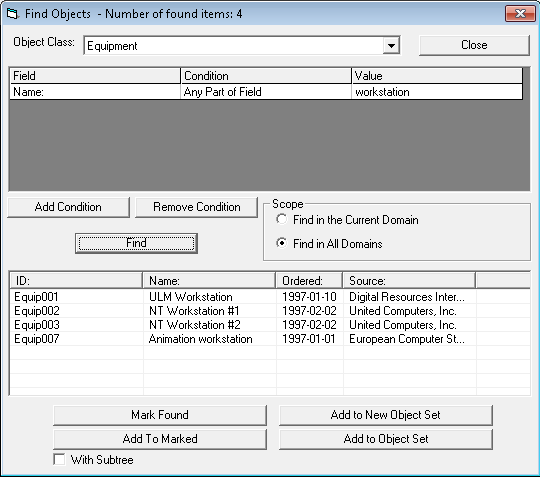
Choose Object Class: Equipment, Field: Name,
Condition: Any Part of Field, Value: type workstation.
Then click Find button.
Next, press Add to New Object Set button. This creates new Object Set with documents found.
HyperDoc inserts small arrow icon at front of each matching object in the Navigation window to indicate the members of the current Object Set.
You may also add objects to the Object Set by finding them one by one, right-clicking each one and choosing Object Set/Add in the pop up menu.
In order to find objects that belong to the currently open Object Set, you may use the Object/Set/First-Next-Previous-Last menu commands.
Choose Object/Set/First and see in the Navigation window that Animation workstation has been made current.
Click the document icon to the left of this object name, so that it gets selected and marked with green color.
The Documents List window should show the record of contract Quot001, and an Excel sheet representing the document itself should appear in the HyperView window, as in the next picture.
You may create heterogeneous object sets, simply by adding different kinds of objects to the same set, e.g. for grouping together workstations and cables.
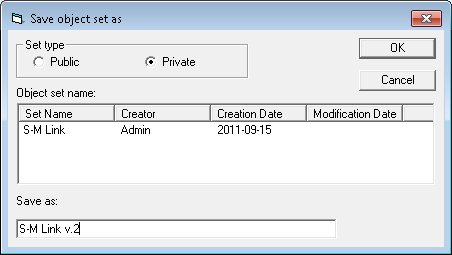
You may save HyperDoc Object Sets under specific names. Choose Object/Set/Save 'Unnamed' and type "Workstations" in the Object set name box of the Save object set as dialog.
Please notice that you may save object set either as Public, to be accessible to all HyperDoc users, or as Private,
to be accessible only to its creator.
Object InfoScope shows those database objects that belong to the currently open Object Set together with their parent objects in the navigation hierarchy. It indicates which of those are linked to spots defined on HyperDoc documents and handles two-way linking between spots and objects. It is called Object InfoScope because its content is determined by Object Set members and does not change when you simply browse through the Navigation window. Object InfoScope looks into the documents for graphical presentation of a predefined set of objects.
Choose the Object InfoScope function in the View menu. The InfoScope window opens and shows the Object Set members (marked by arrow icons) and their environment in the hierarchy, as in the next picture.
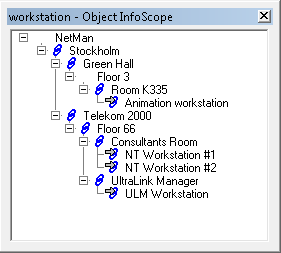
In order to find a document that presents ULM Workstation simply click it in the InfoScope window. HyperDoc finds the correct document, synchronizes the Navigation window to show the object that is connected to it, and displays an appropriate view in the HyperView window.
Redchain icons in the InfoScope window indicate all objects that are represented on the current drawing. Clicking ULM Workstation in the InfoScope window highlights it there and selects its spot (linked graphic entity) in the drawing. Clicking a spot in the drawing selects it and, if it is linked to an object in the InfoScope window, highlights its linked object.
Bluechain icons in the InfoScope window indicate all objects that are represented on drawings other than current.
The way InfoScope acts while looking for appropriate drawings and displaying its view is controlled by two options: Autoshow document and Autozoom spot.
When the Autoshow document option is checked, InfoScope automatically finds a document attached to the clicked object or to its closest ancestor in the currently active hierarchy,
such that the clicked object is represented on it.
Otherwise, you must right-click the object and use the Show document command.
When the Autozoom spot option is checked, automatically shows a zoom window presenting the clicked object, when no default view is defined for it.
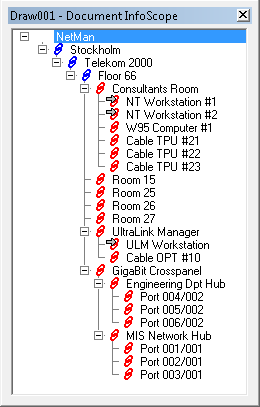
Document InfoScope works similarly to its Object cousin, but the content of its window is defined as objects that are linked to spots contained in the current document. Additionally the upward neighborhood in the hierarchy is also displayed. It means that the contents of the Document InfoScope window changes dynamically as you browse through HyperDoc documents. Document InfoScope looks into the documents to find all database objects that are linked to their spots.
Choose Document InfoScope in the View menu. Click at document icons of various objects in the Navigation window and see how Document InfoScope shows all objects that are linked to spots in those documents.
You may activate both Object and Document InfoScope windows simultaneously and get an unusually reach insight into relations between navigation objects, documents and database objects represented on the background of the drawings.
Object Sets would be normally used to create groups of objects from the Navigation hierarchy, often not homogeneous, i.e. possibly crossing hierarchy levels. In order to represent object sets in the Navigation window, you may create Anchor objects that are regular Navigation hierarchy members, to which any Object Sets may be freely attached. Right-clicking Anchor Objects opens Object Set menu that contains Open attached, Attach here and Detach functions. Anchor Objects are displayed in blue in the Navigation window when an Object Set is attached to them.
Demonstration database NetMan contains two kinds of Anchor Objects: Communication Links (prefixed by CL:) and Rental Units (prefixed by RU:).
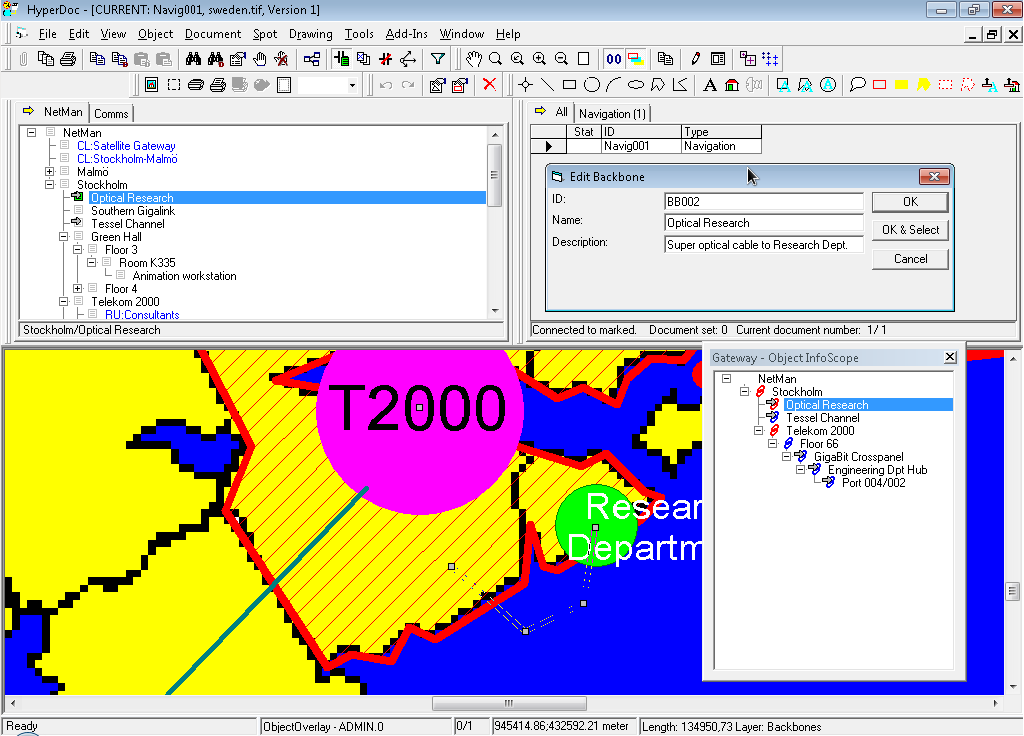
While having the Object InfoScope window open, find and click blue CL: Satellite Gateway right under the NetMan root node.
Providing that the Dynamic Object Set option is checked (default), the attached Gateway Object Set will be opened and its structure presented in the Object InfoScope window.
Click Optical Research in the InfoScope window to see the presentation of this Backbone Cable on the map. Then, right click at it and choose Backbone Properties... in the menu. This will show the Edit Backbone dialog with this object's record from the database.
Explore other Object Sets by clicking at their Anchor Objects in the Navigation window: CL: Stockholm-Malmö, or RU: Consultants and RU: Engineering Department right below Telekom 2000.
HyperDoc shows its real power and flexibility when it is integrated with specialized database applications. Acting as an autonomous graphical subsystem HyperDoc provides resources and tools for graphical instrumentation that enhances handling of various business processes that may benefit from integrated access to photographs, maps, drawings and other documents. Drawings and other documents assume active functions in those processes, as HyperDoc’s integration tools allow for two-way communication with database applications. Drawings, and their entity-level contents, may be used for database-controlled presentation of selected information and, acting in the opposite way, they may be used for graphical selections that control the database activity.
HyperDoc can be configured to associate graphical representation parameters with an object class. You can for example define that rooms will be represented as polygons filled with green and fire extinguishers will be represented with special icons of desired size. To manage such parameters you can use two commands available in HyperDoc Configuration Manager popup menu for object class: Representation Parameters and Delete Representation. With the first one you can define various graphical representation parameters for given object class as described below. The second one deletes representation options for given object class.
Entity type
Entity type is a type of vector entity, representing object of given object class as a spot on HyperDoc drawing. Entity type can be selected as one of the following:
point
line segment
polyline
rectangle
polygon
circle
ellipse
circle arc
icon
block insert
Layer name
Name of vector layer inside Object Overlay, where spots representing objects of given object class will be created.
Selection prompt
Prompt displayed in HyperDoc status bar when the user is asked to select spot representing object of given object class.
Creation prompts
Prompts displayed in HyperDoc status bar when the user is asked to click one or more points defining position of new vector entity representing object of given object class.
Icon parameters
If selected entity type is icon, then you need to enter icon file name and icon size.
Insert parameters
If selected entity type is an insert then you need to enter block name. This block should be present in the drawing you create the insert in. If it is present in the Stamps.TVD file currently used by HyperDoc, then it will be copied to all new drawings on attaching them to HyperDoc.
HyperDoc user interface is not just a modern look but rich environment with customization possibilities. HyperDoc administrator can assign each user or a group of users different subsets of HyperDoc huge command list. Related commands are grouped in toolbars. Toolbars can float or they can be docked by each side of the main HyperDoc window.
HyperDoc administrator can enter customize mode with Customize command available in the Tools pull-down menu or in the popup menu that is shown
after right mouse clicking on the free area on the main menu bar or on any toolbar handle.
In customize mode you can move menu items around with drag and drop.
You can delete them by dropping them out of a menu or a toolbar. To customize popup menus use Customize Popup Menus toolbar visible in Customize Mode.
You can switch toolbars on and off. With Customize form you can manage UI profiles:
create new ones, save them to DB or file, load them as current from DB or from file and assign them to users or groups of users.
You can drag command tools from the Commands page of the Customize form and drop them on menu bars or toolbars.
On startup HyperDoc loads UI profile assigned to the current user. If no profile is assigned to the current user, HyperDoc loads profile assigned to a group, which the current user belongs to. If there is no such profile, then one of two predefined profiles is loaded: from Admin.tb2 file for a HyperDoc administrator and from User.tb2 file for an ordinary user. UI profile stored in DB can be common for several users. However, each of them can have his individual UI tools layout stored automatically in temporary directory on a local disk.
To use UI customization capabilities you must have database in a new format, i.e. containing two new tables: HDocProfiles and HDocUserProfiles. HyperDoc Administrator utility program can create these tables.
HyperDoc user interface elements are: pull-down menus, popup menus and toolbars. pull-down menus are accessible from the main menu bar. Main menu bar is initially on top of HyperDoc main window just below the title bar of this window. Main menu bar can be dragged down: between toolbars. HyperDoc toolbars are of two kinds: toolbars containing command buttons and toolbars containing major HyperDoc user interface elements: Navigation Window, Document List and Infoscope Windows. Any toolbar can be docked or can float over the main HyperDoc window. Sample profiles that come with standard HyperDoc installation contain following toolbars:
General, Navigation, Object Set, Document Set, HyperViewer View, HyperViewer Print, HyperViewer Edit, HyperViewer Drawing, Navigation Hierarchy, Document List, Vector Snap, Document Infoscope, Object Infoscope and Multipage Support. There are following popup menus: Objects Popup, Documents Popup, Multi-Documents Popup, Documents Sort Popup and Infoscope Popup.
HyperDoc standard installation contains two user interface profiles stored in Admin.tb2 and User.tb2 files. By default the first is used by HyperDoc administrators and the second – by ordinary users. This behavior can be changed with Customize form commands.
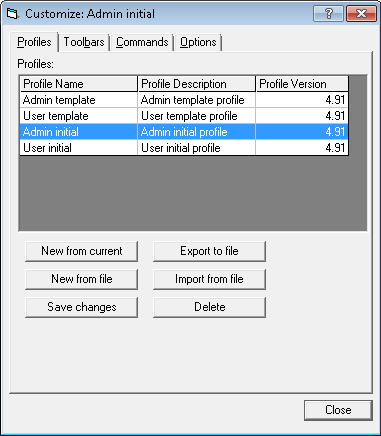
Customize form has four tabs: Profiles, Toolbars, Commands and Options. The last three are like in Customize dialog in many common software applications and programs with user interface customization capabilities. The first tab, Profiles, needs some explanation. There are two grids on it. The first grid contains a list of user interface profiles stored in database. The second grid contains a list of HyperDoc users and database groups or roles. Initially there are four profiles. They are created and their contents is copied from disk to database, when the Customize form is shown for the first time. Admin.tb2 file is copied as contents of admin template and admin initial profiles. User.tb2 file is copied as contents of user template and user initial profiles. Two profiles: admin template and user template are read only. They can be used to create other profiles with the Save As… command. Admin initial and user initial are sample profiles for HyperDoc administrator and a general HyperDoc user respectively. They can be modified.
Here is a list of command buttons available on the Customize form. To understand them it is important to distinguish between current profile and selected profile. Current profile is a profile currently used by HyperDoc user interface. Selected profile is a profile, which is currently selected in the Profiles grid.
Load - loads as current the profile, which is currently selected in the Profiles grid
Save - saves current profile as the profile, which is currently selected in the Profiles grid
Save As - saves current profile as new profile with selected name
Import - loads selected file with tb2 extension as current profile
Export - saves current profile to selected file with tb2 extension
Delete - deletes the profile, which is currently selected in the Profiles grid
Assign Profile - assigns the profile, which is currently selected in the Profiles grid to a user or a group or a role currently selected in the Users/Groups grid
Clear Assignment - clears assignment of a profile to a user or a group or a role currently selected in the Users/Groups grid
It comes with the territory. HyperDoc has been positioned as an application and a toolbox for integration of composite documents with various database applications. It simply means that it had to be developed as a highly customizable piece of software. HyperDoc may be customized in a number of ways, depending on its particular application needs. In the order of growing complexity those are:
defining database tables and fields for business objects and documents,
defining business objects hierarchies,
defining business object sets and their Anchor Objects,
defining printing templates, stamps and other symbol libraries,
using OLE Automation API to control HyperDoc from external databases,
developing HyperDoc add-ins to perform customized database and document management functions,
using OLE Automation API to implement two-way communication with external databases.
The first four levels may be implemented without any programming and remind to a large degree configuring any other database application. More advanced integration may require some programming, but this is normally done in Visual Basic in easy object-oriented way.
More details on customizing HyperDoc you may find in HyperDoc Configuration and Integration Manual.
HyperDoc demo database contains reference to sample add-in, which demonstrates measuring areas of spots connected to the current object set members.
The sample add-in adds a new command Measure Object Set to HyperDoc Add-Ins menu. The hierarchy definition in demo database is extended with additional information for each object class.
The spot area connected to the object of given class can be added, subtracted or skipped from the computation. The result of the computation is displayed in the 'Total area' field on the Measurement Result dialog.
When there is no spot for one of the objects from the object set or the spot is placed on a different document the object is not included in the computation.
