HyperDoc Online user interface consists of four panes (Hierarchy Pane, Object Properties Pane, Document List Pane and Document View Pane) shown in the main browser window. Some operations are performed in additional windows shown on request.
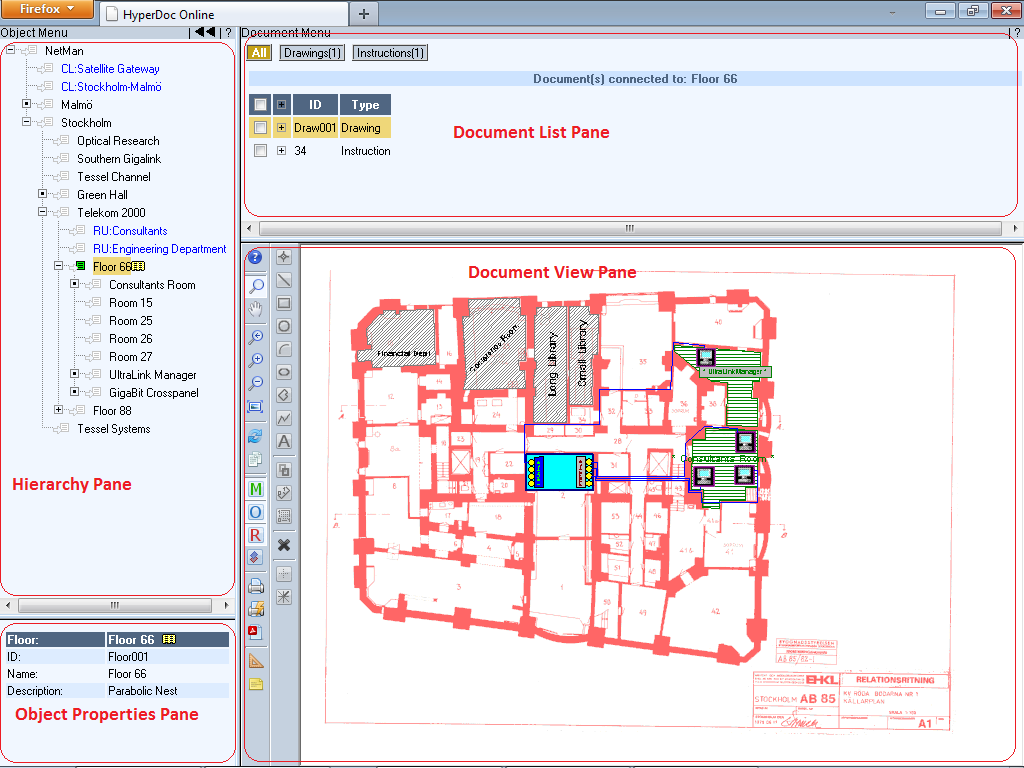
The hierarchy pane displays a hierarchical tree of business objects. The tree defines document management structure that reflects your business-specific needs. You can navigate through the tree to find a given object. Click on the object label to make the object current and display list of documents associated with the object and attributes of the object. You can also click the document icon, located on the left side of the label, to make the object current.
There is a menu bar Object Menu at the top of the hierarchy pane. When you left-click on it, hierarchy pane menu appears. This menu commands are described below.
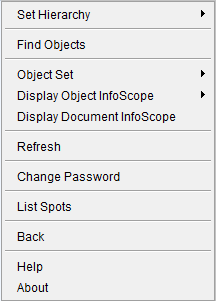
Set Hierarchy command located in the hierarchy pane menu allows to select what hierarchy of business objects is displayed in the hierarchy pane. The same hierarchy is used in InfoScope windows, for hyper-navigation (see the section called “Hyper-Navigation”) and to determine object type list in newly opened Find Object window.
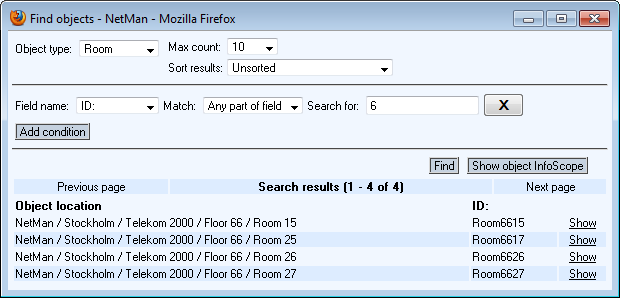
Selecting Find Objects command from the hierarchy pane menu shows a form where you can enter search criteria for objects.
You can find objects only from the current hierarchy. Available object type list shows only types from the current hierarchy.
To find objects enter search criteria in the object search form and press the Find button or the Show InfoScope button.
If you press the Find button, a list of objects meeting specified criteria is shown at the bottom of the form. You can limit the number of entries shown on a page by setting Max Count. Press the Show button next to the object description to show this object in the hierarchy pane.
If you press the Show InfoScope button, InfoScope window is displayed with all objects meeting specified criteria marked with arrows. See the section called “InfoScope” for details.
Object set is a subset of the main hierarchy. It provides a base for object InfoScope (see the section called “InfoScope” below).
Objects that belong to the object set are marked with a small gray icon (an arrow) visible in the hierarchy tree (to the left of the object label). You can click this icon to add object to the object set or remove object from the object set.
You can also populate the current object set with the following methods:
loading an object set saved in the database and attached to some object,
loading a named object set saved in the database - from InfoScope window,
showing search results in InfoScope.
See HyperDoc manual for more information about object set handling.
The menu items for Object Set are:
Add Object
This command adds a currently selected object to the current object set. Another way of adding a single object to an object set is to click an appropriate icon placed before the object name. In the object InfoScope window, and the hierarchy window icons depicting a gray chain, and a light-gray arrow respectively are used.
Remove Object
This command removes a currently selected object from the current object set. Another way of removing a single object from an object set is to click a dark-gray arrow symbol placed before the object name. This function works in both hierarchy and object InfoScope windows.
Clear
Clear command removes all objects from the current object set.
An object might have an object set attached to it. Objects possessing
this feature are marked in the hierarchy tree by a different font color.
If the current object belongs to the kind, it is possible to load an object set
attached to it, that is to replace current object set with a pre-defined one.
If the os_auto_load option is set to true
(this is its default value), then an object set connected to the current object
is loaded automatically (if any) when current object is changed in the hierarchy
pane. If the os_auto_load option is set to false
you can load object set attached to the current object with
Open Attached command.
InfoScope windows display links between objects and spots. There are two types of InfoScope windows: Object InfoScope and Document InfoScope. You can display them with Document InfoScope and Object InfoScope commands respectively - both available in a hierarchy pane pull-down menu. You can view both InfoScope windows simultaneously.
Object InfoScope window displays objects from the current Object Set. The contents of the Object InfoScope window changes as you change the contents of the current Object Set or make other Object Set the current one. Document InfoScope window displays objects that have links to spots on the current document. The contents of the Document InfoScope window changes as you make another document the current document.
In both Object and Document InfoScope windows there are also displayed those branches of object hierarchy that are necessary to show the relevant objects.
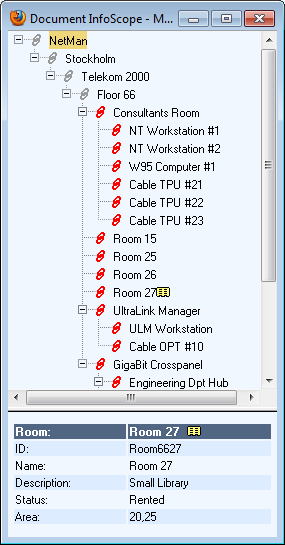
There are special marks to the left of the object name, which give additional information about objects shown:
red chain - this object has a link to a spot on the current document,
blue chain - this object has a link to a spot on a document different than the current document
arrow - this object belongs to the object set - the current object set for Object InfoScope or set of objects having spots on the current document for Document InfoScope.
When you position a mouse cursor over a spot, an object linked to this spot is shown in gray in currently visible InfoScope windows (if any). If you keep mouse cursor over this spot for a little longer time, linked object properties will be shown at the bottom of visible InfoScope windows (if any).
When you position a mouse cursor in Infoscope window over an object linked to a spot on the current document, this spot gets selected. If you keep mouse cursor over this object for a little longer time, its properties will be shown at the bottom of InfoScope window.
When you click an object marked with a red or a blue chain in InfoScope window, relevant document is displayed zoomed around spot representing clicked object. In the main hierarchy an object connected to this document is selected. If there is more than one such object, then this one is selected, which is closer in hierarchy tree to the clicked object.
Display Object InfoScope command shows an additional window, containing an object set based InfoScope tree. On top of the window there is a combo-box with a list of object sets saved in HyperDoc database. To load a saved object set, choose the set name from the combo-box.
Navigating in the InfoScope tree works differently from the main hierarchy tree. Clicking an object name in InfoScope tree causes HyperDoc Online to focus on a spot connected to the object. This may require switching to another object in the main hierarchy and changing current document.
Display Document InfoScope command shows an additional window, containing a document InfoScope tree. The tree consists of all objects linked to spots on a currently displayed document and additional nodes connecting them to the root. The appearance and navigation rules of document InfoScope tree are the same as for Object InfoScope.
Object Properties pane is located below Hierarchy pane.
If you keep mouse cursor over an object for a while or select it by clicking in hierarchy pane this object properties will be shown in the Object Properties pane pane under the hierarchy pane.
You can select text that is displayed in this pane with your mouse and then use keyboard shortcut CTRL+C to copy text to your clipboard.
The document list pane shows a list of documents associated with the current business object. You can show All documents or documents of selected type only.
At the top of the document list pane there is a menu bar. When you left-click on it, document list pane menu appears. This menu commands are described below.
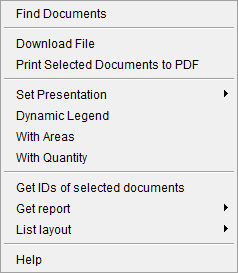
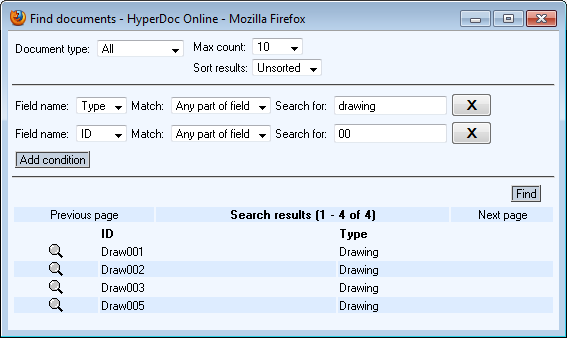
Selecting Find Documents command from the document list pane menu shows a form where you can enter search criteria for documents.
To find documents enter search criteria in the document search form and press the Find button. List of documents meeting specified criteria is shown at the bottom of the form. You can limit the number of entries shown on a page by setting Max Count. Press the magnifying glass icon before the document description to show this document in the document list pane and the document content in the document view pane.
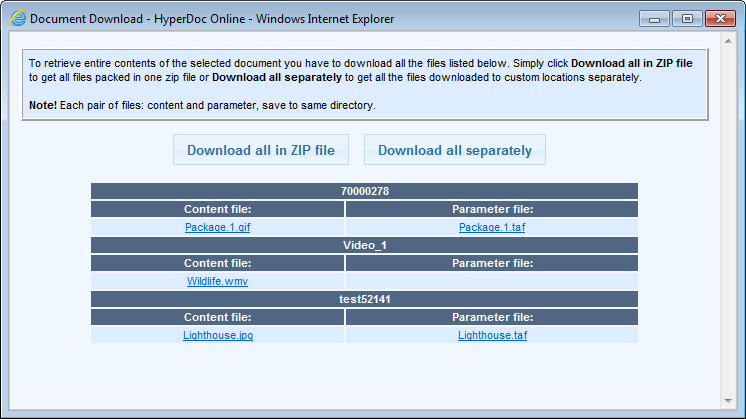
You can download document content to work with the document off-line. To do so, use Download File command. A separate browser window is shown, containing a list of files that are necessary to recreate the document off-line.
It is possible to download multiply files/documents in HyperDoc Online just by clicking single button.
The Download File dialog has two buttons:
Download all in ZIP file - your browser will download all documents you have selected packed as a ZIP file (default name is
download.zip).Download all separately - you will be asked to open/save/cancel for each documented selected to download.
Additionally, downloaded package will have report.txt file with any errors that were encountered during download if any.
Note
.NET Framework 3.0 or 4 is required on server machine.
Caution
Downloading multimedia files on BLOB Databases (non standard) may not work properly. See the section called “Blob Databases - streaming and downloading multimedia files.”
Warning
There are problems with seeing some downloaded files using Download to ZIP option. This problem relates only to document that have special characters in their ID (like &, /, \, # etc.).
After downloading .zip file, Windows Explorer (if you browse this zip file) won't show files with special characters in their ID. They will be invisible. But they will be downloaded. You could still see them or extract them by using 3rd party tools.
This option invokes printing to PDF operation for each document selected on document list (at least one doc has to be selected).
Important
Printing is done for each document selected using parameters defined for QuickPrintToPDF button.
External documents selected are downloaded in their original file formats just as they were added. Logical documents are omitted.
Note
Please remember that, each document is downloaded to user computer according to browser settings - just as any other file on Internet is.
You can highlight different spots with different colors according to properties of business objects represented by these spots. The set of administrator defined colors and corresponding object conditions is called a presentation. The Set Presentation command allows to select one of predefined presentations or none. When a presentation is active, legend is shown in a separate window. It contains colors used by the presentation with description of their meaning. If you use appropriately prepared print template, legend can be visible on the printout.
You cannot permanently define presentations with HyperDoc Online. See HyperDoc manual for more details on defining presentations.
You can however create a temporary custom presentation using Filter Creator Add-in described in the section called “Usage”.
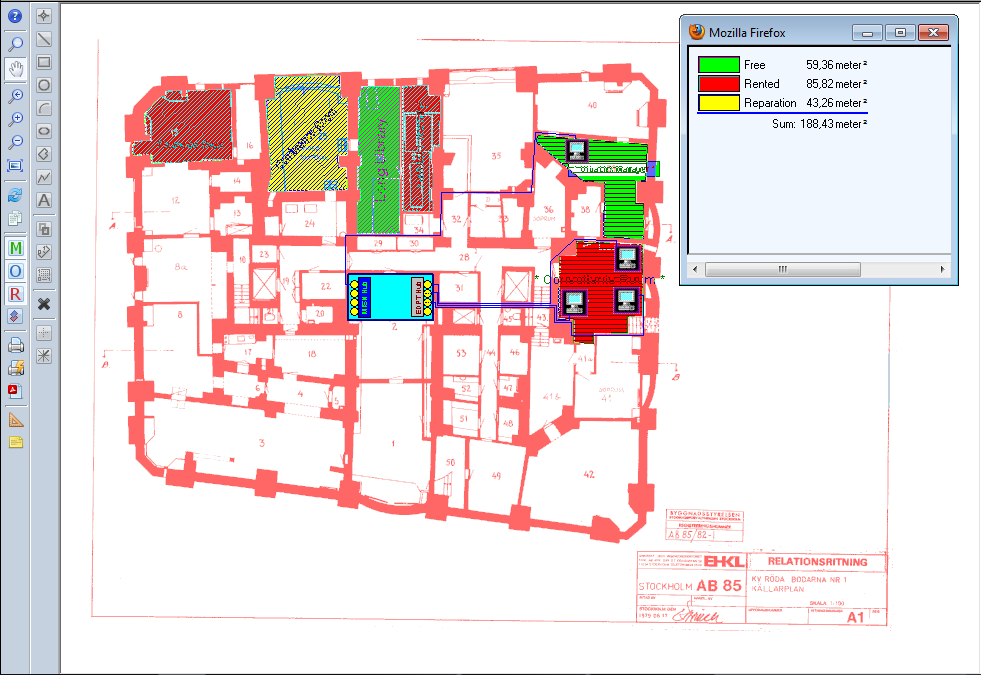
When you have presentation active you can check additional functions from menu, those are:
Dynamic Legend
When this option is checked, the presentation legend will show only those colors that are present on current document.
With Areas
Ads information about object areas to the presentation legend. Using it disables option With Quantity.
With Quantity
Adds information about quantity of spots (per type) in object to the presentation legend. Using this disables option With Areas.
This function copies IDs of currently selected documents (those with checked check-box) to your computer clipboard.
You can then paste them anywhere, just like standard text.
Creates a report of currently selected documents containing available information on them.
This report can have a form of:
HTML page with layout similar to HIS.
XML data.
The document view pane shows a content of the document highlighted in the document list pane. On the left side of the pane a double toolbar is displayed. The right side of the pane may contain a control panel that lets you perform various activities on the document.
Up to three vector drawings can be displayed together with the document. There are:
Redlining drawing, that contains some extra remarks and annotations made over the original document,
Object Overlay drawing, that contains spots with a hyper-links stored in them (see the section called “Hyper-Navigation”),
Measurement drawing, that you can use to write down results of a length, perimeter or area measurements of pointed objects.
The first two drawings are saved in the database, the third one is a temporary drawing created on the client side, but it can be printed out as well as the rest of them.
The document view pane can be in one of the following modes:
Jump (Hyper-Navigation) mode - when you can jump to the other database objects, documents and drawings - see the section called “Hyper-Navigation”,
Print mode - when you can define various parameters of printing process, inspect them and perform printing - see the section called “Printing”,
Measurement mode - when you can define various spots and measure its lengths, perimeters and areas - see the section called “Measurements”.
The default mode is the Jump mode. It means that to switch to any other mode you have to click a specified button on a toolbar, which becomes pressed. After depressing this button (by clicking it again), you close the mode and return to Jump mode. Any mode can be closed by opening another one.
For information describing Toolbars button refer to Chapter 2. of HIS Manual, the section called “Toolbars”.
HyperDoc can store so called native documents (based on mainly scanned or rasterized drawings) as well as so called foreign documents of various types (Office documents, PDF files, DWG/DWF drawings, SVG pictures, plain text files, any URL pointed resources, multimedia files and other of any type).
Foreign documents cannot be rendered by HyperDoc natively but are passed along to associated program to display it.
Note
Please note that due to various possibilities of different browsers with different configuration regarding user security and installed plugins, actual user experience in handling foreign documents may vary.
Below you can see screen from HyperDoc Online - take a look at Document View Pane. As you can see it differs from the one you see while opening native documents.
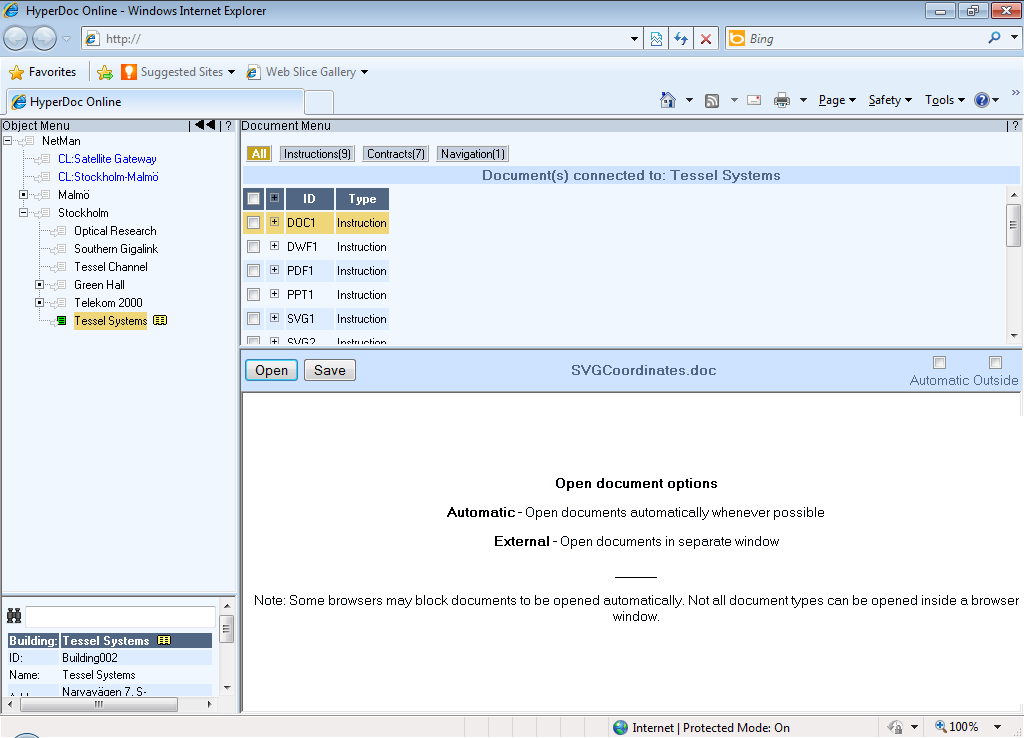
On top of the Document View Pane there is a Title bar. It contains: button Open and Save, original file name attached to the document and two checkboxes Automatic and External
Button Open tries to open (load) foreign document directly in viewer frame (or in external window depending on your configuration - read below). Depending on browser configuration, document content can be opened directly or after additional confirmation in separate dialog displayed by browser. If browser cannot open foreign document natively or using installed plugins, separate dialog is displayed by browser that allows to open document using associated application or standard application used to open those kind of documents is being launched.
Button Save allows to save (download) document content directly on your disc. Depending on browser configuration, downloading can start immediately or after additional confirmation in separate dialog displayed by browser where you decide to open document in associated application, instead of saving. If system doesn't have appropriate application associated with given document type, separate dialog will be displayed by browser that helps to find suitable one.
Check-box Automatic forces Open action to be started immediately after choosing document from document list. This is default setting; to avoid waiting for downloading large documents, user can switch Automatic check-box off and open documents on demand using Open button manually.
Note
In some situations depending on browser type and configuration, automatic opening cannot be forced due to potential security reasons. In this case, user has to activate Open action manually.
Check-box External forces document content to be directed to external browser window instead of internal viewer frame. It is possible to open several documents displayed in external windows concurrently. Changed setting of External check-box will be used in next Open action. To switch target of currently opened document, click External check-box and then Open button to re-open it again.
The default combination of this check-boxes can be controlled by parameters defined in [Configuration]section in INI file:
foreign_document_autoopen
Select between
trueorfalseto set if foreign documents should open automatically.foreign_document_external
Select between
trueorfalseto set if foreign documents should open in external window.
It should be noted, that MS Office documents could be opened directly in Internet Explorer 7.0 browser using MS Office plugin. However, behavior of such arrangement is found not to be stable, especially when trying to open the same document in several external windows concurrently. To avoid potential problems that can lead to browser hangs, MS Office documents are passed directly to external application when opened. It should be noted that the same behavior is presented by higher Internet Explorer versions and other popular browsers as well (FF, Chrome, Opera).
Each user can only download (stream) only one video/music at a time but many users should be able to stream/download same video at the same time.
Important
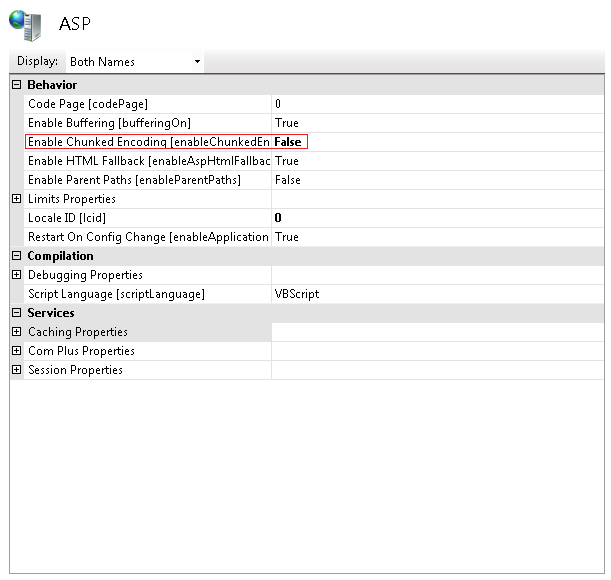
To improve downloading / streaming please disable HTTP 1.1 chunked transfer encoding in IIS configuration.
To do so please go to Internet Information Services (IIS) manager and configure properties for ASP application.
Warning
Please note that in BLOB databases there is a problem with streaming external documents to many users in the same time. On standard DB many users at once, can stream/download same documents but in case of BLOB DBs it's not possible.


