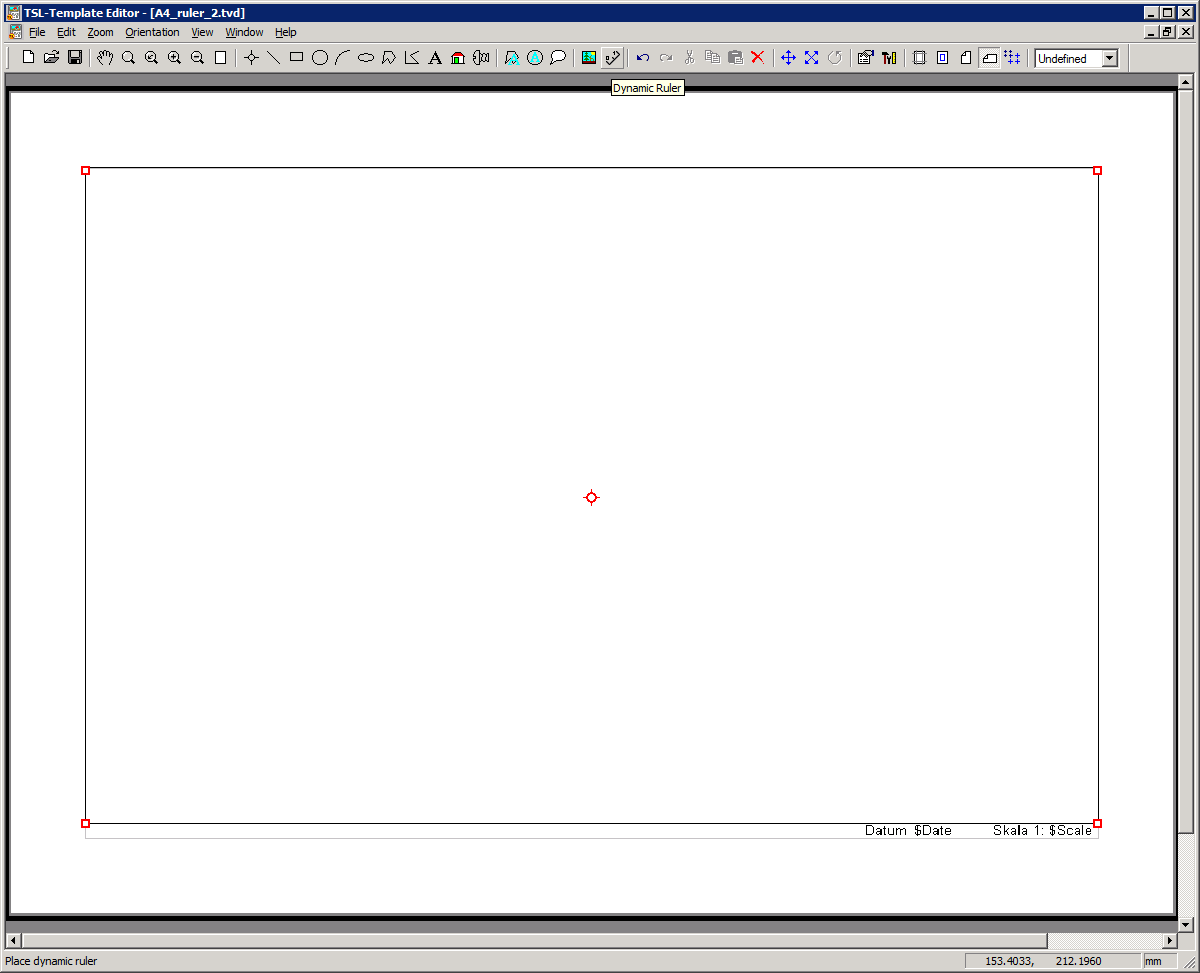
Image window is a viewport placed within the printable area on the sheet of paper. It is presented as a rectangle frame with blue borders. SuperEdit prints document content inside image window. There can be more than one Image window defined in one template. In SuperEdit print preview mode you can assign which documents should be printed in particular image windows. You can define Image window parameters with Image Parameters command.
You can start drawing an image window by calling the Image Window function in the Edit pull-down menu, or pressing the Image Window toolbar button. Define the rectangle where you want a view of the drawing is to be placed on paper.
Several additional parameters may be associated to image window. You may set them in the Image Parameters dialog.
Warning
Please do not create templates with more than 4 Image Windows. In case of such templates there is a risk it wont work with HyperDoc/HyperDoc Online.
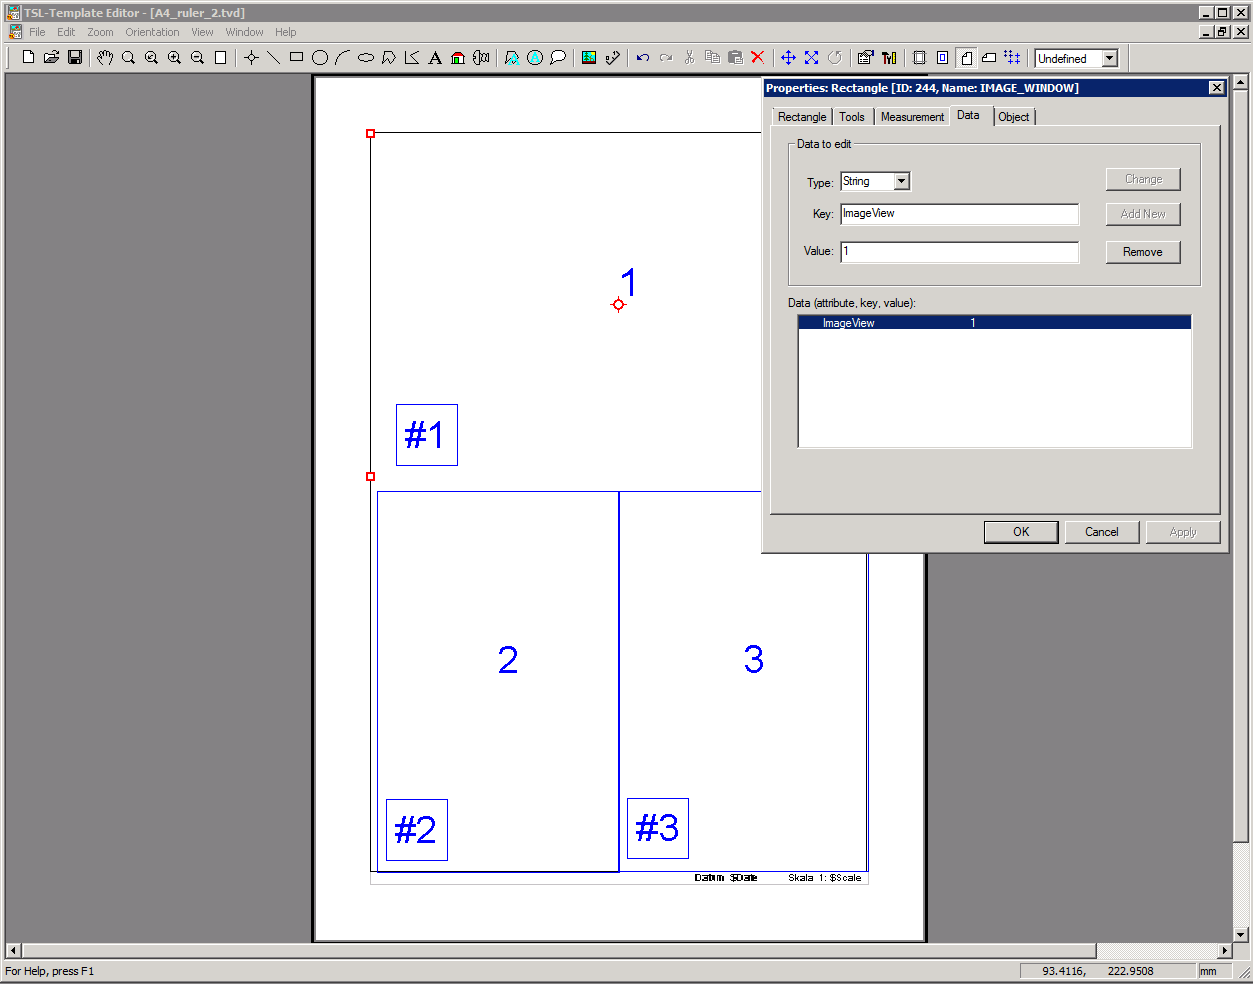
To give each Image Window it's order number click on it with Right Mouse button and then on Entity Properties.... Choose Data tab and add following data:
Type: all of options here should be fine (preferably String),
Key: type
ImageView,Value: type number of this Image Window (1, 2, 3 or 4).
Next click Add New button and apply the changes.
Important
When adding additional Image Windows, Template Editor will automatically add parameters ImageView with concurrent
Value number to new Image Windows and to an existing ones (if they do not have this parameters already).
You may invoke the Image Parameters dialog with Image Parameters command in the Edit menu or by pressing the Image Parameters toolbar button. It allows defining following parameters:
Scale – it is the default scale used to present printed document inside Image Window;
Fit to image window – when this option is switched on, then by default printed document will be scaled to fit to Image Window;
Print frame – allows controlling if Image window frame is going to be printed;
Hide image – allows not to print document shown in given Image Window.
Default Scale
You may set individual value of default printing scale for each image window, choosing between automatic fit or predefined fixed settings. Starting values are taken from the Page setup settings. These settings may be changed and adjusted during printing.
Print Frame
You may want an image window border to be printed together with its contents or not. Check appropriate box in the Image Parameters dialog or choose the Print frame option in the pop-up menu activated with the image window selected. This setting may be changed during printing.
Hide Image
You may want to temporarily disable displaying and / or printing the contents of the document within the image window. Check appropriate box in the Image Parameters dialog or choose the Hide image option in the pop-up menu activated with the image window selected. This setting may be changed during printing.
When two Image Windows are overlapping in Print Template, the common part will become empty white space. When a user needs one big Image Window with a smaller "preview / overview" window, the only way to make it work is to place another image window on top.
Controlling this parameter in Template Editor is one of three ways - settings this parameter overwrites any other settings (which are general) for this specific template.
This parameter is set by choosing proper option from dropdown menu.
This will only influence specific template and will overwrite general settings but only for this specific template.
If you choose option Undefined template will use parameters from INI file - DefaultVportsOverlapMode in section [TSLRVC Library Settings]
or from Advanced tab of HyperDoc Option dialog - parameter Fill/clear overlapping viewports.

Tip
You can set this parameter different for both orientation: Landscape and Portrait.
You may place any other vector entities like additional frames, text headings, descriptions and other elements as desired to complete the page layout for each orientation. Use appropriate functions in the Edit menu or toolbar buttons in the Edit group.
All elements of the page layout may be changed, completed or redefined as long as you are in SuperEdit print preview mode. These changes will affect only the current printing job and will not be saved. To modify drawing templates permanently, you have to change them using Template Editor.
Option Dynamic Ruler is available to use from toolbar and Edit\Draw menu.

Important
Dynamic Ruler option/button will not be active if you do not have any Image Window currently active/selected.
There can be only one Dynamic Ruler per one Image Window in template.
Rulers for Landscape and Portrait orientation have to be defined separately.
User does not have to modify any parameters of created Dynamic ruler entity. But those parameters can be modified to change scheme name for ruler image file.
Note
Please note that, when you add Dynamic Ruler or new Image Window, Template Editor will automatically add ImageView Data to all Image Windows present.
The Value of Key: ImageView will be displayed inside Image Window so they can be easily recognised.
When you addDynamic Ruler to specific Image Window, there will be a string displayed inside Dynamic Ruler entity that will look like: #Value of Image Window ImageView key.

Caution
Data type for Image Window should always be of String type.
It's best that Value of ImageView be a number (default) value if your gonna use multivieport template in HOPA.
Changing the Value can brake HOPA calls so this is not recommended.
Rulers images for given scale have to prepared separately and put in appropriate place according to points below:
Ruler icon files are expected to be in PNG format,
2-256colors and1scale value.Default name schema for ruler image that will be used by our software is
ruler_<scale_value>.This name is required for program to show ruler when appropriate scale is being used on printout. The prefix part (
ruler_) can be changed in template editor for each ruler entity.So if we want to have printout with ruler that is made with
400.00scale we have to prepare a ruler icon with ruler_400.png name.Ruler images have to be placed in one of three places so they can found and used by TSL programs:
- in folder where you have HyperDoc installed:
Tessel Software Line\HyperDoc\Program\,- in folder where currently used print template (
.tvd file) is being stored,- folder defined in
INIfile underIconPathparameter.
Tip
Example of two ruler files are available withing your HyperDoc installation, under this path: Tessel Software Line\HyperDoc\DemoDB\Templates.
Also example of template using rulers is stored in same location - PRINT-A4.TVD


