HyperDoc is initially configured to use the demonstration database NetMan.mdb. To use another database open hdoc.ini and change the MainDatabase parameter in Access Settings section to the full path name of the desired database. Alternatively, one can save modified hdoc.ini file under another name and use the new file name as a start-up parameter for HyperDoc.
Creating HyperDoc database
Launch SQL Server Enterprise Manager utility. Create empty database 30 MB in size with Create for load option set. Load the HyperDoc database backup into it. Now you can create users in this database. If any of such users already exist, you must delete them and then create them again. Each user must have this database set as its default database. See section HyperDoc databases in SQL Server for important details on setting user permissions.
ODBC source configuration
To create ODBC source for HyperDoc perform the following steps:
From the Control Panel, double-click the ODBC application; Choose the Add button; From the Installed ODBC Drivers select SQL Server and click the OK button; In the ODBC SQL Server Setup dialog fill-in the following fields: Data Source Name - give unique name to the data source Server - name of the appropriate SQL Server Network Library - see comments below Click on the Options button and enter HyperDoc database name in the Database Name field and make sure that the Create Stored Procedure for Prepared Statement option is off. In default ODBC configuration client connects to SQL Server using named pipes protocol. Named pipes connection requires validation by NT server. To connect to SQL Server without NT validation, the client workstation must use either TCP/IP protocol or SPX protocol. To set up requested network communication protocol fill Network Library field in the ODBC source definition with one of the following values: DBMSSOCN for TCP/IP DBMSSPXN for SPX To use TCP/IP protocol the DBMSSOCN.DLL library must be in directory pointed to by the PATH environment variable. The same applies to DBMSSPXN.DLL library for SPX protocol. These libraries are usually placed in \MSSQL\BINN directory by SQL Server client setup.
Preparing hdoc.ini file
In order to make HyperDoc use SQL Server database you must make the following modifications to the hdoc.ini file: Set DBType=ODBC in the Database Settings section. WARNING! This setting is case sensitive. Set MainDatabase=DataSourceName in the ODBC Settings section, where DataSourceName is the name of the ODBC data source created in the previous topic.
HyperDoc needs a properly configured database in order to work. HyperDoc database configuration consists of the following steps:
Creating database. Creating system tables. Preparing object hierarchy. Preparing document types. Defining HyperDoc Login account. Defining HyperDoc database users and administrators. Configuring logical devices. Preparing user interface profiles. Defining graphical representation of business objects.
To create a new database in Microsoft Access format use HyperDoc Configuration Manager. To create a new database on Microsoft SQL Server use any standard tool (like MS SQL Enterprise Manager). We do not recommend creating an empty database on Oracle Server. Create and configure an Access database and then upsize it to Oracle Server.
To create system tables in a new Access or MS SQL Server database open the database with HyperDoc Configuration Manager. The program will detect that the configuration table and other system tables are missing and will create them automatically.
To create an object hierarchy use HyperDoc Configuration Manager. You can use tables already existing in a database (or linked from another database) or create new tables. Use the same tool to define document types used in your HyperDoc database.
You need to designate a special user account as HyperDoc Login account. This account should have all permissions to all HyperDoc tables. When you create a new database in Microsoft Access format with HyperDoc Configuration Manager this account is created automatically. Otherwise you have to create this account with tools specific to the DBMS and select the appropriate account in HyperDoc Administrator.
You should designate user accounts as HyperDoc users and administrators. For Microsoft Access databases all the tasks may be performed with HyperDoc Administrator utility. For other DBMS you should use DBMS-specific tools to create user accounts and to assign them appropriate rights (or roles) as described in the 282 Database Users section.
Before you start adding documents you should define default logical devices to store document contents, ObjectOverlay (spots) and redlining data. To do this start HyperDoc, log in using one of HyperDoc administrative accounts and select Tools/Options/Logical Devices from the main menu. For detailed description, see section 260 Logical Devices.
HyperDoc can work with administrator-configurable user interface definitions called profiles. Profile is a subset of HyperDoc command set, where commands are grouped in menus and toolbars, created by HyperDoc administrator for a user or particular group of users. To manage profiles start HyperDoc, log in using one of HyperDoc administrative accounts and select Tools/Customize from the main menu. See appropriate part of section 3 Basic concepts for details.
HyperDoc representation capabilities streamline the process of filling HyperDoc database with graphical data and of modifying it. These capabilities are based on a concept of associating graphical representation parameters with object classes. This association is part of HyperDoc configuration and can be done with HyperDoc Configuration Manager. See appropriate part of section 3 Basic concepts for details.
HyperDoc Options dialog consists of six tabs, each for separate set of options, and common dialog elements. Tabs are:
Behaviour
Drawing
View
Print
Integration
Advanced
User/Groups drop-down combo box - selects user (or group) to set options for.
OK - saves changes and close dialog.
Cancel - discard changes and close dialog.
Apply - save changes.
This tab contains options of Hyperdoc’s general behaviour:
Object selection and marking,
Attaching documents,
Object set handling,
User interface profiles assignment.
Auto show document - defines if document content is displayed after object marking. If checked, document content is displayed after object marking. If unchecked, no document content is displayed
Current object marking – defines if current object is marked to display default document. If checked, current object is marked to display default document. If unchecked, current object is not marked and no document will be displayed.
Linked hierarchies – defines if HyperDoc should preserve current object during switching hierarchies. If checked, current object is kept during hierarchy change, if possible. If unchecked, current object is not kept during hierarchy changes.
HyperDoc option | Parameter name | Container |
Auto show document | AutoShow | HDocParams table |
Current object marking | CurrObjMarking | HDocParams table |
Linked hierarchies | KeepCurrentObject | HDocParams table |
Copy document on attach - – defines if HyperDoc should copy documents to the internal folders. If checked, HyperDoc is copying attached documents to the internal folders. If unchecked, they stay in their location as external documents.
Convert to UNC - defines if documents paths are converted to UNC when adding to configuration. If checked, documents paths are converted to UNC. If unchecked, documents paths are not converted to UNC.
HyperDoc option | Parameter name | Container |
Copy document on attach | CopyDocsOnAttach | HDocParams table |
Convert to UNC | ConvertToUNC | HDocParams table |
Auto target object selection - defines if target object is selected during hyper jump. If checked, default target object is selected during hyper jump. If unchecked, user is asked for target object.
HyperDoc option | Parameter name | Container |
Auto target object selection | AutoTarget | HDocParams table |
Dynamic object set - defines handling of object sets attached to objects. If checked, object set is loaded when user selects object with object set attached (blue one in hierarchy tree). If unchecked, object set is not loaded when user selects object with object set attached to it.
Show Infoscope on „with object” OS load - defines Object Infoscope behaviour when loading object set attached to object. If checked, Infoscope is opened when object set attached to the object (blue one) is loaded. If unchecked,Infoscope is not opened when object set attached to the object is loaded.
Show Infoscope on OS load - defines Object Infoscope behaviour when loading object set by menu command. If checked, Infoscope is opened when object set is loaded with menu command. If unchecked, Infoscope is not opened when object set is loaded with menu command.
HyperDoc option | Parameter name | Container |
Dynamic object set | AutoLoadAttachedOSets | HDocParams table |
Show Infoscope on „with object” OS load | ShowISOnObjOSLoad | HDocParams table |
Show Infoscope on OS load | Show Infoscope on OS load | HDocParams table |
Show grips - controls state of visibility of vector object grips. If enabled, grips are showed around selected vector element.
Use selected tools - controls usage of selection attributes when selecting vector objects on drawing. If enabled, selection attributes are used for selected vector element.
HyperDoc option | Parameter name | Container |
Show grips | ShowGrips | HDocParams table |
Use selected tools | UseSelectedTools | HDocParams table |
Define attributes button – opens Tool Set: Selected dialog box. Options (Selected toolset) are defined in Stamps.tvd
Use OS member tools - controls usage of highlighting attributes for spots connected to current ObjectSet. If enabled, spots connected to current ObjectSet will be filled using ObjSetMember tool.
Define attributes button - opens Tool Set:ObjSetMember dialog box. Options (ObjsetMember toolset) are defined in Stamps.tvd.
HyperDoc option | Parameter name | Container |
Use OS member tools | UseOSMemberTools | HDocParams table |
Symbol library name button - opens Symbol Library dialog box to define name of symbol library taken from file (form disk option) or from database. It that case Stamps.tvd must be copied to database using LogDevMover add-in.
HyperDoc option | Parameter name | Container |
Symbol library name | LibVectDrwName | HDocParams table |
Symbol library properties button - opens Properties:Stamps.tvd dialog box. This dialog box presents all properties of Stamps.tvd file.
Preferred layers button - opens Preferred Layers dialog box:
Overlay preferred layer name - define name of layer of overlay drawing to be set current.
Redlining preferred layer name - define name of layer of redlining drawing to be set current.
HyperDoc option | Parameter name | Container |
Overlay preferred layer name | CurrTVDLayer | HDocParams table |
Redlining preferred layer name | CurrRedLayer | HDocParams table |
Force image palette - - if enabled, image color palette is used for raster image display.
Paste on current layer - if enabled, user can paste elements on his current layer during Copy/Paste operation. If disabled, see user permissions for current drawing in HyperDoc Manual.
Import all layers - - if enabled, all layers (empty and disabled too) will be imported during import of vector drawing. If disabled, only visible layers with vector objects will be imported.
HyperDoc option | Parameter name | Container |
Force image palette | ForceImagePalette | HDocParams table |
Paste on current layer | PasteOnCurrentLayer | HDocParams table |
Import all layers | ImportAllLayers | HDocParams table |
Icon path - define path to folder with icons used in database and on print templates.
HyperDoc option | Parameter name | Container |
Icon path | Icon path | INI file, [General] section |
Number of decimal places for coordinates and lengths - defines number of decimal digits in coordinates and lengths,
Number of decimal places for angles - defines number of decimal digits in angles,
Number of decimal places for areas - defines number of decimal digits in areas,
Number of decimal places for others - defines number of decimal digits in displayed float numbers.
HyperDoc option | Parameter name | Container |
Number of decimal places for coordinates and lenths | DecimalDigitsLine | HDocParams table |
Number of decimal places for angles | DecimalDigitsAngle | HDocParams table |
Number of decimal places for areas | DecimalDigitsArea | HDocParams table |
Number of decimal places for others | DecimalDigits | HDocParams table |
View settings button - opens Configuration: View dialog box. Options stored in INI file, [TSLRVC Library Settings] section.
Raster magnify glass button - opens Configuration: Magnifying Glass dialog box . Options stored in INI file, [Raster Magnify Glass Options] section.
Vector snap settings button - opens Configuration: Vector Snap dialog box . Options stored in INI file, [Raster Snap Options] section.
Print template name - opens Print Template dialog box to define name of print template to be used by default, taken from file (form disk option) or from database. It that case at least one print template must be copied to database using LogDevMover add-in.
HyperDoc option | Parameter name | Container |
Print template | PrintTemplate | HDocParams |
Print selected element - controls state of selection of vector objects on printout.
If enabled, selected elements are printed with selection attributes. Possible values are 0 or 1.
Use image colors when printing - enables color printing.
HyperDoc option | Parameter name | Container |
Print selected element | PrintSelectedElement | HDocParams table |
Use image colors when printing | Use image colors when printing | INI file, [TSLPPL Library Settings] section |
Print cache button - opens Print Cache Options dialog box. Options stored in INI file, [TSLPPL Library Settings] section.
Publish HTML setup button - opens Publish HTML Setup dialog box:
HTML Preview Template - HTML template name to be used with printouts with Publish HTML function.
Print resolution - image resolution to be used with printouts with Publish HTML function.
Preview resolution - image preview resolution to be used with printouts with Publish HTML function.
HyperDoc option | Parameter name | Container |
HTML Preview Template | HTMLPreviewTemplate | INI file, [TSLRVC Library Settings] section |
Print resolution | HTMLPrintResolution | INI file, [TSLRVC Library Settings] section |
Preview resolution | HTMLPreviewResolution | INI file, [TSLRVC Library Settings] section |
Custom shell extensions - defines additional file extensions, which will be showed by HyperDoc.
HyperDoc option | Parameter name | Container |
Custom shell extensions | CustomShellExt | HDocParams table |
In this dialog user can define file extensions that HyperDoc will try to open in it's native window frame.
So for example .docx format can be added here and HyperDoc from this moment will try to open documents with attached .docx files in HyperDoc window.
Important
Due to changes in newer Internet Explorer versions (which is used for opening external documents in HyperDoc window) external files like .docx may not open in HyperDoc window.
This is known MS bug. Please refer to this article on how to fix this problem.
Parameter files button - opens External Parameter File Options dialog box. Options stored in INI file, [External Parameters Filters] section.
Associations button - opens Open With... dialog box. Options are stored in HDocAssociations table.
Add-in Manager button - opens Add-In Manager dialog box. Options stored in HDocAddIns table.
HyperDoc option | Parameter name | Container |
Ask for save vectors in new version | AskForSaveVectorsInNewVersion | HDocParams table |
Autoload geographical transformation | AutoLoad | INI file, [Geographical Mappings] section |
Autosave interval for vector drawings | SaveOnDemandInterval | HDocParams table |
Cache expiration period | CacheExpirationPeriod | HDocParams table |
Disable versioning (remove old versions after adding new one) | DisableVersioning | HDocParams table |
Display FI2002 page | FI2002Standard | INI file, [Floor Plan Settings] section |
‘Documents For Spots’ list mode shows connected documents too | InfoScopeDocListExtendedMode | HDocParams table |
Expand hierarchy tree after marking multiple objects | ExpandHierarchyAfterMarkingObjects | HDocParams table |
Fill/clear overlapping viewports common parts | DefaultVportsOverlapMode | INI file, [TSLRVC library settings] section |
Flush log | FlushLog | INI file, [TSL Diagnostics] section |
List documents when multiple | ListDocsWhenMultiple | HDocParams table |
Log basic | LogBasic | INI file, [TSL Diagnostics] section |
Log file name (without the path) | LogName | INI file, [TSL Diagnostics] section |
Max number of auto windows | MaxAutoWindows | HDocParams table |
Max number of shown windows | MaxShowWindows | HDocParams table |
Max number of tiled windows | MaxTiledWindows | HDocParams table |
Object infoscope title | ObjectInfoScopeTitle | HDocParams table |
Preview associated Security Class names in hierarchy | SecurityClassHierarchyPreview | HDocParams table |
Skip config verification | SkipConfigVerification | HDocParams table |
Skip restoring document | SkipRestoringDoc | HDocParams table |
Trace errors | TraceErrors | INI file, [TSL Diagnostics] section |
Work with CADRaster | CADRaster | INI file, [General] section |
Work with SuperEdit | SuperEdit | INI file, [General] section |
Work with SuperView | SuperView | INI file, [General] section |
Zoom factor used to expand/shrink area with spot to display it | ZoomAroundSpotFactor | HDocParams table |
Follow this steps:
In Domain controller create Groups/users you need.
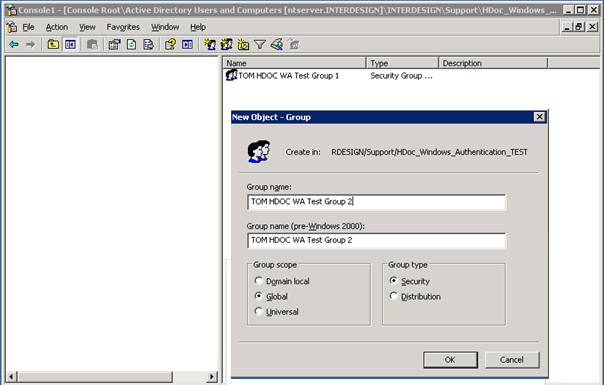
To groups you can add domain members that you wish to allow using HyperDoc in this configuration.
Open SQL Server Management Studio.
Under your DB server\Databases\Security\Logins add new logins (logins for created domain groups/users).
Use Windows authentication option.
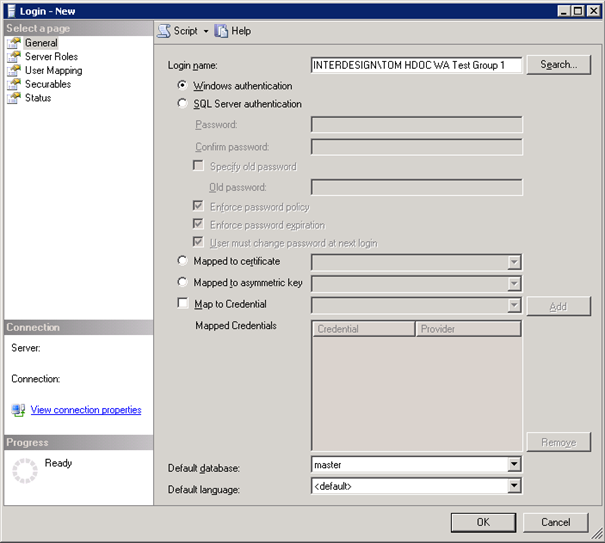
For added group’s/user’s logins map them to Database you want to use it with (
User Mappingoption on left panel).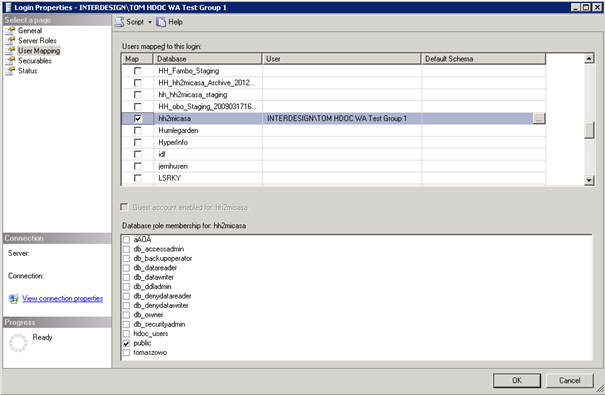
Open HyperDoc Admin application with INI pointing to chosen database.
On Database Users tab search for added groups/users and set them as
HdAdminorHDUseras preferred.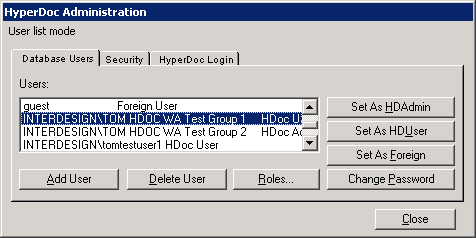
On
Securitytab click onUser Permissions…button and find your newly added groups/users to assign rights to them.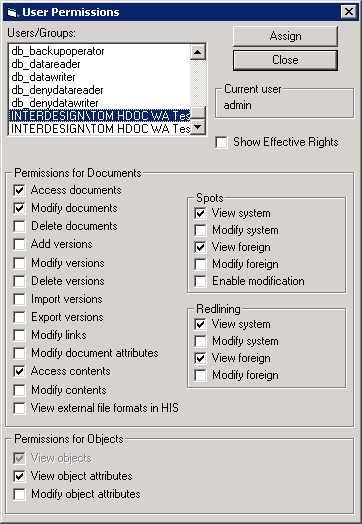
Open SQL Server Management Studio again
In chosen Database do:
check and create user in master database
USE [master]; GO;
CREATE USER [CommonLogin] FOR LOGIN [CommonLogin]
add needed execute rights
USE [master]; GO;
grant execute on sys.xp_logininfo to [CommonLogin]
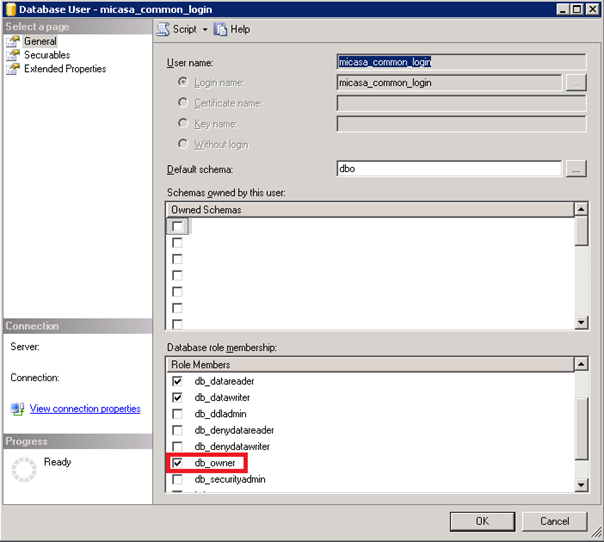
Common login you created must have db_owner right.
Important
INI file should not have parameters username and password in [ODBC Settings] section.
Note
Installation of HyperDoc on each computer should be done by user with administration rights for the computer where HyperDoc is being installed and in the installer HyperDoc should be allowed to be used by all computer users.
Domain user logged into windows that is a member of added to domain group will now be able to log into HyperDoc without authentication and he will be granted rights according to the group he belongs to.


