
As described in the section called “Toolbars”, there are three buttons that allows Printing:
 Print Preview - opens Print panel.
 Print - immediately starts printing current document using parameters defined in HDocASP.ini file.
 Print to PDF - immediately creates a PDF file from current document using parameters defined in HDocASP.ini file.
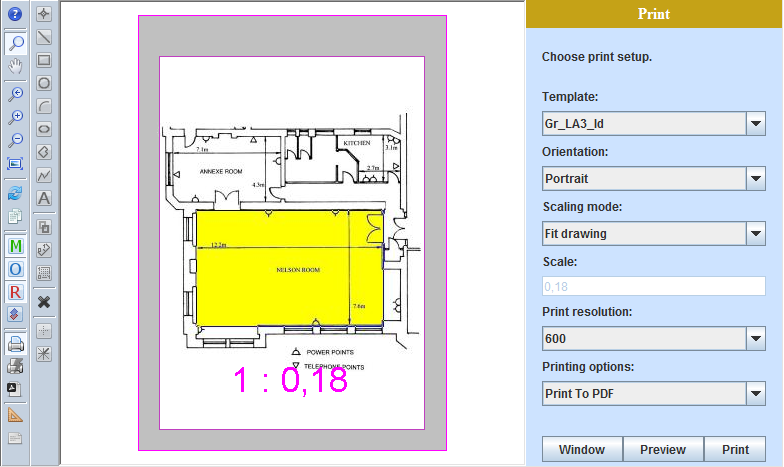
To enter this mode click the Print Preview button on the left toolbar of HyperDoc Online Document View Pane.
As a result you can see the Print panel with several fields and boxes as on screen below:
Important
All the options available in Print Preview described below are set for the first time by their default values.
But when changed, browser will remember last used setting. Next time you open Print Preview panel, HyperDoc Online will use remembered settings.
Please note that, information about last used print template is stored by browser you use to display HyperDoc Online. So when you open HyperDoc Online with another browser or delete browsers cache, default values will be used again.
Caution
Safari browser is not remembering last print template used, so it's using the one from Configuration INI file.
HyperDoc Online allows you to print the document using a print template technology.
The print template is a special drawing that defines the layout of a printed page. The print template can contain standard drawing border where some texts can be taken directly from HyperDoc database. The print template defines part of the printout where document content will be printed and this area is called Image Window.
The default Print Template used in HyperDoc Online is taken (if set) from Configuration file (INI) - from parameter PrintTemplate in [General] section.
This template will be chosen as default option in Template dropdown menu in Print Preview panel.
Please use Perview button to see how print template looks.
When you are printing document using template that have more than one Image Windows are, they can overlap.
When they do overlap, the common part will become empty white space or one of the Image Window will be placed on top of another one (when a user needs one big Image Window with a smaller "preview / overview" window for instance).
To controll this behaviour you can set proper value for parameter DefaultVportsOverlapMode (see the section called “[TSLRVC Library Settings] section”) or edit template using Template Editor program (see the section called “Overlapping image windows on print templates”).
Sets whether document shown currently in Print Preview should be printed in Portrait or Landscape orientation.
The Scaling mode box contains the following items:
Scale view- shows current view with the user-specified scale inScalefield,Match view- same as above but enlarges view to achieve the standard scale which are taken fromINIfile (see the section called “Customizable "standard scales" with INI parameters in Hyper Doc Online”),Fit drawing- fits entire drawing in the image window,Match drawing- same as above but enlarges view to achieve the standard scale.
The Scale field contains the actual scale used to prepare the preview (and the printout).
It is automatically updated in the Fit drawing and the Match drawing modes.
In the Scale view and Match view mode, you can enter your own scale in this field.
To show the results (and to round-up scale to nearest standard value in Match view mode), press the Preview or the Window buttons.
Allows choosing one of four printing options:
Simple,
Advanced - available only in Internet Explorer,
Print to file,
Print to PDF.
Using this option will print the document with a header and a footer and with all the other options set in Print Preview mode.
Note
Advanced Printing mode is available only in Internet Explorer.
Advanced Printing allows user to print images without headers and footers.
In this mode, the Print button opens a new window, prepared to print the document. As soon as all the necessary images are downloaded, the Print window is opened automatically.
The advanced mode should be used when there is a need to remove default headers and footers from the printed page. When the user selects this option, no headers and footers selected in Print Setup dialog will be printed. In addition, all Margins values specified in this dialog are ignored. When printing in this mode HyperDoc Online tracks orientation changes and displays warning when plot orientation differ from selected in printer or when plot is too big to print properly on selected paper.
To use the Advanced mode, the user must download a special binary component. This component will be installed when the Print command is invoked for the first time. User will be prompted with dialog box asking if he want to trust TSLPrintSupport.cab. To install this Addon, user must agree.
Default security settings in Internet Explorer prevent unsigned ActiveX components from installing on the user machine. To change this behavior Internet Explorer Security settings must be changed as described in HIS Administration Manual in the section called “Advanced Printing in Internet Explorer”.
Print to file option allows you to save the selected view in Print Preview mode to a PNG file on your computer.
Document ID will be used as default name for saved file.
See also description for parameters bith_depth connected to this function in the section called “[Configuration] section” and PrintToFileWithMargins in [TSLRVC Library Settings] section.
Print to PDF option allows you to save the selected view in Print Preview mode to a PDF file on your computer.
After you click on Print button new browser tab will open.
Depending on browser you are using you may be prompted with various dialogs but generally you will be asked whether you want to Open, Save or Save as the PDF file.
Document ID will be used as default PDF name.
See also description for parameters bith_depth connected to this function in the section called “[Configuration] section” and PrintToFileWithMargins in [TSLRVC Library Settings] section.
Tip
When you have the PDF file saved you can print it on your local printer. Depending on PDF viewer you can get different printing dialogs. Always set the printing to no additional scaling, actual size, no margins - this way you will get on paper same scale as set in HyperDoc Online.
Warning
Please note that, there are some images that can be problematic to convert to PDF file. Problem can be encountered when for example you try to Print to PDF large images (like 2MB) with template for A3 (or larger) paper size with highest resolution set in HIS (600).
In those cases, try to change your resolution to smaller one - like 400 or change template size.
You can now control which of printing options (Advanced Print, Simple, Print to file) will be available in
Print Preview mode by using parameters that have to be added to [CONFIGURATION] section in HDocAsp.ini file.
Parameters are:
HIS_print_to_file – indicates whether print to file mode is enabled,
HIS_print_advanced - indicates whether advanced print mode is enabled (IE only),
HIS_print_simple – indicates whether simple print mode is enabled.
HIS_print_to_pdf – indicates whether printing to PDF mode is enabled.
All parameters share same integer values from range 0-1.
Value 0means disabled.
If parsed value is grater than 1, it will be treated as 1 (enabled).
On non Internet Explorer browsers if advanced print is enabled and simple print is disabled, simple print is automatically enabled.
If all print mode parameters are disabled, then simple print is automatically enabled.
If print mode parameter is not set from INI, dafault=1 (enabled) will be used.
Example of setting parameters:
HIS_print_to_file = 1;
HIS_print_advanced = 1;
HIS_print_simple = 1;
HIS_print_to_pdf = 0;
Buttons:
Window button - shows a paper sheet with a special rectangle (called the print window) that defines an area on the paper, where the document (or its part) is to be printed. The position and extents of a print window are defined in a print template and are constant.
Preview button - shows or refreshes the print preview.
Print button - shows a page ready to print in a separate browser window.
Tip
In the Scale view and Match view scaling modes, you can change the relative extents of the print window rectangle by dragging the grips on its corners, change a position of the sheet against the document by dragging the central grip, or enter desired scale value in the scale field. A scale that is displayed inside the print window is changed accordingly.
In the Fit drawing and the Match drawing scaling modes, the scale and position of the print window is calculated automatically, so the grips on the print window, as well as the scale field on the Print panel, are not accessible.
At any moment you can use the Preview button to inspect results of your settings and then return to defining the print window again by pressing the Window button, if necessary.
Print
- immediately starts printing current document using parameters defined in HDocASP.ini file.
Parameters for this button are stored in [CONFIGURATION] section of HDocASP.ini file:
QuickPrintTemplateQuickPrintOptionQuickPrintOrientationQuickPrintScalingModeQuickPrintResolution
Values of this parameters will be taken for all printouts made by clicking on this button. When value is not defined, default value will be used instead.
If QuickPrintTemplate is not present or it's value is empty, blank template will be used instead.
See the section called “[Configuration] section” for details on those parameters.
Print to PDF
- immediately creates a PDF file from current document using parameters defined in HDocASP.ini file.
Parameters for this button are stored in [CONFIGURATION] section of HDocASP.ini file:
QuickPrintTemplatePdfQuickPrintOrientationPdfQuickPrintScalingModePdfQuickPrintResolutionPdf
Values of this parameters will be taken for all printouts made by clicking on this button. When value is not defined, default value will be used instead.
IF QuickPrintTemplatePdf is not present or it's value is empty, blank template will be used instead.
See the section called “[Configuration] section” for details on those parameters.
