
HyperDoc as a document management system distinguishes between a concept of logical document and a concept of physical document. The latter is a file with a document content, e.g. scanned image, digital photo or a spreadsheet. The former is a set of information stored in HyperDoc database concerning certain document. Document list window displays a list of logical documents in one of four modes:
 - Connected Mode,
 - Document Set Mode,
 - Disconnected Mode.
 - Infoscope Mode.
You can switch between these modes pressing one of three buttons on General toolbar or selecting appropriate option from menu View.
Document List Window in Connected Mode displays documents connected to objects that are currently marked in navigation window.
Document list window in Document Set Mode displays documents, which are in the current Document Set.
Document List Window in Disconnected Mode displays documents, which are not connected to any objects
Document list window in Infoscope Mode displays documents with spots linked to current object.
Document Set is an arbitrary named collection of documents, which can be stored in HyperDoc database. All documents from the current Document Set are displayed in Document Set Mode in the Document List Window. In other modes documents from the current Document Set are displayed with a star in the second column of Document List Window.
If you want to store information about a document in HyperDoc, you need to have a logical document.
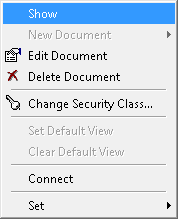
You can create one with New Document command available in Document pull-down menu and in Document List Window pop-up menu in Connected Mode and in Disconnected Mode.
Only to a logical document you can attach document content file (with Attach File command available in File pull-down menu).
Attaching file to a logical document you create physical document: HyperDoc copies the file to its internal file directory, where it remains in read-only mode: you cannot modify it.
However you can have many different versions of one physical document. You create them with a pair of commands: Export Document Set and Import.
With Export Document Set you check out document content file from HyperDoc to your work directory, where you can modify it using appropriate application.
After modifications you can import this file as a new version of physical document. This version becomes the current one, but you can make another version current.
If you have a logical document without an attached content file you can use Create File command, which allows you to create MS Word or MS Excel document and attach it to the current logical document in a single step.
You can also use Attach Scanned Image command to scan image and attach scanned file at once.
If you have a logical document with an attached content file you can use Edit File command as a shortcut for Export – Import pair.
To express complex real-world relationships and to make navigating HyperDoc database easier you can create links between documents and business objects as well as links between documents and spots (spots are described in HyperView Window chapter).
Commands in Document pull-down menu refer to the current document. Current document is marked with a small triangular arrow in the left column of document list in Document List Window. Commands in Document List Window pop-up menu refer to a right-clicked document, except for a situation, when more than one document on the list is highlighted. In this situation Document List Window pop-up menu refers to highlighted documents and it has a different set of commands. HyperDoc temporarily highlights document to which pop-up menu applies. You can adjust column width in the Document List Window by double clicking on the right edge of a column title. HyperDoc examines column title and all visible column items to calculate optimal column width.
Document List Window has tabs in its upper part.
They allow seeing documents of particular types.
The All tab is always first and it shows documents of all types.
Apart from the All tab there are other tabs – one for each document type.
When such tab is active only documents of this particular type are displayed in the Document List Window.
Pressing the Connected Documents button or choosing Connected Documents command from View menu switches the Document List Window to the Connected Mode.
In this mode the Document List Window shows documents (document records or logical documents) connected to objects that are currently marked in the object hierarchy window.
Pressing the Document Set button or choosing Document Set command from View menu switches the Document List Window to the Document Set Mode.
In this mode the Document List Window shows documents that belong to the currently opened Document Set.
Pressing the List Disconnected button or choosing Disconnected Documents command from View menu switches the Document List Window to Disconnected Mode.
In this mode the Document List Window lists documents (document records or logical documents) that are not connected to any objects from any hierarchy of the object hierarchy window.
Pressing the Infoscope Mode button or choosing Infoscope Mode command from View menu switches the Document List Window to Infoscope Mode.
In this mode the Document List Window lists documents (document records or logical documents) that cotain spots linked to object currently selected in navigation window.
The New Document command is available in the Document pull-down menu and in the Document List Window pop-up menu
(when no more than one document is highlighted in the Document List Window).
This command shows a form that you can use to enter new document attributes. One of them (sometimes referred to as a key field) is used to identify document.
There cannot be two documents, even of different types, with the same value of the key field. Documents of different types may have different sets of attributes.
The Edit Document command (not to be confused with Edit File command) is available in the Document pull-down menu and in the Documents List Window
pop-up menu (when no more than one document is highlighted in the Document List Window).
When selected in the Document pull-down menu, it allows reviewing and modifying attributes of the current document.
When selected in the Documents List Window pop-up menu, it allows reviewing and modifying attributes of the document you right-mouse-clicked to show this pop-up menu.
This command shows a form that you can use to see and change document attributes.
One of them (sometimes referred to as a key field) is used to identify document.
You cannot change the value of the key field after the document is created.
Documents of different types may have different sets of attributes.
The Delete Document command is available in the Document pull-down menu and in the Documents List Window pop-up menu (when no more than one document is highlighted in the Document List Window).
When selected in the Document pull-down menu, it deletes the current document. When selected in the Documents List Window pop-up menu, it deletes the document you right-mouse-clicked to show its pop-up menu.
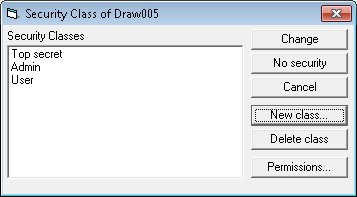
The Change Security Class command is available in the Document pull-down menu and in the Document List Window pop-up menu
(when no more than one document is highlighted in the Document List Window).
It is available only for documents, which have document files attached. When selected in the Document pull-down menu, it allows changing security class of the current document.
When selected in the Documents List Window pop-up menu, it allows changing security class of the document you right-mouse-clicked to show its pop-up menu.
Security class is a set of security credentials that can be used to restrict access to a document.
The Set Default View command is available in the Document pull-down menu and in the Document List Window
pop-up menu (when no more than one document is highlighted in the Document List Window)..
The Set Default View command associates the currently visible zoom window with the connection between the current object and the current document.
Next time this document will be displayed as a result of its connection with this object, the stored window coordinates will be used to show this pre-defined view of a file attached to this document.
This command works only if there is a connection between given object and given document and if a document file attached to logical document is a native file (raster, vector or composite document).
Note
If the default view is not remembered please use Refresh command from View menu.
The Clear Default View command is available in the Document pull-down menu and in the Document List Window pop-up menu.
The Clear Default View command erases view information associated with the connection between the current object and the current document.
The Connect command is available in the Document pull-down menu and in the Document List Window pop-up menu (when no more than one document is highlighted in the Document List Window).
When selected in the Document pull-down menu, it connects current document to the current object.
When selected in the Documents List Window pop-up menu, it connects to the current object the document you right-mouse-clicked to show its pop-up menu.
If the respective document and object are already connected, this command is not available and the Disconnect command is available instead.
The Disconnect command is available in the Document pull-down menu and in the Document List Window pop-up menu (when no more than one document is highlighted in the Document List Window).
When selected in the Document pull-down menu, it disconnects current document from the current object.
When selected in the Documents List Window pop-up menu, it disconnects from the current object the document you right-mouse-clicked to show its pop-up menu.
If the respective document and object are not connected, this command is not available and the Connect command is available instead.
Both human users and computer applications tend to organize the objects they deal with in manageable sets. HyperDoc lets you define a set of documents that belong together for whatever reason. Document Set simplifies the following operations on multiple documents:
displaying documents contents in separate windows,
batch printing of similar documents,
connecting to business object,
linking to spot,
exporting multiple documents.
You may modify Document Set contents manually or using Find Documents dialog. If the Document List Window is in the Connected Mode or Disconnected Mode then documents belonging to the current Document Set have “*” (star) character in their Stat column. In the Document Set Mode the Documents List Window shows documents that belong to the current Document Set. You may save Document Set under specific name in order to use it later. HyperDoc supports two types of Document Sets: Public accessible to all users, and Private accessible only to its creator.
The Document Set commands are available in the Document pull-down menu and in the Documents List Window pop-up menu.
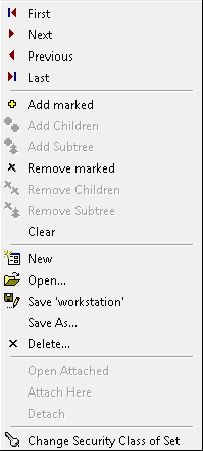
The Add command adds current (when issued from Document pull-down menu) or right-mouse-clicked (when issued from the Document List Window pop-up menu)
document to the current Document Set.
If the respective document is already a member of the current Document Set, this command is not available and the Remove command is available instead.
The Add All command adds all documents that are to be displayed in Document List Window to the current Document Set.
The number of these documents can be greater than the number of documents currently visible in documents window.
The Remove command removes current (when issued from Document pull-down menu) or right-mouse-clicked (issued from the Document List Window pop-up menu) document from the Document Set.
If the respective document is not a member of the current Document Set, this command is not available and the Add command is available instead.
The New command creates new “unnamed” Document Set and makes it current. If previously used Document Set has been modified HyperDoc asks you to save changes.
The Open command loads contents of saved Document Set and makes it current. If previously used Document Set has been modified HyperDoc asks you to save changes.
The Save command allows you to store contents of current Document Set in the database.
If current Document Set is “unnamed” HyperDoc will ask you to define Document Set name.
You may save Document Set as Public accessible to all users, or as Private accessible only to its creator.
The Save As command allows you to store contents of current Document Set in the database under different name.
You may save Document Set as Public accessible to all users, or as Private accessible only to its creator.
The Show All command displays all (but no more than the MaxShowWindows parameter in the HDoc.INI file General Section indicates,
or 16 when this parameter is missing) document files attached to documents belonging to the current Document Set.
Show Selected command is available only in Document Set Mode when the current document set is not empty.
The Show Selected command displays those document files that are attached to currently selected documents belonging to the current Document Set.
To toggle document selection state click left mouse button with the Ctrl key pressed in the left column of the Documents List Window.
The constraint on the number of simultaneously open documents is the same as with the Show All command.
The Connect command connects to the current object all the documents from the current Document Set.
The Export command exports Document Files of all documents belonging to the current Document Set.
First you are asked to select a disk directory to export document files to.
All document files will be copied to this directory.
A docs.lis file (you can change this default name) containing the list of document IDs, document type IDs and file names is saved in the same directory.
This file allows importing all these files (after possible modifications with appropriate editors) in a single step.
After the export, current versions of exported documents are locked.
It prevents from multiple exports of the same version of document file.
You can manually change locking status of document file version using the Versions command.
The Import command expects the documents to be locked and it unlocks them.
The Print command (available in the Document Set sub-menu) prints content of all
documents belonging to the current Document Set using the current default Print Template (see description of Print Template command).
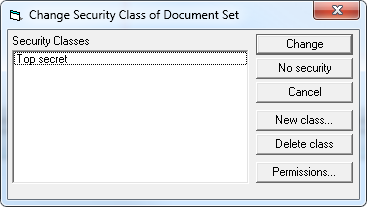
The Change Security Class of Set command allows changing security class of the current document set.
Security class is a set of security credentials that can be used to restrict access to a document set.
The Import command (available in the File pull-down menu) imports previously exported document files (see the Export command).
It launches the Open Document List File dialog in which you choose a file with a list of documents to be imported, e.g. docs.lis.
Such file is created by the Export command. For each of imported files its current version is unlocked, a new version is created and made current, and the imported file is attached to it.
The Export and Import commands are used to modify document files, which is done by editing applications outside of HyperDoc.
This is necessary, because HyperDoc stores document files in read-only mode.
If the current version of imported document is not locked, there is a warning, but it is possible to proceed.
If the current version is locked, then Unlock Version operation is performed under normal conditions, i.e. if the current user has
HyperDoc administrator privileges or is the person who locked given version.
After this, new version is created.
The Create File command is available in Document List Window pop-up menu.
It creates a new MS Word or MS Excel document and attaches it to the right-mouse-clicked document.
It is available only for documents without attached files.
The Attach file command is available in the File pull-down menu and in Document List Window pop-up menu.
It attaches a file that you choose to the indicated document.
It is available only for documents without attached files.
There are two modes of attaching files governed by Copy Docs on Attach option.
The Attach Scanned Image command is available in the File pull-down menu and in Document List Window pop-up menu.
It opens window for scanning and attaching images to the indicated document.
It is available only for documents without attached files.
This feature works in same manner as in other Tessel Software Line products (e.g. SuperEdit, CADRaster).
Scanning is available through TWAIN interface.
On the top of window there are buttons for managing scanning process:
Accept- currently displayed scanned image is attached to the indicated document.Cancel- currently scanned image (if any) is discarded – nothing is attached.Scan- performs scanning process on previously selected scanner (see: Select Source). Scanned drawing is displayed in window. Previously scanned image is discarded. Scanning process is impacted by two options:Scan Params and Scan UI Visible.Scan Multipage- similar to Scan, but performs scanning of multiple pages. All scanned pages are combined into one, multi-page drawing file. Managing of multi-page files is described in Multi-page documents chapter, later in this document.Select Source- this command allows you to select “data source” or, simply scanner, which you want to use. You will have to use this command only if you have more than one TWAIN compatible device installed in your computer.Scanning parameters...- opens Scanning parameters window. You can adjust here such parameters as number of colors, size of image, resolution etc. There is also possibility to fine-tune your scanning parameters usingAdvanced…button – it causes opening of scanner’s native User Interface to control all available parameters. After sample scanning all parameters are saved.Scan UI Visible- this two-state button indicates whether scanner’s native user interface should be shown during scanning process.
Other buttons on the toolbar are same as on standard HyperDoc’s toolbars and are described in HyperView Window chapter.
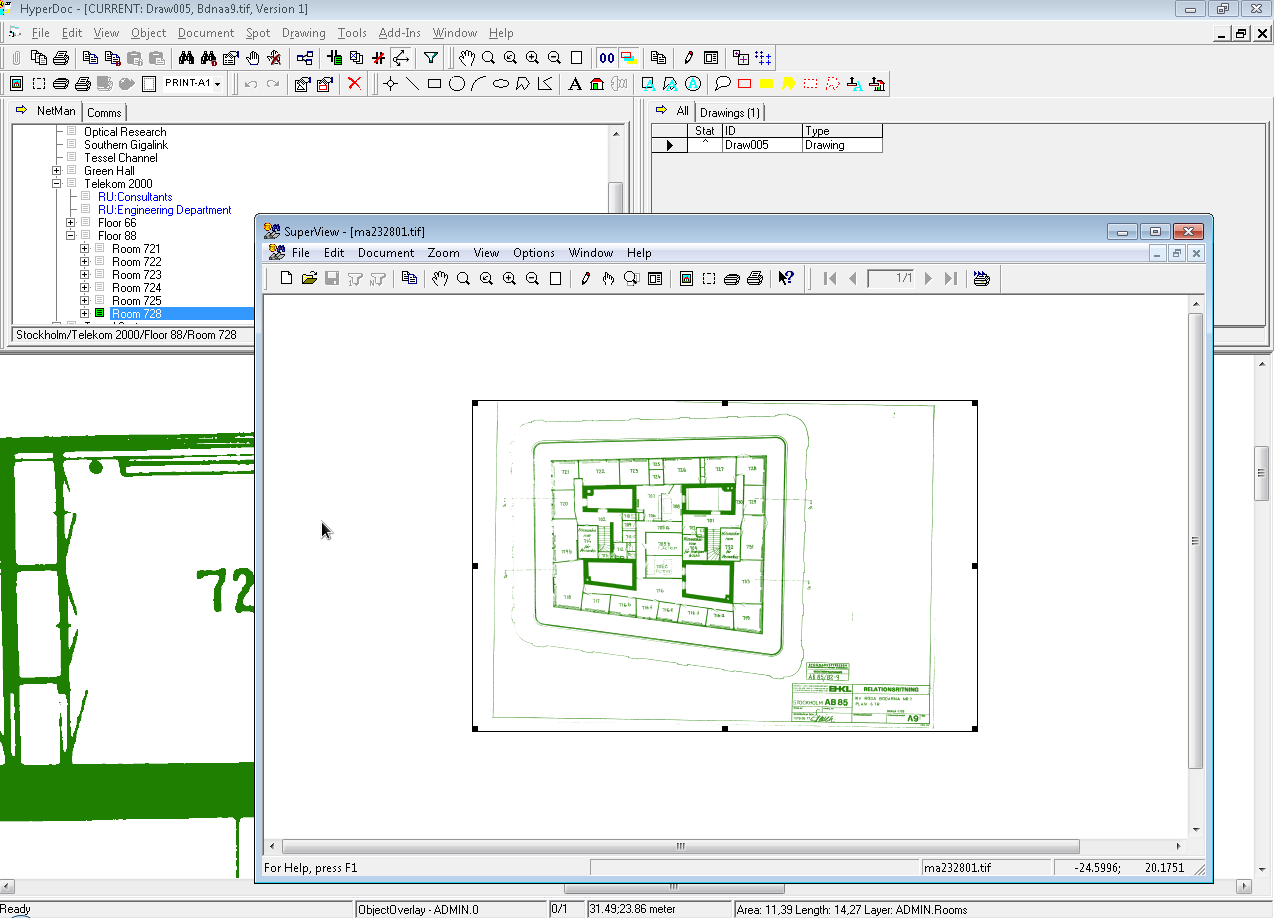
The Preview in SuperView command is available in the Tools pull-down menu.
It launches SuperView (separate program that is installed with HyperDoc).
In SuperView you can preview files in supported graphics formats.
When you find a file you are looking for, you can attach it to the respective document with the Attach From SuperView command in the File pull-down menu.
The Attach From SuperView command attaches to the indicated document a file that is displayed in the current window of this
SuperView instance that was launched with the Preview in SuperView command.
The Edit command is available in the File pull-down menu and in Document List Window pop-up menu.
It can have three subcommands, depending on the HDoc.INI file settings: Common, SuperEdit and CADRaster.
The last two are present only if the [General] section in the HDoc.INI file contains SuperEdit and CADRaster keys respectively with values of 1.
Each of these three commands exports the current version of given document file to a temporary subdirectory in the temporary directory,
makes respective file editor edit exported file and, after edition is finished, it imports the changed file back to HyperDoc.
The SuperEdit subcommand launches SuperEdit as a file editor.
The CADRaster subcommand establishes communication with a running instance of CADRaster - you must launch CADRaster manually.
The Common subcommand opens indicated file in the editor that is associated by the operating system with the given file type.
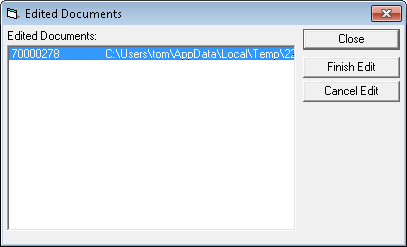
Edit commands show the Edited Documents form in which all current editing sessions are described.
See the View Edited Documents command description.
The View Edited Documents command is available in View pull-down menu. It displays the Edited Documents dialog in which all current editing sessions are described.
By pressing the Finish Edit button you confirm that you want to create new document file version from edited document. You should do the Save command in respective editor before.
For some editors HyperDoc can detect that a file is no longer edited (after doing the Close command in an editor) and it performs actions analogous to pressing Finish Edit button automatically.
If you want to cancel editing session, you press the Cancel Edit button.
The Remove File command deletes all versions of respective document along with files attached to them.
Externally attached files are not deleted - just read-only attribute is removed from them. You cannot remove file if at least one of its versions is locked.
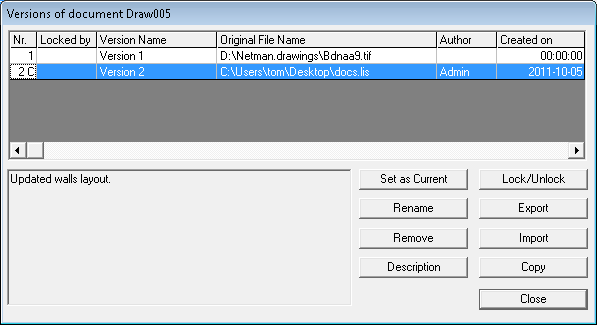
The Versions command launches the Versions dialog.
It displays information about all versions of respective document and allows renaming, removing, locking, unlocking, exporting, changing version description and setting any document version as current.
Each physical document version has following attributes:
number; used as version ID;
user ID of the one who locked this version (Locked By);
version name;
original file name;
user ID of the one who created this version (Author);
creation date;
description.
Using command buttons on the Versions dialog you can perform following operations.
Set as Current - the last version is usually current unless you change this;Rename - allows changing version name;Description - allows changing version description;Export - executes only when given version is not locked;Import - allows importing new document version;Copy - allows to copy document file contents without locking the current version;Lock - available only when given version is not locked;Unlock - available only when given version is locked; executes if the current user is an HDoc admin or is the person who locked given version;Remove version - executes only when given version is not locked;
HyperDoc is downward compatible with databases without new fields for storing new version attributes (Locked By, Author, Creation Date, Description were added in HyperDoc version 3.4). However, it of course cannot store them in a database without appropriate new fields.
The Set Document As Default command designates one of documents connected to given object as a default document.
If only one object gets marked and the Document List Window is in Connected Mode, the list of documents connected to the marked object is displayed and the default document is automatically made current.
Default document has a D character in the second (Stat) column of the Document List Window.
If none of documents connected to given object is set as a default document, then the first document from the list is made current.
The Copy Document Link command copies to the system clipboard information identifying the right-mouse-clicked document.
This information can be used by the Paste Document Link command.
The Paste Object Link command retrieves from the system clipboard information identifying certain object and links this object to the right-clicked document.
This command is available in the Documents List Window pop-up menu in the Connected and Disconnected Mode when more than one document is selected.
It adds selected documents to the Document Set. To toggle document selection state click left mouse button with the Ctrl key pressed in the left column of the Documents List Window.
The Show Selected Documents command shows document files associated with selected documents.
This command is available in the Documents List Window pop-up menu in the Connected and Disconnected Mode when more than one document is selected.
To toggle document selection state click left mouse button with the Ctrl key pressed in the left column of the Documents List Window.
The Copy Selected Document Links command is available in the Document List Window pop-up menu when multiple documents are selected.
It copies a list of document links to the system clipboard.
Such a list can be pasted in the context of an object (Paste Document Link command) or a spot (Paste Link command).
To toggle document selection state click left mouse button with the Ctrl key pressed in the left column of the Documents List Window.
This command is available in the Documents List Window pop-up menu in the Connected and Disconnected Mode when more than one document is selected.
It deletes selected documents.
To toggle document selection state click left mouse button with the Ctrl key pressed in the left column of the Documents List Window.
The Sort Documents Ascending and Sort Documents Descending commands are available in the pop-up menu that shows
when you right-click a title of a column in the Documents List Window in the Connected and Disconnected Mode.
It allows sorting (ascending or descending) documents displayed in this window according to the contents of indicated column.
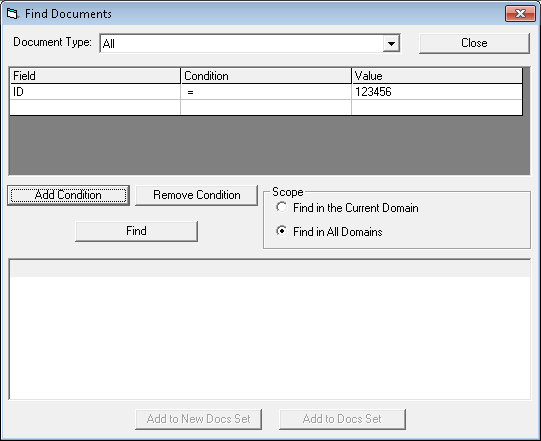
The Find Documents command is available in the Edit pull-down menu and in the pop-up menu that shows when you right-mouse-click a title of a column header in the Documents List Window.
It allows finding documents with a specified value of specified field (column) from documents listed in Documents List Window.
It launches Find Documents dialog in which you can select a Document Type to be to be searched.
Search query is prepared based on conditions rows. Each row (minimum one) consists of 3 columns: Field, Condition and Value.
Those fields need to be filed up before starting search.
You can modify numbers of rows using Add Condition and Remove Condition buttons.
The Find Documents command by default works on the current domain (documents currently listed in the Document List Window).
Find Documents dialog has a group of two option buttons that allow selecting either to perform search in the current domain or to search in all domains (current hierarchy).
To start your search press Find button. All the documents matching searched criteria will be displayed in the area at the bottom of Find Documents dialog.
With the Add to New Docs Set and Add to Docs Set buttons you can add documents that match specified criteria to the Document Set with or without clearing its previous contents.
The Copy Documents Report command is available in the Edit pull-down menu.
It copies contents of the Documents List Window to the system clipboard in a tab-delimited format.
The first line of the report contains headings of the Documents List Window.
The format of the data is suitable for easy manipulation in common office applications like word processors or spreadsheet programs.
