HyperDoc consists of the startup program and several auxiliary libraries. Compressed versions of all these files and the installation program setup.exe are on the installation disks. Properly installed HyperDoc can be run by double-clicking its icon in the Tessel Software Line folder.
In order to use HyperDoc you should have:
Microsoft Windows 10, 8 or 7,
at least 100 MB of free hard disk space,
mouse or other pointing device supported by MS Windows,
graphics card and monitor of at least VGA capabilities,
RAM as recommended to run Operating System.
In order to use HyperDoc Online (HIS) you should have:
Microsoft Windows Server 2106, 2012 or 2008 Server R2,
at least 30 MB of free hard disk space,
mouse or other pointing device supported by MS Windows,
graphics card and monitor of at least VGA capabilities,
RAM as recommended to run Operating System.
HyperDoc Setup provides a quick and easy way to install this program on a user computer or file server. Setup uses a standard Windows user interface style. It contains all features and functions that are appropriate for Windows applications.
After loading CD-ROM, Tessel Software Line Setup starts automatically and lets you choose a product and its language version. In order to restart Tessel Software Line Setup, e.g. to install more products, re-load CD-ROM or open it in Windows Explorer and double-click TSLStartup.exe.
During installation, you can accept or choose an installation directory for HyperDoc. The default directory name is C:\Program Files\Tessel Software Line\HyperDoc (if selected directory does not exist, it will be created, even with its parent directories).
After this phase Setup starts copying selected files to the installation directory. During this, Setup displays its progress bar.
Setup copies all HyperDoc files to the chosen directory and creates the log of performed operations. Demo database is copied to the additional DemoDB subdirectory that may be deleted when no longer needed. The newly created program group Tessel Software Line\HyperDoc 4 contains the following items:
Create HIS Application to create new HIS application in IIS
HyperDoc Administrator to launch HyperDoc Administrator utility
HyperDoc Configuration Manager to launch HyperDoc Configuration Manager utility
HyperDoc to launch the program
License Tool to launch license manager
SuperView to launch SuperView
Template Editor to launch Template Editor
Demo\HyperDoc Administrator to launch HyperDoc Administrator utility with demonstration database
Demo\HyperDoc Configuration Manager to launch HyperDoc Configuration Manager utility with demonstration database
Demo\HyperDoc Demo to launch HyperDoc with demonstration database
Help\Release Notes to show Release Notes in HTML help format
Help\Release Notes.pdf to show Release Notes in PDF format
Help\TSL Documentation to show Tessel Software Line Documentation in HTML help format
Help\TSL Documentation.pdf to show Tessel Software Line Documentation in PDF format
The sample HyperDoc INI file is copied to the HyperDoc DocDB subdirectory C:\Program Files\Tessel Software Line\HyperDoc\DemoDB\.
It contains the option settings and the default attribute values for HyperDoc commands.
Some problems can occur under Windows when user without assigned administrator privileges invokes Setup. In addition Windows UAC (User Account Control) may interrupt installation. In such situation please turn off UAC (Vista) or change its state to lowest position (Windows 8 and 7).
Important
When finished, Setup will ask if you want to launch HyperDoc after closing Setup.
Please do not use this option and launch HyperDoc manually afterwards.
Each product installed from Tessel CD or downloaded from http://tessel.com comes with a demo license.dat file that allows running it in Evaluation Mode accepting the enclosed demo drawings only.
After starting HyperDoc in DEMO mode you will be able to work with DEMO database only.
In order to utilize the program normally, you must add a valid user license file.
If license file LICENSE.DAT was delivered separately it must be copied to HyperDoc instalation folder.
You can view your license files using Notepad and manage them manually whenever necessary. Service Pack Disks downloaded from http://tessel.com do not contain license file – please contact your dealer or admin@tessel.se to get one.
Your LICENSE.DAT file may require a hardware lock. In order to use hardware lock you must install Sentinel driver.
You may install them independently from Tessel CD or download them from http://www.safenet-inc.com/support-downloads/sentinel-drivers/.
Setup includes an integrated uninstallation program that allows users to uninstall HyperDoc components cleanly and effectively and recover system resources such as disk space used by files and registry entries.
If, for some reason, you must uninstall HyperDoc, run the Uninstall program icon or start Control Panel’s Programs and Features, select HyperDoc and click the Uninstall button. Uninstall will remove most of the HyperDoc program files and delete changes made to your Windows files. However, some files that are used by Windows or other programs may not be removed automatically, so it may be necessary to delete them manually.
You can use Group Policy to distribute computer programs by using assigning or publishing software.
Assigning Software
You can assign a program distribution to users or computers. If you assign the program to a user, it is installed when the user logs on to the computer. When the user first runs the program, the installation is finalized. If you assign the program to a computer, it is installed when the computer starts, and it is available to all users who log on to the computer. When a user first runs the program, the installation is finalized.
Publishing Software
You can publish a program distribution to users.
When the user logs on to the computer, the published program is displayed in the Add or Remove Programs (or Programs and Features) dialog box, and it can be installed from there.
To publish or assign a computer program, you must create a distribution point on the publishing server:
Log on to the server computer as an administrator.
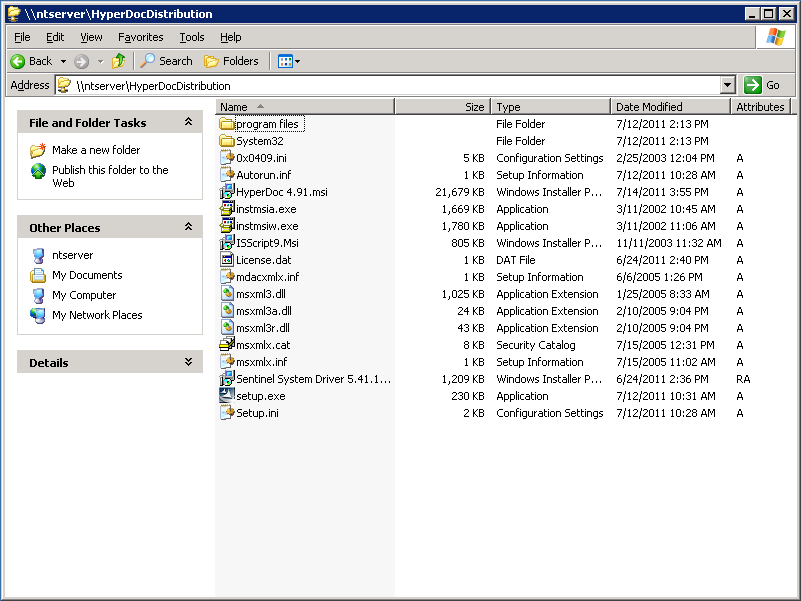
Create a shared network folder where you will put the Microsoft Windows Installer package (
.msifile) that you want to distribute (for example:\\file server\HyperDocDistribution\).Set permissions on the share to allow access to the distribution package.
Copy installation package (CD-ROM image) to the distribution point.

To create a group account in Active Directory on the Domain Controller:
Click Start, point to Programs, point to Administrative Tools, and then click Active Directory Users and Computers.
In Active Directory Users and Computers window, expand <domain name>
In the console tree, right-click the folder in which you want to add a new group.
Click New, and then click Group.
Type the name of the new group. Use a name that you can easily associate with the role or service for which you are creating.
In the New Object - Group dialog box, do the following:
In Group scope, click Global scope.
In Group type, click Security.
Click Finish.
Repeat steps 3 through 7 for all remaining groups.
Proposed groups are:
HyperDoc Users
TDXM Users
SuperEdit Users
CADRaster Users
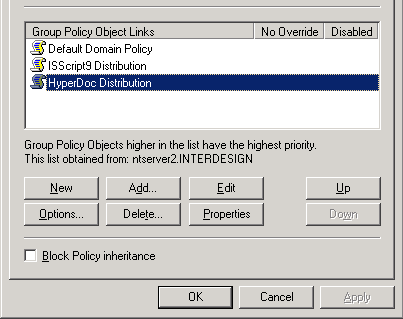
To create a Group Policy object (GPO) to use to distribute the software package:
Start the Active Directory Users and Computers snap-in. To do this, click Start, point to Administrative Tools, and then click Active Directory Users and Computers.
In the console tree, right-click your domain, and then click Properties.
Click the Group Policy tab, and then click New.
Type a name for this new policy (for example, HyperDoc Distribution), and then press ENTER.
Click Properties, and then click the Security tab.
Click to clear the Apply Group Policy check box for the security groups that you want to prevent from having this policy applied.
Click to select the Apply Group Policy check box for the groups that you want this policy to apply to.
When you are finished, click OK.

To assign a program to computers that are running Windows Server 2003, Windows 2000, or Microsoft Windows XP Professional, or to users who are logging on to one of these workstations:
Start the Active Directory Users and Computers snap-in. To do this, click Start, point to Administrative Tools, and then click Active Directory Users and Computers.
In the console tree, right-click your domain, and then click Properties.
Click the Group Policy tab, select the group policy object that you want, and then click Edit.
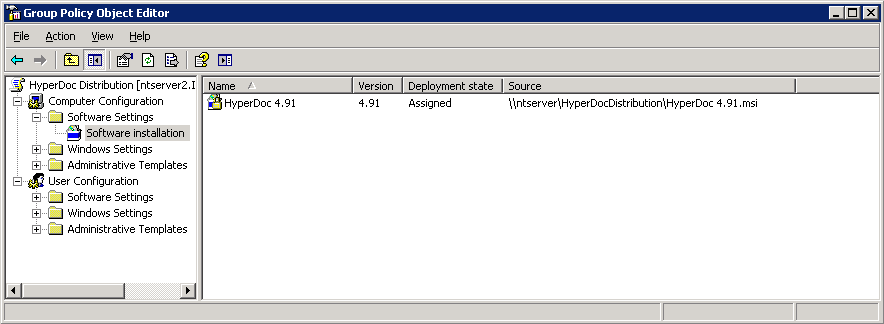
Under Computer Configuration, expand Software Settings.
Right-click Software installation, point to New, and then click Package.
In the Open dialog box, type the full Universal Naming Convention (UNC) path of the shared installer package that you want. For example:
\\file server\HyperDocDistribution\HyperDoc 4.92.msi.Important
Do not use the Browse button to access the location. Make sure that you use the UNC path to the shared installer package.
Click Open.
Click Assigned, and then click OK. The package is listed in the right pane of the Group Policy window.
Close the Group Policy snap-in, click OK, and then quit the Active Directory Users and Computers snap-in.
When the client computer starts, the managed software package is automatically installed.

To publish a package to computer users and make it available for installation from the Add or Remove Programs tool in Control Panel:
Start the Active Directory Users and Computers snap-in. To do this, click Start, point to Administrative Tools, and then click Active Directory Users and Computers.
In the console tree, right-click your domain, and then click Properties.
Click the Group Policy tab, click the group policy object that you want, and then click Edit.
Under User Configuration, expand Software Settings.
Right-click Software installation, point to New, and then click Package.
In the Open dialog box, type the full UNC path of the shared installer package that you want. For example:
\\file server\HyperDocDistribution\HyperDoc 4.92.msi.Important
Do not use the Browse button to access the location. Make sure that you use the UNC path to the shared installer package.
Click Open.
Click Published, and then click OK.
The package is listed in the right pane of the Group Policy window.
Close the Group Policy snap-in, click OK, and then quit the Active Directory Users and Computers snap-in.
Test the package:
Note
Because there are several versions of Microsoft Windows, the following steps may be different on your computer. If they are, see your product documentation to complete these steps.
Log on to a workstation that is running Windows XP Professional by using an account that you published the package to.
In Windows XP, click Start, and then click Control Panel.
Double-click Add or Remove Programs, and then click Add New Programs.
In the Add programs from your network list, click the program that you published, and then click Add. The program is installed.
Click OK, and then click Close.
or
Log on to a workstation that is running Windows 7 Professional by using an account that you published the package to.
In Windows 7, click Start, and then click Control Panel.
Double-click Programs and Features, and then click Install program from the network.
In the Install program from the network list, click the program that you published, and then click Add. The program is installed.
Click OK, and then click Close.


