An image displayed in the document view pane may contain spots with links to the other objects or documents in the database. When you move the mouse over any of these spots while the jump mode is active, the spot's color gets highlighted. In the same time, you can see a kind of link description in the status bar. When you click such a spot, relevant object gets highlighted in the hierarchy pane, the document list pane is filled appropriately and the content of the document is displayed automatically. Hyper-Navigation works only within the current hierarchy. You cannot "jump" to another hierarchy.
Toolbars are displayed vertically on the left side of document view pane. You can activate toolbar buttons by clicking them. The first (left) side of collumn with buttons is always active. The second one becomes active after activating appropriate mode from the first toolbar. Each mode remains active until you depress the button to close this mode or enter another one.
For information on buttons from the right side see the section called “Measurements”.
Buttons from left pane are:
 Help - opens this manual in new tab of your browser.
 Zoom Window - toogle activation of transparent zoom mode. It can be activated or switched off in the middle of the currently realized action.
 Pan View - toogle activation of transparent pan view. It can be activated or switched off in the middle of the currently realized action.
 Zoom Previous - toogles you back to previous view.
 Zoom In - zooms in your current view.
 Zoom Out - zooms out from your current view.
 Zoom Extents - zooms into view that allow you to see whole document.
 Reload - reloads your current document. It does not changes current zoom.
 Copy View - copies your current view to clipboard or/and into new browser tab. See more information below in the section called “Copy View”.
Drawing visibility (you can control the visibility of any vector drawing that is displayed together with the document):
 Toogle Measurements drawing - switches on/off displaying the measurement drawing.
 Toogle ObjectOverlay drawing - switches on/off displaying the object overlay drawing.
 Toogle Redlining drawing - switches on/off displaying the redlining drawing.
 Set layer - opens Layer panel on right side of Document View Pane where user can specify visibility of Object Overlay and Redlining layers.
 Print Preview - opens Print panel. More information on Printing can be found in the section called “Printing”.
 Print - starts printing current document using parameters defined in HDocASP.ini file.
 Print to PDF - immediately creates a PDF file from current document using parameters defined in HDocASP.ini file.
 Measurements drawing active - opens Measurements panel.
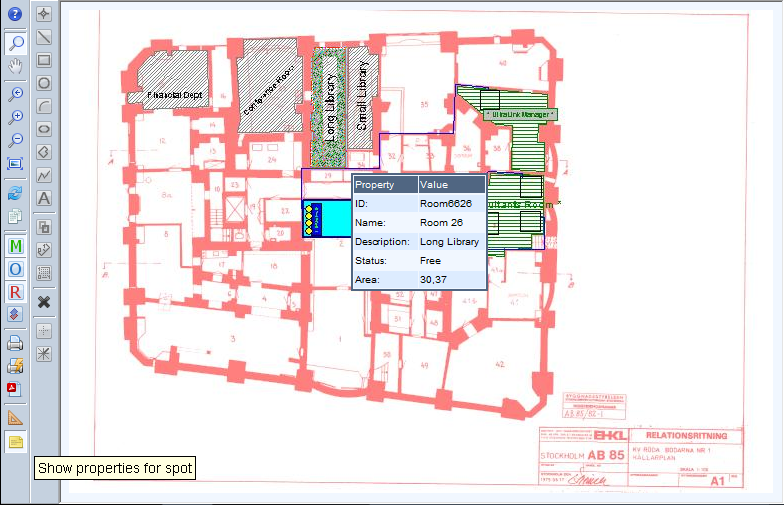
  Show Properties for spot - turns on displaying spot information by hovering mouse over this spot - see the section called “Object properties for hovered spot”.
More information on some Toolbars option are below:
You can zoom and pan to display required part of the document. The first two groups of buttons on the first toolbar control this kind of activity.
Using Zoom Window button you activate a zoom window mode. In the zoom window mode, you may define the rectangular area of the document to be zoomed in. To do this, press down the left mouse button with the cursor over the first corner of the desired area and then drag the cursor holding mouse button pressed to show the opposite corner, where you release the button. While dragging the cursor, the shape of the rectangle is displayed to show the currently defined window. After releasing the mouse button, a new view is displayed.
Using Pan View button you activate a panning mode. In the panning mode, you can scroll the document by holding down the left mouse button and dragging. While dragging the cursor, the bitmap view of the document is shifted, showing the effect of the panning operation. After releasing the mouse button, a new view is displayed.
In the most cases, both the zooming and the panning actions can be started transparently, i.e. without restrictions to the normal activity. You can click on spots to select them (see the section called “Hyper-Navigation”), drag spot's grips to edit them (see the section called “Selection and grips edition”, or - in the same time - start dragging to define the zoom rectangle or panning offset, depending on which one of the Zoom Window or Pan View buttons is active. You can release these buttons to switch this feature off.
During defining vector entities (see the section called “Defining spots and texts”), both Zoom Window and Pan View buttons become depressed. To activate the desired action, you have to press the appropriate button on the left toolbar. Now you can point out the zooming rectangle or panning offset, with normal activity of defining a vector entity action suspended. After reloading the desired view, the zooming or panning action is finished and the normal activity is resumed. When you finish defining vector entity, previous settings of Zoom Window and Pan View buttons are restored.
The Zoom Previous button lets you review a zooming history. Using the others zoom buttons you can Zoom In and Zoom Out in the document, show entire document (Zoom Extents), and Reload its current view from server.
Copy View can now be direct copy to your clipboard.
This functionality gives user the possibility to copy current view to clipboard by pressing Copy View toggle menu button in HISDocView frame.
Note
Former functionalities of Copy View, that is opening new window with object view, were not disabled and can be enabled in INI section, described in HIS Administrator Manual - please see the link below.
Now the user is able to paste image containing current view to MS Word or Paint documents by just executing paste operation (using keyboard shortcut CTRL+V or clicking on Paste from proper menu).
For information related on configuring this function please refer to HIS Admin Manual, the section called “Copy View - configuration”.
This HyperDoc Online functionality allows user to show properties in a popup window for spot when mouse pointer is hovered over this spot.
This functionality can be enabled with a button on a toggle menu: Show properties for spot. This functionality is enabled for JumpServer context only.

This function allow you to trigger pop-up menu on right click on hovered spot in in HyperDoc Online view frame and copy link to spot, that opens HOPA .asp page.
It's now enabled in Internet Explorer 6 and later, Mozilla Firefox, Opera, Chrome and Safari without user attention.
To use it follow this steps:
Select an object from hierarchy to show it in HyperDoc Online view frame.
If image contains spots, move mouse over spot. It should get highlighted.
Right click on hovered/highlighted spot. Action will trigger popup menu.
Click Copy link to spot menu option.
If operation is successfully no popup message will be displayed but the link will be copied to clipboard.
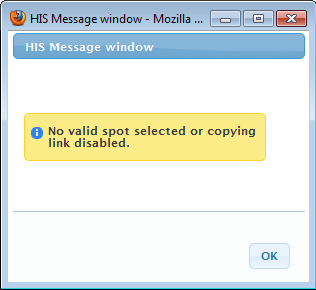
If copying fails the user will be prompt with a following popup:

Note
For information on configuration this function refer to HIS Admin Manual - the section called “Copy link to spot”.
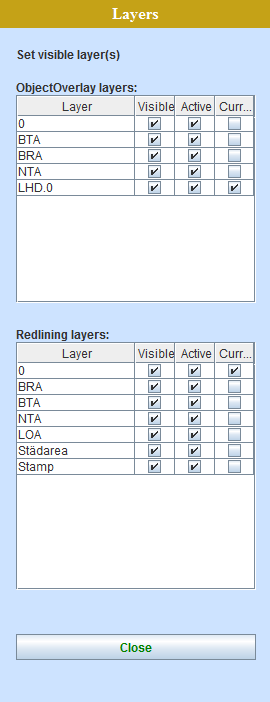
When clicking on Set Layer button on HIS toolbar, you will see Layers Pane.

Set Layers consists of two tables: ObjectOverlay layers and Redlining layers, each with four columns:
Layer - displays layer name that is present on current drawing.
Visible - controls if layer is visible on drawing. If layer is not visible than it's also not active.
Active - controls if objects (like spots) on layer can be used or not. If layer is set to inactive it still can be visible.
Current - controls which layer is the one your currently working on.
Note
Current layer comes from current layer set on server in each overlay drawing and can be individually changed on client in temporary manner (until other drawing will be loaded). Note that in this way, if spot from current layer covers totally another one which is on the other layer, that another one cannot be selected until its layer will be selected as current.
Warning
If write_vectors is not set than Redlining's Current Layer cannot be set.
Important
Changes done on Set Layers Pane are only temporary, they are not in any way sent to database.


