
To select HyperDoc database to be used by HyperDoc Online
open HDocASP.ini file located in Program subdirectory
of the installation directory. Enter information in [Database
Settings], [Access Settings],
[Options], [ODBC Settings] sections
as appropriate for your installation. These setting are analogous to
respective settings in HDoc.ini file in standard
HyperDoc product. Please refer to HyperDoc manual for further details.
IMPORTANT: Please note that HDocASP.ini file contains confidential information like
user name and password used to access databases. So it is of utmost importance
to remove read permissions to this file. It can be performed using
Internet Service Manager after completing configuration.
User name and password in the [Access Settings] or
[ODBC Settings] section must always be supplied, since HIS
uses them to connect to the database and they determine database rights
of all HyperDoc Online users. Their application access rights can be determined in one
of two other ways. HyperDoc Online either works in anonymous mode (user defined in the
[anonymous user] section determines application rights for
all users) or uses credentials supplied via the Web browser for each user separately.
When using SQL Server databases appropriate system
data source must be defined and its name entered in HDocASP.ini file.
Example settings for Microsoft Access database.
[Database Settings] DBType=Access [Access Settings] MainDatabase=C:\Program Files\Tessel Software Line\HyperDoc\DemoDB\NetMan.mdb UserName=Admin Password=admin [Options] SystemDB=C:\Program Files\Tessel Software Line\HyperDoc\DemoDB\System.mda
Example settings for Microsoft SQL Server database.
[Database Settings]
DBType=ODBC

[ODBC Settings]
MainDatabase=DRIVER={SQL Server}; PROVIDER=SQLOLEDB; Database=database_name; SERVER=server_name
RDO=0
UserName=admin
Password=admin
HyperDoc Online supports running multiple HyperDoc
databases on the same server. This can be achieved thanks to HyperDoc Online
feature of reading HDocASP.ini from Config
subdirectory of ASPPages,
if one exists.
You must perform the following steps to
enable more than one database.
Make a separate configuration directories for each HyperDoc database.
Each of these directories should contain own copy of
HDocASP.iniwith settings appropriate for its respective database.Create virtual directories in IIS for each of the databases - all of them pointing to
ASPPagesdirectory. Configure IIS applications and MTS packages as described above.Using IIS in each of virtual directories create new virtual directory with name (alias)
Configpointing to previously created configuration directory with appropriateHDocASP.ini.Remember to disable read permissions for
HDocASP.inifiles in all directories in the same way as it is done for single database configuration.
Alternatively you can use obsolete method of cloning whole
ASPPages directory.
Make a separate copy of
ASPPagesdirectory for each HyperDoc database.Create
HDocASP.inifiles in each of these directories, each of the files should contain settings appropriate for its respective database.Create virtual directories in IIS for each of the directories and configure IIS applications and MTS packages as described above.
Disable read permissions for
HDocASP.inifiles in all directories to avoid leakage of important system information (like user names and passwords used to access databases).
In HyperDoc Online you can use the same print templates as in standard
HyperDoc. To use the templates in HyperDoc Online open HDocASP.ini file located
in Program subdirectory of the installation directory and set
TemplateDirectory parameter located in the
[General] section to the full path of directory
containing your template files. HyperDoc Online will use all the template files
in this directory (but not in its sub-directories).
Make sure that there is at least one template file (.tvd) in this directory and that this file does not have read-only attribute set.
Default template name can be specified using parameter named PrintTemplate in the same section.
If you have icons in redlining/object overlay drawings in your
database, you need to configure HyperDoc Online to use appropriate icon
directory. Set IconPath parameter in the
[General] section of HDocASP.ini file
to the full path of the icon directory
[General]
TemplateDirectory=C:\Program Files\Tessel Software Line\HyperDoc\DemoDB\
PrintTemplate=PRINT-A4.TVD
IconPath=C:\Program Files\Tessel Software Line\HyperDoc\DemoDB\Resource
Important
To get HyperDoc Online working on Internet Information Services 7.0 in Windows Server 2008, 2008 R2, Vista or Windows 7 and 8 environment following components should be installed with IIS:
IIS 6 Management Compatibility with IIS 6 Metabase Compatibility and IIS 6 Management Console
Application Development with ASP
To enable IIS 6 Management Compatibility please perform following steps:
Click Start, click Control Panel, click Programs and Features, and then click Turn Windows features on or off.
Open Internet Information Services.
Open Web Management Tools.
Open IIS 6.0 Management Compatibility.
Click to select the IIS 6 Metabase and IIS 6 configuration compatibility, IIS 6 WMI Compatibility, and IIS 6 Management Console check boxes.
Click OK.
To enable ASP on Windows Server 2003:
Click Start, point to Control Panel, and then click Add or Remove Programs or, for Windows Server 2008, in Control Panel, click Program, and then click Turn Windows features on or off.
In the Add or Remove Programs window, click Add/Remove Windows Components or for Windows Server 2008, in Server Manager, click Add Roles.
In the Windows Components window, click Application Server, and then click Details.
In the Internet Information Services (IIS) window, click World Wide Web Service, and then click Details.
In the World Wide Web Service window, click the check box next to Active Server Pages, and then click OK.
Click OK to close the Internet Information Services (IIS) window.
Click OK to close the Application Server window.
In the Windows Components window, click Next.
In the Completing the Windows Components Wizard window, click Finish.
To enable ASP on Windows Server 2008:
Click Start, point to Control Panel, click Programs, and then click Turn Windows features on or off.
In Server Manager, click Add Roles.
On the Add Roles Wizard page, select Application Server, click Next three times, and then click Install. Windows Server installs the new role.
Important
Please note that User Authentication Control mechanism used in Windows Server 2008, 2008 R2, Vista or Windows 7 and 8 should be disabled during creation of new HyperDoc Online application, because it could prevent Create HIS site application from working correctly.
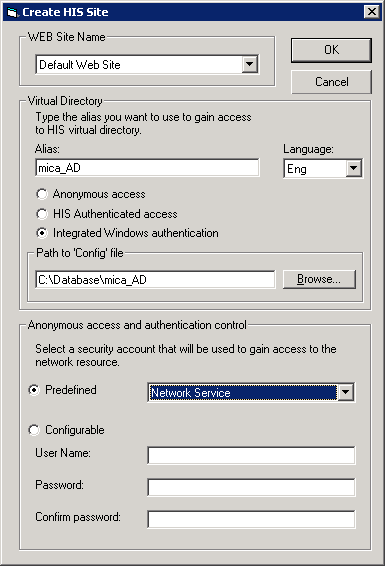
HyperDoc Setup program creates an icon in the HyperDoc program group
Create HIS Application. Double-click this icon
to start automatic IIS configuration program. This program creates HyperDoc Online
application and configures it automatically.
To create HyperDoc Online application provide the following information:
Virtual Directory Alias- enter name of the virtual directory that will be used to access the application,Anonymous access and authentication control- enter user name and password of an account to be used for the application (this user should be able to access HyperDoc database and document store - if the database or the document store reside on a separate computer this should be a domain account),Authenticated access- select login mode for the application (see the section called “Login modes” for details).
After completing this procedure you should be able to use
HyperDoc Online by pointing your browser to the created virtual
directory (like http://your-server/virtual-dir/).
If automatic configuration fails for some reason, you may perform manual configuration of IIS and MTS/Component services as described in sections below.
To use HyperDoc Online you must configure the Internet Information Server.
Start Internet Service Manager (located in Programs/Windows NT 4.0 Option Pack/Microsoft Internet Information Server folder).
Select the web site you want to use (usually this is Internet Information Server/*your-host/Default Web Site).
Right-click on it and select New/Virtual directory. The New Virtual Directory Wizard should show on the screen.
Enter the name for Alias to be used to access virtual directory (e.g. HyperDoc Online) and press the Next button.
Enter path with content - this should be full path to
ASPPagessubdirectory of HyperDoc Online installation directory - and press the Next button.Set required access rights to Read and Script and press the Finish button.
Right-click on the new virtual directory, select Properties, check the Run in separate memory space box and press Apply button.
Switch to the Documents tab, make sure that Enable Default Document box is checked and add either
hismain.htmlorhislogin.aspas the default document - depending on the desired login mode (see the section called “Login modes” for more information).Switch to Directory Security tab and press Edit button in Anonymous Access and Authentication Control.
In Authentication Methods dialog make sure that Anonymous Access is checked, Integrated Windows authentication and Basic authentication are unchecked and press Edit button for Account used for Anonymous Access.
In Anonymous User Account dialog:
select appropriate user account - this user should be able to access HyperDoc database and document store - if the database or the document store reside on a separate computer this should be a domain account,
make sure that Enable Automatic Password Synchronization is not checked,
make sure that the password for this user is entered correctly.
This user password should not be changed or each password change should be appropriately reflected in IIS configuration.
Press OK button.
Verify that the user specified in previous step has access to the HyperDoc Online installation directory.
Start Internet Services Manager (located in Programs/Administrative Tools folder).
Select the web site you want to use (usually this is Internet Information Services/*your-host/Default Web Site).
Right-click on it and select New/Virtual directory. The Virtual Directory Creation Wizard should show on the screen.
Enter the name for Alias to be used to access virtual directory (e.g. HyperDoc Online) and press the Next button.
Enter path with content - this should be full path to
ASPPagessubdirectory of HyperDoc Online installation directory - and press the Next button.Set required access rights to Read and Run scripts and press the Next button.
Press the Finish button.
Right-click on the new virtual directory, select Properties, choose High (isolated) item from Application Protection combo box and press Apply button.
Switch to the Documents tab, make sure that Enable Default Document box is checked and add either
hismain.htmlorhislogin.aspas the default document - depending on the desired login mode (see the section called “Login modes” for more information). NOTE: Added item should be first on list.Switch to Directory Security tab and press Edit button in Anonymous Access and Authentication Control.
In Authentication Methods dialog make sure that Anonymous Access is checked, Integrated Windows authentication and Basic authentication is unchecked and press Edit button for Account used for Anonymous Access.
In Anonymous User Account dialog:
select appropriate user account - this user should be able to access HyperDoc database and document store - if the database or the document store reside on a separate computer this should be a domain account,
make sure that Allow IIS to control password is not checked,
make sure that the password for this user is entered correctly.
This user password should not be changed or each password change should be appropriately reflected in IIS configuration.
Press OK button.
Verify that the user specified in previous step has access to the HyperDoc Online installation directory.
Start Internet Information Services (IIS) Manager (located in Programs/Administrative Tools folder).
Select Web Service Extensions branch and allow Active Server Pages).
Select Application Pools branch (Internet Information Services/*your-host/Application Pools).
Right-click on it and select New/Application pool.... The Add New Application Pool dialog box should show on the screen.
Enter the name for Application pool ID (e.g. HyperDoc Online) and press the OK button.
Right-click on the new application pool, select Properties, choose Identity tab, select Configurable Application pool identity select appropriate user account - this user should be able to access HyperDoc database and document store - if the database or the document store reside on a separate computer this should be a domain account
Select the web site you want to use (usually this is Internet Information Services/*your-host/Web Sites/Default Web Site).
Right-click on it and select New/Virtual directory. The Virtual Directory Creation Wizard should show on the screen.
Enter the name for Alias to be used to access virtual directory (e.g. HyperDoc Online) and press the Next button.
Enter path with content - this should be full path to
ASPPagessubdirectory of HyperDoc Online installation directory - and press the Next button.Set required access rights to Read and Run scripts and press the Next button.
Press the Finish button.
Right-click on the new virtual directory, select Properties, choose Application Pool created previously in Application pool combo box and press Apply button.
Switch to the Documents tab, make sure that Enable Default Document box is checked and add either
hismain.htmlorhislogin.aspas the default document - depending on the desired login mode (see the section called “Login modes” for more information). NOTE: Added item should be first on list.Switch to Directory Security tab and press Edit button in Anonymous Access and Authentication Control.
In Authentication Methods dialog make sure that Anonymous Access is checked, Integrated Windows authentication and Basic authentication is unchecked and press Edit button for Account used for Anonymous Access.
In Anonymous User Account dialog:
select appropriate user account - this user should be able to access HyperDoc database and document store - if the database or the document store reside on a separate computer this should be a domain account (it should be the same user account as used as Application Poll identity),
make sure that Allow IIS to control password is not checked,
make sure that the password for this user is entered correctly.
This user password should not be changed or each password change should be appropriately reflected in IIS configuration.
Press OK button.
Verify that the user specified in previous step has access to the HyperDoc Online installation directory.
Right-click on new application in Internet Information Services/*your-host/Web Sites/Default Web Site/your_application) and select New/Virtual directory. The Virtual Directory Creation Wizard should show on the screen.
Enter config as a name for Alias to be used to access virtual directory and press the Next button.
Enter path to folder with HDocASP.ini file and press the Next button.
Uncheck Read right and press the Next button.
Press the Finish button.
Right-click on new application once again and select New/Virtual directory. The Virtual Directory Creation Wizard should show on the screen.
Enter lang as a name for Alias to be used to access virtual directory and press the Next button.
Enter path to folder with particular language in ASPPages folder of HyperDoc Online installation folder and press the Next button.
On next page simply press the Next button.
Press the Finish button.
Using the same method create virtual directory called manual. it should point to manual subfolder of language folder selected in previous steps.
Start Internet Information Services (IIS) Manager (located in Programs/Administrative Tools folder).
Make sure ASP is enabled.
Select Application Pools (*your-host/Application Pools).
Right-click on it and select Add Application pool....
Enter the name for Application Pool (e.g. HyperDoc Online) select No Managed Code in .NET Framework version combo box. Click OK.
Right-click on the new application pool, select Advanced Settings..., choose Identity and select appropriate user account - this user should be able to access HyperDoc database and document store - if the database or the document store reside on a separate computer this should be a domain account
Please note that if the operating system is in 64-bit edition then to make HyperDoc Online working, application pool for given HIS site should be enabled to run 32-Bit applications. Setting Enable 32-Bit Applications can be set in Advanced Settings options panel for the application pool.
Select *your-host/Sites and right-click on it and select Add Web Site.
Enter the site name for your application (e.g. HyperDoc Online), select application pool defined in previous steps and define path with content - this should be full path to
ASPPagessubdirectory of HyperDoc Online installation directory. Click on Connect as... button to select user account - this user should be able to access HyperDoc database and document store - if the database or the document store reside on a separate computer this should be a domain account (it should be the same user account as used as Application Poll identity),Verify that the user specified in previous step has access to the HyperDoc Online installation directory.
Right-click on new application in *your-host/Sites/your_application) and select Add Virtual directory.
Enter config as Alias a name and enter path to folder with HDocASP.ini file and press the OK button.
Right-click on new application in *your-host/Sites/your_application) and select Add Virtual directory.
Enter lang as Alias and enter path to folder with particular language in ASPPages folder of HyperDoc Online installation folder and press the OK button.
Right-click on new application in *your-host/Sites/your_application) and select Add Virtual directory.
Using the same method create virtual directory called manual. it should point to manual subfolder of language folder selected in previous steps.
HyperDoc Online installation requires configuration of the MTS package as well.
Start Internet Service Manager (located in Programs/Windows NT 4.0 Option Pack/Microsoft Internet Information Server folder).
Click on Microsoft Transaction Server, then expand this node and select the package representing HyperDoc Online application in IIS - usually this is Computers/My Computer/Packages Installed/IIS-{Default Web Site//Root/his}.
Right-click on the package and select Properties.
Switch to identity tab and click This user button.
In User field enter the same user account that was used for anonymous access in IIS configuration. Enter password for this user in Password and Confirm password fields.
HyperDoc Online installation requires configuration of the COM+ Applications as well.
Start Component Services (located in Programs/Administrative Tools folder).
Click on Component Services, then expand this node and select the package representing HyperDoc Online application in IIS - usually this is Computers/My Computer/COM+ Applications/IIS-{Default Web Site//Root/his}.
Right-click on the package and select Properties.
Switch to identity tab and click This user button.
In User field enter the same user account that was used for anonymous access in IIS configuration. Enter password for this user in Password and Confirm password fields.
It is possible to accelerate HyperDoc Online Publishing Agent by storing prepared images in the file system of the server.
To enable this feature, perform the following steps.
Create a directory for the image cache.
Set
Directoryparameter of[ASP Cache]section of theHDocASP.inito the location of that directory.
[ASP Cache]
Directory=C:\Path-To-Image-Cache-Directory
Image cache is automatically cleared after sending updates to HyperDoc Online.
HyperDoc Online can now work in two login modes: anonymous and verified.
In anonymous mode users do not need to authenticate to use HyperDoc Online. There are two ways to use this mode:
hismain.html
To use this mode, make
hismain.htmlpage a default page for the IIS application and add section like the following one toHDocASP.ini.[anonymous user] Username=JohnDoe Password=Xyz123!@#
This section defines a database user whose application rights will be given to all anonymous HyperDoc Online users. You cannot connect to HyperDoc Online using
hismain.htmlwithout a valid[anonymous user]section.HISAutoLogin.asp.
It could be used for start UI. It does not require authentication, but must be enabled and IP Restriction is recommended.
To enable this page, set in
INIfile, in section[Configuration]parameter:HISRestrictedAutoLogin=1;
When it is enabled, it requires user name and password for anonymous access. Add following section:
[HIS Restricted Access User]
UserName=JohnDoe
Password=Xyz123!@#
Please remember, that this page give unauthorized access to HyperDoc Online, so you should use it with caution - enable IP Restriction.
To open HIS using HISAutologin.asp type into browser:
http://HIS_Server_Name/HisAutologin.asp
This will open HyperDoc Online with Find Object window that will allow you to search and go to desired Object.
You can also use parameters of specific object or document and add them to url to open using HOPA parameters to open HIS already on this specific object:
http://HIS_Server_Name/HisAutologin.asp?ObjID=HDocHierarchyDef2|1|HDV_H2_FLOOR|283
http://HIS_Server_Name/HisAutologin.asp?DocID=2145533
Note
Please note that, using
HISAutologinwithDocIDwill show first found document with given ID. There can be more documents (links) with same ID in database.Using
HISAutologin.aspgives you the possibility to open HIS in a Subtree mode (hierarchical tree is narrowed only to the desired object and it's parents up to the root).Example use of this parameter can be as following one:
http://HIS_Server_Name/HisAutologin.asp?ObjID=HDocHierarchyDef2|1|HDV_H2_FLOOR|283&subtree=1&HierName=HDocHierarchyDef2
This will enable subtree mode as
subtree=1was used (subtree can be added afterHierNametoo if needed). For nowsubtreevalue can only be"1".You can also use additional parameters in this mode:
Parameters are:
UseView- determines whether we want to get whole drawing (parameter value 0) or specified view (value 1 – default).SpotMarginPercent- percent of area surrounding spot (e.g. “100” – spot only; “110” – add 10% margins around spot boundaries).
Note
Using
HierNameparameter is recommended allways.Subtreemode will not work withDocIDparameter.
In verified mode users need to authenticate to use HyperDoc Online. Authentication is performed by the underlying database system - i.e. the user logging in via HyperDoc Online uses the same name and password that is used to log in with standard HyperDoc.
To use verified mode,
make hislogin.asp page a default page for the IIS application.
You can configure HyperDoc Online to allow using both modes. One of them is the default
one (depending on default page setting) and other is available by indicating
the other page (hislogin.asp or hismain.html)
while connecting to HyperDoc Online.
To disallow anonymous access you must make
hismain.html inaccessible for direct Web access.
To do this, perform the following steps.
Open properties of the
hismain.htmlfile in Internet Service Manager.Make sure that the Read check box of the Access Permissions is not checked.
Do not delete hismain.html file since this would break HyperDoc Online operation.
This HyperDoc Online web page is standard .asp page, which allows user to see all HyperDoc parameters currently used in HyperDoc Online.
All files required to display GetParams.asp page properly are stored in HyperDoc Online folder HyperDoc/Current/ASPPages/
To display page in browser, one should simply type:
http://his_address/getparams.asp where his_address stands for address of currently used HyperDoc Online.
Important
Access to page getParams.asp is restricted to users with administrator privileges only.
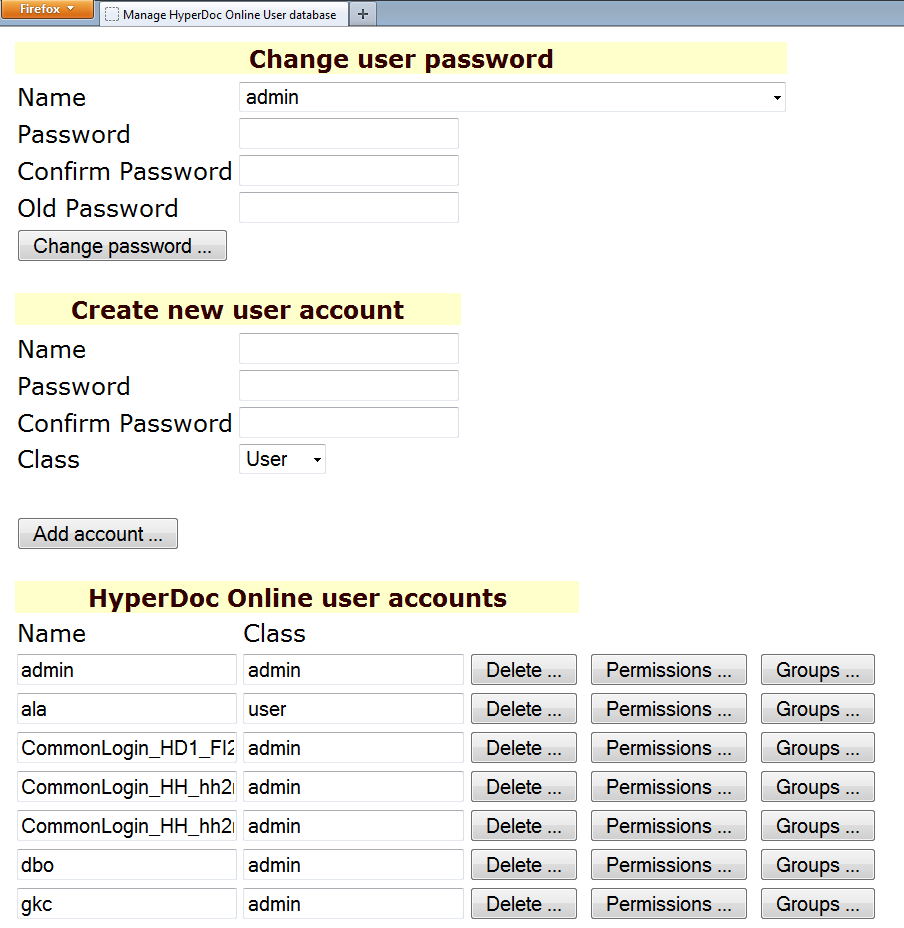
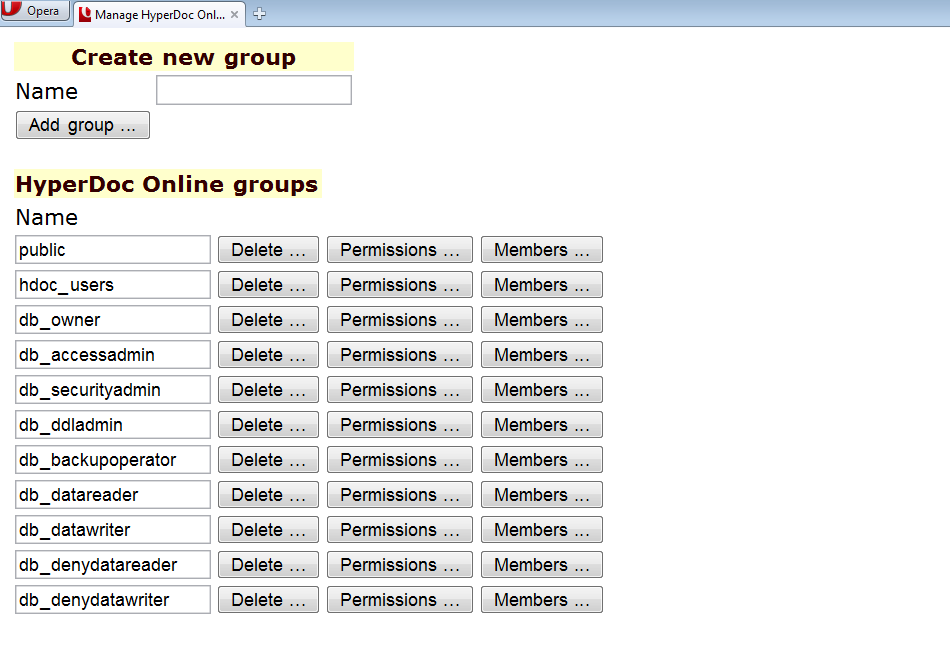
Proprietary groups and users memberships can be managed from within HyperDoc Admin tool or using hisUsers.asp and newly added hisGroups.asp web pages.
Groups functionality in HyperDoc controlled via hisusers.asp and hisgroups.asp
HyperDoc has been extended with possibility of using proprietary groups with already implemented Proprietary User List mode.
Important
If user is added as a group member his effective rights are the sum of his personal rights and rights resulting for all his group's memberships. Please note that groups cannot be set as group members in this mode.
MSSQL users and groups can be also managed using HyperDoc Admin tool and HIS sites described above. But in this case, there are some limitations.
Here are some of them: fixed database roles couldn't be deleted, public role and dbo user shouldn't be managed using above tools. User used by HyperDoc Internet Server needs to have enough rights for users and groups handling (please refer to Microsoft MSDN to check rights requirements).
To enable using of proprietary groups with proprietary users one has to use “Check and Create Extra Tables” option from HyperDoc Configuration Manager's File menu.
Then they would be available after setting Proprietary User List mode in HyperDoc Admin from User list mode menu.
hisUsers.asp has been extended with Groups button.
List of operations possible to be done on hisUsers.asp site:
adding new users,
changing users passwords,
deleting users,
setting users memberships,
setting users permissions (HyperDoc rights).
The page looks like this:
HyperDoc Online application has been prepared to support Windows Authentication. In this matter we strongly rely on configuration tasks performed by administrator across existing IT environment, where solution is supposed to work. Areas of IT environment configuration/management which might require administrator's attention are:
Active Directory,
IIS,
MS SQL Server.
Whole idea behind configuring our application this way is to allow users to access HIS without need to log in – this is possible when given user works on computer which is a part of a company's domain and is already logged in with proper domain user account which has been set in MS SQL Server to have rights to HyperDoc database:
individually,
by domain group membership.
In another situation user will have to specify proper credentials to access HIS site - this is called fallback. It has its own limitations and sometimes may simply not work (please see section: Limitations and “double hop” problem).
Please notice that usage of Windows Authentication for HIS access is supported only by Internet Explorer web browser (version 8 and newer). It may be possible to use other web browsers for such an access, but it may require additional configuration not covered in this document and was not tested therefore it’s not supported.
Before preparing such environment it would be best to be familiar with some articles on this subject:
There are many possibilities to make web application to use Windows Authentication and cooperate with Active Directory and MS SQL Server. Here is a proposed configuration which could be set for HyperDoc Online.
Follow needed actions from the section called “Configuring HyperDoc Client with Active Directory users and groups via Windows Authentication” related to Window's domain, domain groups and users, SQL server, logins and rights
HIS application must work under Network Service account.
Please make sure that following IIS option Execute in MTA is set to False.
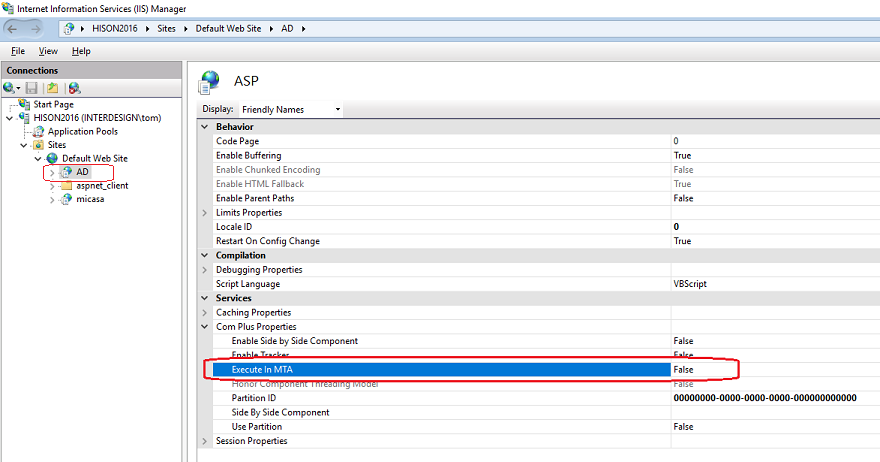
Network Service account must have access to INI file (check Security of INI file).
Find out what is HDOC's Common Login (by using Database or HDOC Admin)
In INI file in section
[ODBC Settings]addusernameandpasswordparameters using common login credentials.Open SQL Server Management Studio.
In chosen Database do:
check and create user in master database
USE [master]; GO;
CREATE USER [CommonLogin] FOR LOGIN [CommonLogin]
add needed execute rights
USE [master]; GO;
grant execute on sys.xp_logininfo to [CommonLogin]
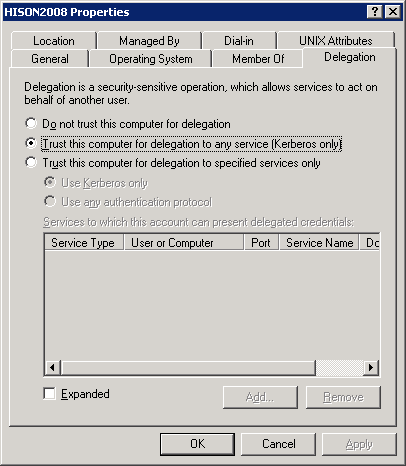
On domain controller computer set web server's (IIS) computer account to be trusted for delegation in Active Directory: "Trust this computer for delegation".
Make sure that there are proper Service Principal Names set in Active Directory domain for web server and database server computers (if they are separated – if not only one SPN should be checked).
Please notice that SPNs should be registered for both servers (ISS server and Database server). If given service works on domain account then it should be registered for this specified account, if not it should be registered for computer account. Additionally SPNs should correspond for names used to access servers (specified in browser url when accessing HIS application, or in HdocAsp.ini where we specify database server name).
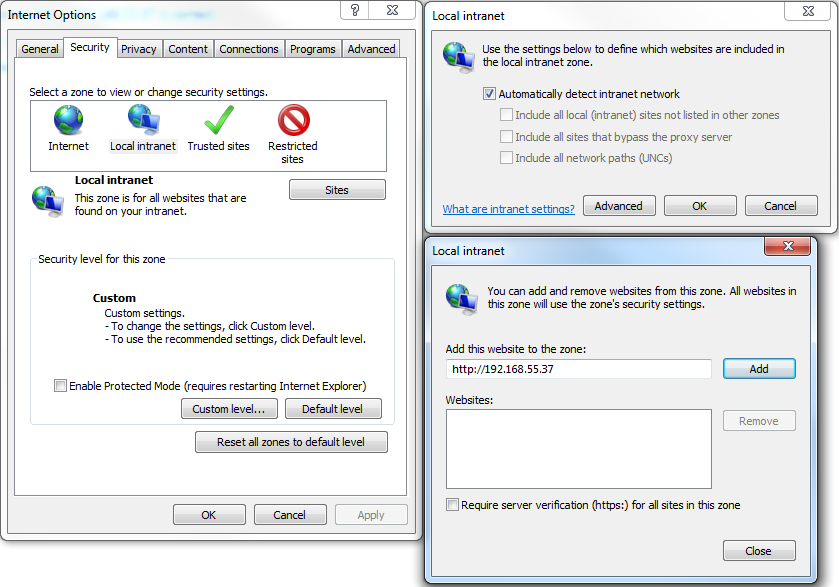
Add HIS url to Local Intranet or Trusted sites zone in Internet Explorer settings used by client.
IE should also have Enable Integrated Windows Authentication option enabled (
Internet Options/Advanced/Security).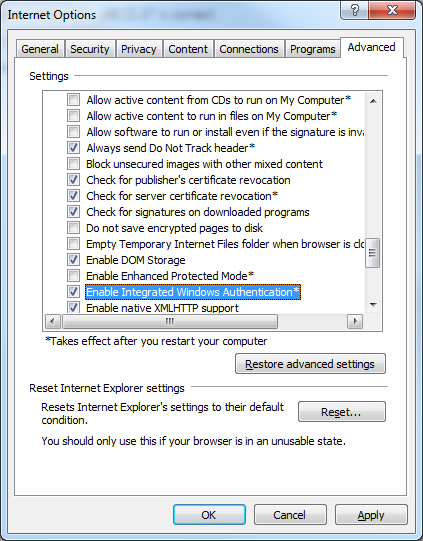
Warning
If you use domain groups in your configuration, they will be also visible in hisgroups.asp page of HIS site. But as they are only users for SQL, you cannot add members to them from this page. This can only be done in domain controller.
"Double hop" infrastructure means that HIS web application working on IIS server makes use of database which works on MS SQL Server which is located on another server.
User credentials from Internet Explorer are delegated from web server computer to database server. This requires that Windows Authentication process is performed using Kerberos protocol. Kerberos requires client connectivity to Active Directory Domain Controller – so client computer should be a part of company's domain or be in same network.
Please take this into consideration while planning HIS installation. If we still want to access HIS from "outside" computers, the easiest way to achieve that could be to install IIS and MS SQL Server alongside on same server computer.
Problems with configuring Integrated Windows Authentication for web application, especially when we need to consider "double hop" issue is a really broad topic. Many things could be configured wrong. There are also some limitations for usage scenarios.
For diagnosing problems with Windows Authentication we strongly suggest usage of DelegConfig application. It can be downloaded from here.
It is widely used by IT community. The main thing is to install this test application just alongside HyperDoc Online – on same IIS server and with application pool working on behalf of the same user as for HIS. Then you could use it's reporting and testing capabilities. Please refer to download package with this application for additional instructions on its installation.
We strongly recommend using the section called “Automatic application configuration”
with Create HIS Application program.
Manual procedure is much more error prone.
HyperDoc Online components work as a Microsoft Transaction Server package. The package runs in a security context of a user specified when creating HyperDoc Online application. This user may have different rights to various files (like HyperDoc database, document content files, redlining and object overlay files or template files), than the user logged in at the server console. This is usually the first thing that should be verified when HyperDoc Online does not work as expected.
User account specified for HyperDoc Online should have the following rights:
read and execute access to all files in HyperDoc Online
Programdirectory,read and execute access to all
.DLL,.OCXand.EXEfiles inWINNT\System32directory,read access to all files in
ASPPagesdirectory and all subdirectories - includingConfigvirtual directory,when using replication to HyperDoc Online, read/write access to the
packagesdirectory - real or virtual sub-directory ofASPPagesdirectory,when Access database is used - read/write access to the database files,
read/write access to spot and redlining files,
read access to the document files (read/write access when replication is used).
When database, document or vector files (redlining, spots) are stored on another machine, this account should be a domain account.
Data source for HyperDoc Online should be a system DSN.
When using named pipes network library, HyperDoc Online user account (a domain account) should have right to log in to the SQL Server machine, even when SQL Server authentication is used. This limitation does not apply when TCP/IP network library is used.
Quite frequently, problems occur after restoring files from a CD. Since all the files get read-only attribute, various things do not work. For obvious reasons, all the files that HyperDoc Online needs read/write access to (as listed above), cannot have read-only attribute.
If HyperDoc Online does not display drawings, verify that
logical devices specifying HyperDoc document file locations use UNC
convention (\\server\path).
HyperDoc Online is designed to be used on all major browsers as specified before. However due to current Java problems there may be some problems with performance on some browsers.
For instance in Document View Pane you can see error message: Error connecting to server and no document will display there.
To fix such problem create a XML file on your server computer. XML should be named crossdomain.xml and should be located in C:\inetpub\wwwroot.
Content of XML file:
<?xml version="1.0"?>
<!DOCTYPE cross-domain-policy SYSTEM
"http://www.macromedia.com/xml/dtds/cross-domain-policy.dtd">
<cross-domain-policy>
<allow-access-from domain="*"/>
</cross-domain-policy>
By default only two of four available document list layouts are enabled in menu - "Free" and "Free - multiline". Also available are: "Fixed width" and "Fixed width - multiline". To enable these options you have to uncomment adequate menu options in "hisDocListStaticReadonlyMenu.xml" file (by removing XML comment marks: "<!--" and "-->"). Please note that there is possibility to set proper layout as default by entering proper value for "use_field_width" parameter in "HDocASP.ini" in "[Configuration]" section - so you have to make sure that option selected as default in INI file is really enabled in menu file. Below there is explanation of each option available with corresponding value to be entered in INI file:
| 0 - free layout - fields in Document List fit to their contents - no line wrapping occurs |
| 1 - fixed width - text that does not fit is clipped (according width in HyperDoc configuration - if available) |
| 2 - fixed width, but multiline - whole text is visible (according width in HyperDoc configuration - if available) |
| 3 - free layout, but multiline - whole text is visible; browser actively adjust column widths, wrapping lines when needed |
By default only two of three available commands for document list report are enabled: "HTML" and "XML". There is one more command: "XML / HTML". This command generates an XML file with reference to proper XSL stylesheet - i.e. user gets in his browser an XML file (which can be saved to file to be processed by other applications) but rendered in browser window as HTML. To enable this option you have to uncomment adequate menu option in "hisDocListStaticReadonlyMenu.xml" file (by removing XML comment marks: "<!--" and "-->"). Please note that you can enforce required changes in report look and layout (e.g. to change report title) by modifying "GetDocListReportHTML.xsl" stylesheet.
Please note that if the operating system is in 64-bit edition then to make HyperDoc Online working, application pool for given HIS site should be enabled to run 32-Bit applications. Setting Enable 32-Bit Applications can be set in Advanced Settings options panel for the application pool.
When starting HIS client on Windows Vista you can get a message:
Cannot access applet testing Java version.
The HyperDoc Online must be viewed with Java 1.1.4 from Microsoft Corp. or Java 1.4.2 from Sun Microsystems Inc.
To install Java on your computer, please visit the Java Web site to download Java Virtual Machine.
Or similar saying that there is no Java installed.
Installing Java in IE7/XP solves the problem.
Unfortunately it does not help for IE7/Vista. Java installation online within IE7 (from here) apparently succeeds and gets confirmed by this, that announces:
Verifying Java Version
Congratulations!
You have the recommended Java installed (Version 6 Update 13).
However, IE7 on Windows Vista may work different:
In Tools/Manage Add-ons it reports Java add-on as installed and enabled (sometimes many times)
In Tools/Internet Options/Advanced Java is not shown, although Vista help says it should
Interestingly, if you completely uninstall Java, IE7 will show it in the Advanced Settings but I dont expect it working.
This work all Java-dependent sites inaccessible for IE7/Vista users.
To fix it please perform following steps:
Uninstall Java and remove all traces of it
Reboot and check results of Java uninstallation until positively there is no sign left, not in Windows, not in IE.
Start IE and try to open HIS client (i.e. here).
Admit that you don't have Java and follow link to install it.
It will redirect you to java site where you must click the Free Java Download and say: I was sent from MS.
This time it will work and you may enjoy HyperDoc Online.
Streaming and downloading multimedia files from BLOB Database (files kept in Database) - this is not supported by us as keeping this kind of files in those Databases is not good idea. It can behave in many ways. Some files may work, other not. You can try to this article to enhance performance of downloading multimedia files by adjusting ISS settings http://support.microsoft.com/kb/944886.
There were made changes to Java 7 update 6 code, that takes care of certification and they resulted in bug in HyperDoc Online. While loading HIS site, mixed content warning poped out informing that some parts of application is not signed (do not have valid certificate - that was not true).
Note
This bug was present in HyperDoc 4.95 and this fix is for this version. For newer version fix will be implemented into HyperDoc code so no administrative actions are required.
To fix this you must add some lines of code on the server:
Find file ASPPages\hisdocview.html and edit it
find line of text
s += "<param name='image' value='images/HyperDocOnline.png'>";add this line of code before the one found in last step:
s += '<param name="codebase_lookup" value="false">';
So it would be like this:
s += '<param name="codebase_lookup" value="false">';
        s += "<param name='image' value='images/HyperDocOnline.png'>";
You also need to modify file ASPPages\HOPAGetView4ObjectOrDocEx.inc:
document.write ("<APPLET code='" + sCode + "' archive='" + sArchive + "' id=HISDocShow name='HISDocShow' width='" + String(width_HISDocShow()) + "' height='" + String(height_HISDocShow()) + "' MAYSCRIPT>");
      document.write ("<PARAM name='codebase_lookup' value='false'>");
      document.write ("<PARAM name='image' value='images/HyperDocOnline.png'>");
The list configuration file sections, used by HyperDoc Online are listed below, followed by link to appropriate place in Configuration File guide:
[Configuration]section - see details in the section called “[Configuration]section”.[[Anonymous User]]section - see details in the section called “[Anonymous User]section”.
Note
Please note that HyperDoc Online is part of HyperDoc program so it inherit many settings/parameters from it. But those two section influnce only HyperDoc Online.
