The Refresh command is available in the View pull-down menu.
In response to this command HyperDoc refreshes all the necessary data from the database.
Use this command to refresh contents of HyperDoc windows (e.g. after other user or some external program has modified data displayed by HyperDoc).
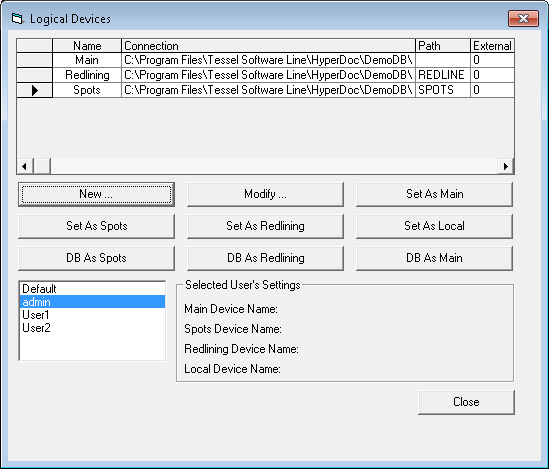
The Logical Devices command is available in the Tools/Options pull-down menu.
The command is available only for HyperDoc Administrator.
The concept of logical device is explained in the section called “Attaching document files”
The command launches Logical Devices dialog with the following sub-commands (buttons).
New…
The New… button launches the Define New Logical Device dialog.
The name of the new logical device should be entered in the Name field.
The Connection Name and Remaining Path fields should contain full path name to the directory for the new logical device.
This path name may be specified in ordinary form or in UNC form and can be split between Connection Name and Remaining Path fields.
The check-box External determines if the new device will be treated as an external device.
Modify…
The Modify… button launches the Modify Logical Device dialog.
The name of the logical device is displayed in the Name field.
The Connection Name and Remaining Path fields contain full path name to the directory for the new logical device.
This path name may be specified in ordinary form or in UNC form and can be split between Connection Name and Remaining Path fields.
The check-box External determines if the device will be treated as an external device.
Set as Main
The Set as Main button designates the selected device as the main device for the selected user.
Set as Spots
The Set as Spots button designates the selected device as the spots device for the selected user.
Set as Redlining
The Set as Redlining button designates the selected device as the redlining device for the selected user.
Set as Local
The Set as Local button designates the selected device as the local device for the selected user.
DB As Spots
The DB As Spots button designates Database tables as a Spot device for selected user
DB As Redlining
The DB As Redlining button designates Database tables as a Redlining device for selected user
DB As Main
The DB As Main button designates Database tables as a Main device for selected user
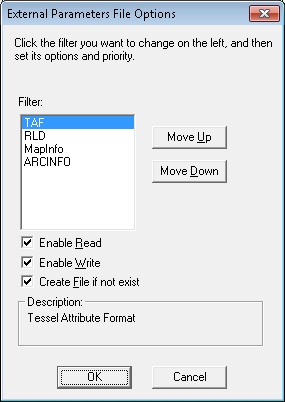
The Parameter Files command is available in the Tools/Option pull-down menu - Integration tab.
It launches the External Parameters File Options dialog.
In this dialog you can select what parameter files (associated with image files) HyperDoc will read or write and in what sequence.
Parameter files are used to store those parameters of image files, which cannot be stored inside image files due to image file format limitations.
There are following parameter file formats:
TAF - Tessel Attribute Format; used by Tessel Software Line programs and applications;
RLD – Raster Lines Definition; historically the first parameter file format used by Tessel Software Line programs and applications;
MapInfo – MapInfo Description File; used by MapInfo application;
ARCINFO – ARC/INFO Parameters File; used by ARC/INFO application.
HyperDoc and other Tessel Software Line programs and applications can be extended with special plug-ins supporting other image file formats.
With the Parameter Files command you can switch on or off the following options for each parameter file format:
enable to read;
enable to write;
create parameter file if it does not exist.
Additionally you can define parameter file priority by changing format order on the list.
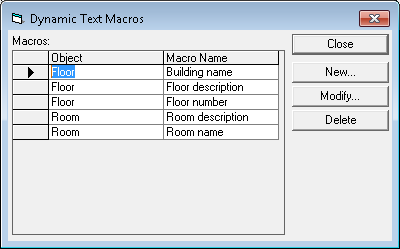
The Text Macros... command is available in the Tools pull-down menu.
It launches the Dynamic Text Macros dialog.
See the Text Entity section for detailed description of dynamic text macros (dynamic texts).
The Show Grips command is available in the Selection sub-menu of the Tools/Options pull-down menu.
It is used to control how selected vector entities will be displayed.
When this option is switched on, selected vector entities are displayed with grips – small gray rectangles in vector entity vertices or characteristic points.
The Use Attributes command is available in the Selection sub-menu of the Tools/Options pull-down menu.
It is used to control how selected vector entities will be displayed. When this option is switched on, selected vector entities will be displayed using attributes defined with Define Attributes command.
When this option is switched off, selected vector entities are displayed with grips – in this case you cannot disable showing grips, because otherwise it would be impossible to distinguish selected vector entities.
The Define Attributes command is available in the Selection sub-menu of the Tools/Options pull-down menu.
It is used to control how selected vector entities will be displayed when the Use Attributes option is switched on.
The Define Attributes command launches Tool Set dialog, in which you can define various display attributes (like color, line style and width) for selected vector entities.
The Copy Docs on Attach command is available in the Tools/Options pull-down menu.
It is used to switch on or off the Copy Docs on Attach option.
When this option is switched off, HyperDoc does not copy document files when attaching them to logical documents (see the description of the Attach File command).
It just sets their read-only attribute on.
This attribute is reset by the Remove File command.
The Set Password command in the Options pull-down menu allows changing current user’s password.
It is possible to associate external viewing or editing applications with HyperDoc document file name extensions.
You can do that with the Associations command in the Tools/Options pull-down menu - from Integration tab.
HyperDoc administrator can edit default associations and associations for each user or a group of users.
HyperDoc user without administrative rights can edit only his own associations.
Associations defined in HyperDoc are used in all places system associations were used before: on current document change and in the Edit/General command.
If there is no association defined in HyperDoc for particular document file extension,
then HyperDoc acts as usual: if possible displays file in its HyperViewer window, otherwise uses system defined association.
HyperDoc Reporter generates reports from the currently displayed document list. Depending on the current display mode, reported document list contains:
documents connected to current domain,
documents in current document set,
disconnected documents.
For each type of the document list, you can prepare a report template that defines a report layout. HyperDoc Reporter initializes report content using the report template. After resolving macros included in the report template HyperDoc Reporter adds a table with reported data at the end of the report document.
HyperDoc Reporter can generate reports in several formats. Generated report can be inspected, modified and printed using Microsoft Office applications. Currently HyperDoc supports the following destination formats:
Microsoft Word 97, Word 2000 document,
Microsoft Excel 97, Excel 2000 document,
HTML file.
In case of Microsoft Word or Excel, HyperDoc launches appropriate application and creates new document containing document list report,
so the applications mentioned above must be properly installed on the HyperDoc workstation.
User can modify report content and print it immediately or save it for future reference.
In case of HTML file HyperDoc Reporter creates report file that can be directly published in the Internet.
For each destination format you can create report template file that defines report layout. HyperDoc Reporter loads report template while starting report generation, next it resolves template macros and adds document list table at the end of the destination document. You can use the following macros in report templates:
$DocSetName- name of current document set (resolved only when document set is reported),$DocType- name of currently selected document type,all print templates macros, so you can add to report current object and it's parents properties or even database query.
Remember that the "@SELECT ..." macro must be ended with '@' character or new line character.
You can specify separate document template for each Document List Window mode (connected, disconnected and document set).
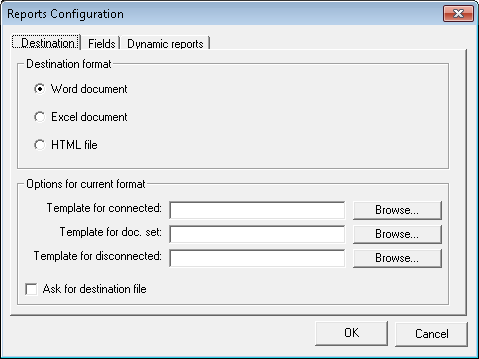
The Tools/Reports/Configuration… command activates a configuration dialog.
The report configuration dialog consists of three pages.
The first page, named Destination, defines current destination format and the following options for it:
template for connected documents,
template for document set,
template for disconnected document,
option if ask user for name of report destination file before report generation.
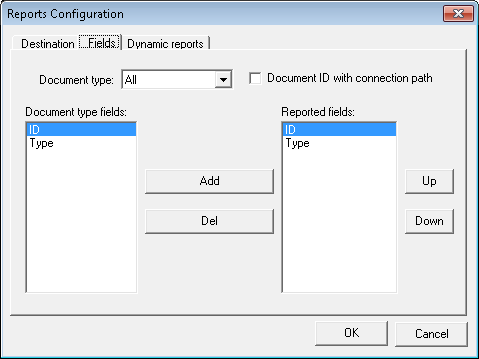
The second tab of the dialog, named Fields, allows you to configure report fields for each document type.
You can define which grid fields for a given document type will be reported and modify their order.
HyperDoc can add document connection path (path to the business object where document is connected) to the document ID while generating report.
This feature is controlled by the "Document ID with connection path" checkbox.
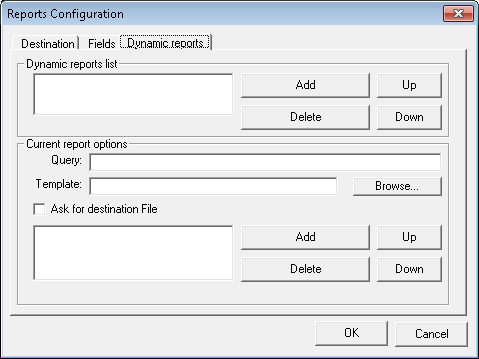
The third tab, named Dynamic Reports, handles dynamic reports.
The Dynamic Reports allows you to generate reports based on specific record set instead of currently displayed document list.
The definition of the DynamicReport consists of:
report name (displayed in
Tools/Reportssubmenu),database SQL query which retrieves data to be reported,
report template file,
option to ask the user for name of report destination file,
the list of reported fields.
The destination format of dynamic report depends on template file definition.
If the template file has an extension consistent with default extension of some destination format (Doc, Xls or HTML),
then this destination format will be used while generating dynamic report.
If the template file does not contain valid extension,
then HyperDoc Reporter adds default extension of current destination format to the template file name and generates dynamic report using current destination format.
Report fields are defined by the names of data fields in their record sets and captions of their columns.
